Blog

Categorised by 'Hardware & Tech'.

  • I've owned my first Synology device - the DS415Play for over eight years. It has been my true day-to-day workhorse, which never faltered whilst churning through multiple downloads and uploads 24 hours a day, 7 days a week, 12 months a year since 2015. It's been one of the most reliable pieces of computer-related hardware I've ever owned.

    Unfortunately, I started to outgrow the device from a CPU, RAM and (most importantly!) hard-drive capacity standpoint and the need for regular restarting became the norm to resolve performance-related issues.

    The performance issues are also caused indirectly by the fact that my NAS isn't solely used by me, but also by my parents and wife where photos are viewed/backed up, documents are stored and videos are streamed.

    The most natural route was to move to stick with Synology and move to one of their larger and expandable NAS devices. The DS1821+ ticked all my requirements:

    • Quad-core 2.2Ghz processor
    • 8 bay Hard Drive capacity
    • Upgradeable RAM
    • NVMe Cache slots
    • Improved scalability

    Focusing on the potential for expansion should mean I won't hit the "hardware glass-ceiling" for many years, which was, unfortunately, the case with my DS415Play. I truly believe that if the DS415Play had the potential for some form of expansion, such as increasing the amount of RAM, it would solve the majority of my usage issues.

    Migrating From One Synology to Another
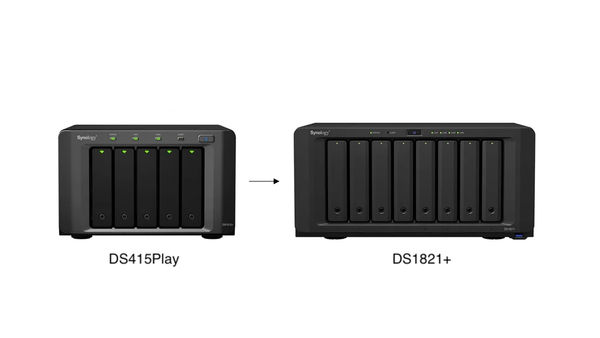
    DS415Play To DS1821+

    I was under the misconception that migrating from one Synology device to another would be as simple as moving the existing drives over. However, this was not the case due to a variety of factors:

    1. Age: Lack of straightforward compatible migration approaches from older NAS models.
    2. "Value" model discrimination: DS415Play is considered a "value" model and no straightforward migration route is available when upgrading to a "plus" model.
    3. Difference in Package Architecture: If the source and destination NAS use different package architectures may result in DSM configurations and package settings being lost after migration. You can only migrate drives to models with the same package architecture as your source NAS.
    4. Direct Ethernet Connection: Data cannot be copied over via a direct connection between both devices.

    The How To Migration tutorial provided by Synology raised more questions about how I should move my data and configuration settings. Out of the three methods proposed (Migration Assistant/HDD Migration/Hyper Backup), there was only one approach that applied to me - Hyper Backup.

    Manual Copy and Paste To USB Drive

    Before settling with Hyper Backup, I decided to carry out a direct copy-and-paste approach of each user's home directory from Synology to an external USB Drive. I thought this might be a less process-intensive and quickest way to move the data. - No Synology app-related overhead that could cause my DS415Play to grind to a halt.

    However, I quickly realised this could come to the detriment of the integrity and overall completeness of the backup. My NAS was still getting used daily and there was a high chance of missing new files and updates.

    With Hyper Backup, I could carry out a full backup initially and then schedule incremental backups nightly until I was ready to make the switch to DS1821+.

    Hyper Backup

    At the time, unbeknownst to me, this would prove to be a right pain. I knew from the start that moving around 5TB of data would be time-consuming but I didn't factor in the additional trial and error investigation time just to complete this task.

    To ensure smooth uninterrupted running, I disabled all photo and file indexing.

    Avoiding Slow Backup Speeds

    The backup procedure wasn't as straightforward as I'd hoped. Early on I experienced very slow backup speeds. This is down to the type of "Local Folder & USB" backup option selected in Hyper Backup. There is a vast difference in transfer speeds:

    • Local Folder & USB (single-version): 10MB - 60MB/s
    • Local Folder & USB: 0 - 1.2MB/s with longer gaps of no transfer speed

    To reduce any further overhead, compression and encryption were also disabled.

    Additional steps were also taken, such as reformatting the external hard drive to ext4 format and enabling the "Enable delayed allocation for EXT4" setting from the Control Panel.

    What is delayed allocation?

    All byte writes are cached into RAM and it's only when all the byte writes have finished and the file is closed then the data is copied out of the cache and then written to the drive.

    The potential disadvantage of enabling this setting is the drive is more vulnerable to data loss in the event of a power outage.

    Make Use of The High-speed USB Port

    Older Synology models have front and rear USB ports. To further aid in faster data transfer, be sure to connect the external hard drive to the rear USB port as this will be USB 3.0 - a better option over the slower USB 2.0 port provided at the front.

    Backup Strategy

    Once I had Hyper Backup running in the most efficient way, I created three backup tasks so the restore process could be staggered:

    1. User Home Directories: Everything within the /homes path.
    2. Photos: DS Photo-related files that have yet to properly be migrated over to Synology Photos
    3. Application Settings*: Settings and configuration for the key apps that I use. This doesn't include any physical files the app manages.

    * Only the "Local Folder & USB" backup type has the option to allow application settings to be solely backed up. Transfer speeds were not a concern as the settings have a very minimal file size.

    Once a full backup was completed, a nightly schedule was set to ensure all backups were up-to-date whilst I waited for some new hard drives for the DS1821+.

    Restore

    Restoring the backed-up data was a lot more straightforward than the backup process itself. The only delay was waiting for the new hard drives to arrive.

    New Hard Drives

    Due to the limitations posed by the only migration approach applicable to me, new drives had to be purchased. This was an unexpected additional cost as I hoped to re-use the 8TB worth of drives I already had in my DS415Play.

    I decided to invest in larger capacity drives to make the most of the 8-bays now at my disposal. Two 8TB Western Digital Reds are just what was required.

    Setup and Restore Process

    Utilising new hard drives was actually a refreshing way to start getting things going with the DS1821+, as any missteps I made as a new Synology owner when originally setting up the DS415Play could be corrected.

    Once the drives were installed, the following restore process was carried out:

    1. Install DSM 7.1.
    2. Create Drive Storage Pools.
    3. Install applications.
    4. Re-create all user profiles using the same details and usernames.
    5. Using Hyper Backup, copy all files into each home directory.
    6. Ensure each user's home folder and child directories are assigned with the correct permissions and are only accessible by the user account.
    7. Restore the /photo directory.
    8. Login to Synology Account in Control Panel and restore all DSM configuration settings from online backup - minus user profiles.
    9. Restore application settings (backup task number 3) using Hyper Backup.

    It was only after restoring the DSM configuration settings (point 8), that I realised user profiles including permissions could be restored.

    DSM Configuration Backup Items

    • File Sharing: Shared Folder, File Services, User & Group, Domain/LDAP
    • Connectivity: External Access, Network, Security, Terminal & SNMP
    • System: Login Portal, Regional Options, Notification, Update & Restore
    • Services: Application Privileges, Index Service, Task Scheduler

    Over Network File Restoration

    I decided to limit the use of over-network file copying to just the final leg of the restoration journey to handle some of the less important/replaceable files.

    I would only recommend over-network file copying if you have a fast and stable home network. My UniFi Dream Machine was more than able to handle the amount of data to the DS1821+.

    What Will Become of The DS415Play?

    There is still life in my old trusty DS415Play as it can still handle low-intensive tasks where background processes are kept to a minimum. Any form of file indexing on a large scale would not be suitable.

    I see the DS415Play being used purely as a network storage device avoiding the use of Synology apps. For example, a suitable use case could be an off-site backup at my parent's house.

    Final Thoughts

    Even though the migration process wasn't as smooth as I hoped it would be, there was a silver lining:

    • A Considered Setup Approach: As a long-term Synology user, I consider myself more experienced and understood more about the configuration aspects, allowing me to set up my new NAS in a better way.
    • Data Cleanse: When faced with limited migration routes, it makes you question what data is worth moving. I am somewhat of a data hoarder and being able to let go of files I rarely use was refreshing.
    • Storage Pools: I was able to set up Storage Pools and Volumes in a way that would benefit the type of data I was storing. For example, Surveillance Station recordings will write to a single hard disk, rather than constantly writing to multiple disks based on a RAID setup.

    After completing the full migration, the following thoughts crossed my mind: How long will this Synology serve me? When will I have to perform another migration?

    It has taken me eight years to outgrow the DS415Play. The DS1821+ is double in capacity and more so from a specification perspective (thanks to its upgradeability). Maybe 10 to 14 years?

    As someone who has just turned 38, I can't help but feel a sense of melancholy thinking about where I will be after that duration of time and whether the investment to preserve memories to my Synology will truly be the success I hope it will be.

  • Published on
    -
    6 min read

    Hardwiring A Dash Cam Into An Audi A1

    Purchasing a Dash Cam has been a priority for me since my pride and joy was damaged when I was in an area of London I hate to drive in. The area in question shall not be named, but I deem it as "a world without rules".

    There are many varieties of Dash Cams on the market that differ in their size and features. From the offset, I had the following set list of requirements in mind:

    • Small form factor
    • LCD Display
    • Option to add a rear camera
    • GPS
    • High-quality night vision
    • Impact sensor - to automatically start recording if a collision occurs when away from the car

    The one that met all these requirements was the RedTiger 4K Dash Cam Front Rear Camera.

    Hardwire Installation

    All Dash Cam's include a power connection to the 12V Cigarette socket, which is absolutely fine if you want a quick setup or are not comfortable in delving into a vehicles fuses. The only disadvantage of this approach is that the 12V socket will always remain occupied and can look slightly untidy.... Dangling wires - no thank you.

    I always had in mind that if I were to get a Dash Cam, I would go down the hardwire option for a more integrated and neater look. To achieve this, a hardware kit needs to be purchased separately. There are many different varieties out there, it's just a matter of finding the right one with a suitable connector for the Dash Cam. In my case, a USB-C connector was needed.

    Understanding The Fuse Box

    Going down the hardwiring approach can be a little daunting and it's recommended one does their due-diligence by reading your car manual and researching online how to access the fuse box as well as getting an understanding of what each fuse does. - This took longer than the installation process itself.

    For my 2018 Audi A1, I found the following resources useful:

    1. Nextbase - How To Fit A Dash cam
    2. Fusebox Info - Audi A1
    3. Audi A5 / S5 2007 -2018 how to fit dash cam to fuse box
    4. Physical Car Owner Manual - Lookup the fuse section
    5. Car Fuse Guide

    Some of these resources were not specifically tailored to my Audi A1, but it gave me a source of reference on what to look out for during the installation process.

    Accessing The Fuses

    The fuses that need to accessed will be located on inside the dashboard. This could either be on the passenger or driver side depending on the most suitable fuse you wish to "piggy-back" onto.

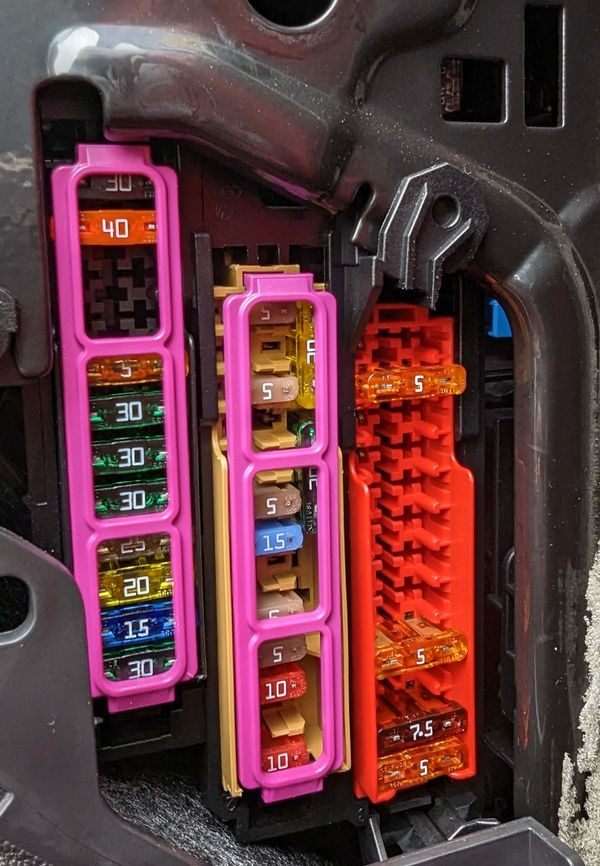
    When you pop open the side-panel of the dashboard, you'll see something that looks like the following:

    In Dash Fuse Boxes

    IMPORTANT: When referring to the Owner Manual, do not make the same mistake I did where I read the fuse box order wrong. In my manual, it illustrated diagrams based on a left-hand drive car, when mine is right-hand drive. This can be confirmed based on the fuse box colour order. As you can see from the image of my fuse box (above), the drivers side fuse boxes are ordered (left to right) - black, brown and red.

    "Piggy-back" A Fuse and Earth Connection

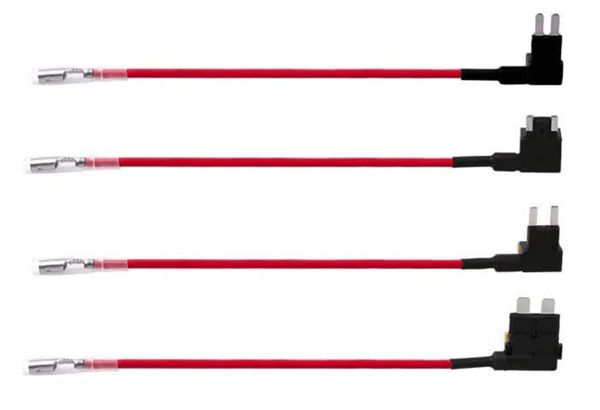
    The hardwire kit will contain various sized fuse wires that can be used based on the size of fuse you plan on "piggy-backing" off of.

    Fuse Wire Options

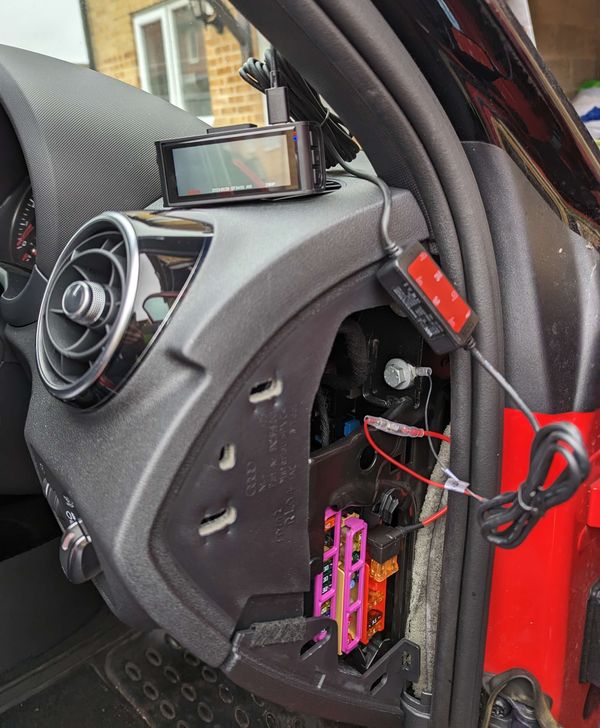
    For my use, I'm concentrating on the red fuse box where regular sized fuses are present. I opted to connect the fuse wire on slot 2 where the 5A Tan fuse is present. The 5A fuse is then slotted onto the fuse wire to "piggy back" the connection.

    Piggy-backed and Earthed Fuse Wire

    One other thing to point out here is that connection needs to be earthed to the vehicle chassis. This is done by connecting the earth cable (shaped like a hook) to a metal screw/bolt.

    Fuse Slot Update

    Whilst finishing the write-up of this post, I made a slight amendment to the fuse slot used. I decided to use slot 11 (7.5A Red fuse) instead. Even though the first iteration worked absolutely fine in the weeks post install, I preferred to piggy-back off the "Control unit for information electronics" rather than "ABS Control Unit" for peace of mind.

    Rear Camera

    I wasn't planning on installing the rear camera as the initial hard wiring required quite a bit of effort. It just happened that I had a few hours to free one free weekend and thought I'd give it a shot. Connecting the rear camera to the main dash cam unit was the easy part, but finding an inventive way to neatly tuck the wires from the front of the car all the way to the rear took a quite some time.

    The end result is pretty cool - if I do say so myself. Now my car has an additional layer of surveillance.

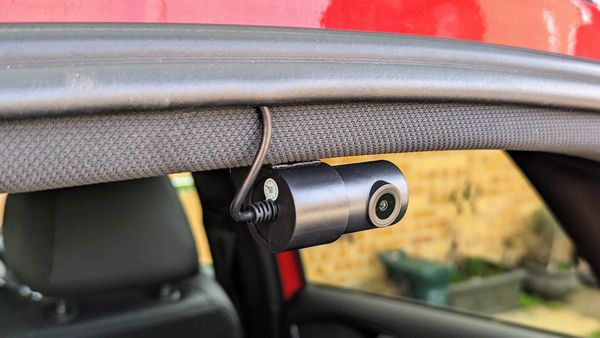
    Rear Dash Cam Unit

    You may have to be inventive as to how you mount the rear camera. The most ideal place would be close to the rear window on the sill. Due to the way my boot door opens, this was not an option and instead opted to mount it to the roof.

    Disclaimer

    The steps I have detailed in this section is based on an approach that worked for me. The information provided does not constitute professional installation advice. I cannot guarantee that the information is always up to date and will work for all vehicles.

    I am not liable for any personal injury that you may suffer, or vehicle damage as a result of partaking in the installation of a dash cam. To do so, will be at your own risk.

    RedTiger 4K Dash Cam Quick Review

    Overall, the RedTiger dash cam is a worthy addition to maintain the security of my car. I can't complain about the camera quality and was very pleased with the resolution output. For example, vehicle number plates are crisp, even from a distance. I was very much surprised at just how well it performed in all conditions - even on poorly-lit roads.

    My only gripe is a lack of backup battery or onboard memory so that your own settings are saved. Unless the device is hardwired where power is always provided, every time you turn off your car these settings will be wiped. This is a minor annoyance and luckily the default settings suffice for my usage.

    The accompanying app is a little clunky and I was expecting this. But it does it's job very well and was surprised to see how much information is presented when playing back a recording. This specific RedTiger dash cam model has the ability to connect via WiFi from the app allowing me to view all recordings and download selected videos directly to my phone.

    Conclusion

    Hardwiring a dash cam may come across as a daunting task. My advice is to invest time in the preparation and understand where the fuse boxes are located. Most importantly, during the installation process, take things slow and plan how the wiring will run along the inside of the car.

    I found the whole experience quite rewarding.

    Once you have a dash cam fitted, you'd wonder how you ever lived without it.

  • Published on
    -
    3 min read

    Pixel Watch and My Smartwatch Epiphany

    I received a Pixel Watch as part of a free reward for pre-ordering the new Pixel 7 phone. I thought this watch would be a fitting replacement for my Garmin Vivoactive 3 that I've owned for over three years. Even though my trusty Garmin is still going strong, you can't help but want to try out a shiny new upgrade that possesses better native integration that works alongside the features of my new phone. Or so I thought...

    I think I've always been hesitant about getting a dedicated smartwatch and preferred fitness watches as health/workout tracking is of greater importance to me. The smartwatches I've seen don't even compare from a fitness tracking standpoint when compared to a Garmin. Nevertheless, I had an opportune moment to try out a smartwatch that just happened to be the Pixel Watch.

    From the moment I received the Pixel Watch, I decided to carry out a two week evaluation period as to whether I could be coerced into moving away from my Garmin. - Pixel Watch on the left wrist and Garmin on the right.

    As much as I loved wearing and using the Pixel Watch over the two weeks, I found myself getting frustrated with it. This isn’t specifically due to shortcomings of the Pixel Watch as it’s not too bad for a first-generation device of its kind, but smartwatches in general.

    I always thought I needed a smartwatch that was tightly integrated with my phone ever since seeing both my wife and sister using features such as making/receiving calls, remotely controlling the camera and receiving app notifications on their Apple Watches. Both of them made it look so fun and useful.

    The Epiphany

    As great as smartwatch features are, I came to a sudden epiphany that possessing one of Pixel/Apple watch calibre wasn't what it was cracked up to be and soon found myself overloaded with constant information and notifications.

    Smartphones have already given us a convenient way to practically do everything at our fingertips. I don’t feel the need for a smartwatch to offer further extension of these features, especially when it requires a phone nearby to enable some of the key features. I could simply switch all these features off to limit connectivity to my phone (completely defeating the point of owning a smartwatch).

    My phone is never too far away and the only time when it isn’t at arm's reach is when I require some quiet or focus time. The main benefit of a phone is there can be an easy physical disconnect, unlike a smartphone that is always attached to one's wrist.

    The point I am trying to make is that due to the world we live in and the economic climate, our brains are already working overtime and processing more than we care to notice. Giving one's mind a rest and being present is no longer a consideration. It's become the societal norm that we should always be online and accessible. Is it so unnatural to step away from phone or watch-based interruptions?

    Over the years through self-discipline, I have managed to reduce the urge of checking my phone whenever a notification pops up and using a smartwatch has slightly hindered what I've tried so hard not to do.

    Conclusion

    I will be sticking with fitness watches, Garmin in particular, as it provides a good balance of the smart features I need without the distractions. The battery life isn't too bad either and retains its charge for around three to seven days, compared to an Apple or Pixel Watch that lasts for around a day at a push (as along as features aren't used in excess).

    Understandably, there will be some who do not share the viewpoint shared in this post and prefer the convenience a smartwatch provides. The honest truth is not everyone needs a smartwatch and the requirement is entirely dependent on the type of functions you feel will be of most use to you.

  • I've owned my UniFi Dream Machine router router for a little over two years, and I'm still getting accustomed to the wide array of configuration options available in the device admin settings. My usual rule of thumb is to only fiddle with the settings if absolutely necessary.

    Today was the day when I needed to change one setting on my router so that my download and upload speeds were not limited. Embarrassingly, I've been criticising Virgin Media, my internet service provider (ISP), for not keeping their half of the bargain in supplying me with appropriate broadband speed as promised, only to discover that it was all along my Dream Machine. Very unexpected.

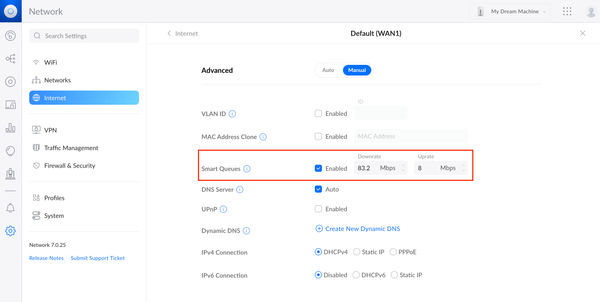
    In the UniFi Network settings, look out for an option called "Smart Queues" where the download and upload speeds limits can be increased or disabled in its entirety.

    UniFi Smart Queue Setting

    What is "Smart Queues" and why would we need it? "Smart Queues" helps decongest networks with lots of clients and constant load. When enabled it will reduce the maximum throughput in order to minimise latency over the network when the connection is at full capacity. Low latency is important for voice/video calls and fast-paced online multiplayer gaming. The following StackOverflow post adds further clarity on the subject:

    Most routers and modems have a design flaw called "bufferbloat"; when your Internet connection gets fully loaded (congested), they mismanage their queues of packets waiting to be sent, and let the queue grow out of control, which just adds latency with no benefit. SQM is the fix for bufferbloat.

    SQM is only tangentially related to QoS. Traditional QoS schemes prioritize some kinds of traffic over others, so when there is congestion, the lower-priority traffic gets slammed with congestion-related latency, and the high-priority traffic hopefully skates by without problems. In contrast, SQM tries to keep the latency low on all traffic even in the face of congestion, without prioritizing one kind of traffic over another.

    I made a decision to disable "Smart Queues" as there isn't enough network traffic used in my household to warrant any form of QoS consideration. This setting can be found by logging into the router Network section > Settings > Internet > WAN Networks > Advanced.

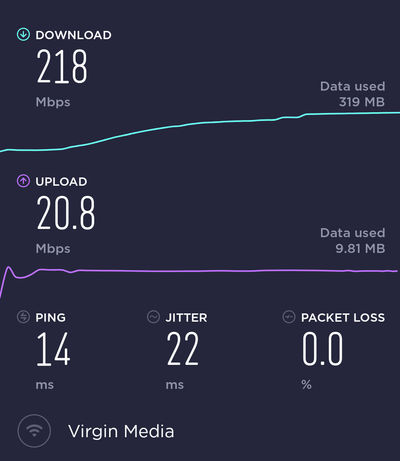
    Once disabled, the difference in internet speed is like night and day.

    Before:

    Internet Speed - Before

    After:

    Internet Speed - After

  • I've owned a NAS in various forms for many years. Something that started initially as re-using an old PC attached to a home network to purchasing a mini NAS box with RAID support. All systems based on Windows Server Operating System. The main focus on early iteration was to purely serve files and media.

    In 2015, I decided to take a gamble and invest in a Synology system after hearing rave reviews from users. Opting for the DS416play seemed like a safe option from a features, pricing and (most importantly) expandability point of view.

    After the move to Synology, everything I had beforehand felt so archaic and over-engineered. To this very day, my DS416play is chugging along housing around 4.5TB of data consisting of a combination of documents, videos, pictures and laptop image backups. All four hard drive slots have been filled providing a total of 8TB of storage space.

    Being a piece of hardware that is on 24/7 and acts as an extension of my laptop storage (via Synology Drive and MountainDuck), I'm pleased to see that after 7 years of constant use it's still ticking along. But I feel this year I'm due an upgrade as only recently the hardware has been playing up and starting to feel a little sluggish, which is only resolved via a restart. This is to be expected from a server running on an Intel Celeron processor and 1GB of RAM.

    So is having your own dedicated NAS a worthwhile investment? - Yes.

    Some of the positive and negative points listed below revolve around the ownership of a Synology NAS, as this is the only type of NAS I've had the most experience with.

    Positives

    You're not a slave to a storage providers terms where they can change what they offer or pricing structure. Just take a look back at what Google did with their photo service.

    Easy to setup, where you require little knowledge to get up and running (based on using a Synology). I'm no network wizard by any means and Synology allows me to get set up and use all features using basic settings initially and tinker with the more advanced areas if necessary.

    Access for many users without any additional costs. I've created accounts for my parents, sister and wife so they can access all that the server has to offer, such as photos, movies and documents. This comes at no additional cost and is very easy to give access via Synology apps.

    Cost of ownership will decrease over time after your initial setup costs (detailed in the negative section). Providing you don't have any hardware issues, which is very doubtful as my own NAS has been issue free since purchase and running 24/7, no reinvestment is required. The only area where you may need to invest is in additional drives for more storage allocation, but the cost for these are nominal.

    Always accessible 24/7 locally and remotely to myself and all the users I have set up. There isn't a day that goes by where my NAS isn't used. Most of the time I use the additional NAS storage as an extension to my laptop that has very little hard-drive space through MountainDuck application.

    Solid Eco-system consisting of applications that you need and which are accessible on mobile and tablet devices. This is where Synology is steps ahead of its competitors as they invest in software as well as hardware. The core applications are Synology Drive, DS Video and Synology Photos.

    Backup's can be easily configured for on-site and off-site. This can be done through RAID configuration and using the CloudSync application to backup to one of the many well-known cloud providers.

    Negatives

    Initial setup costs can be quite high on the offset as you not only need to purchase an adequate NAS server as well as multiple hard-disk drives that will fit into your long-term expansion plan. You need to ask yourself:

    • How much data do you currently need to store?
    • What's the estimated rate of storage consumption over the next few years?
    • Does the NAS have enough hard-disk drive slots for your needs?

    If I could go back and start my Synology NAS journey again, I'd invest more in purchasing larger hard disks.

    Synology Drive On-demand Sync is a non-existent feature on Mac OS, which makes it difficult to store large files without taking up your own workstation disk space. I and many other Mac OS users have been waiting very patiently for this key feature that is already fully functioning on Windows OS. MountainDuck is a workaround but annoyingly takes you out of the otherwise solid Synology eco-system.

    Repairability can be somewhat restrictive depending on the model purchased. The majority of the components such as CPU, RAM and PSU are soldered directly onto the motherboard and if one piece were to fail, you are left with an oversized paper-weight. It is only the more expensive models that allows you to replace/upgrade the RAM.

    Conclusion

    In my view, a NAS is a very worthy investment even by today's standards. You are spoilt for choice - there is a NAS for everyone based on your needs whether you're looking for something basic or advanced. The amount of choice now available proves the popularity and is something that users are not ignoring.

    If you want true freedom and ownership over your data and don't mind a little bit of setup to get you there, a NAS would be right up your street. You'll find even more uses if the NAS you've purchased has developed applications that might prevent you from having to purchase another subscription to an online service. This would help in aiding a quicker return of investment from the original cost of the hardware. For example, through Synology I've found the following replacements for common services:

    • Google Photos > Synology Photos
    • Google Drive/OneDrive > Synology Drive
    • Evernote > Note Station
    • Nest Security Camera > Surveillance Station

    I for one is fully invested and looking for my next upgrade depending on what happens first: Hardware dies or used up all storage capacity where more drive slots are required. The Synology DS1621+ seems to be right up my street.

  • On my UniFi Dream Machine, I have set up a guest wireless network for those who come to my house and need to use the Internet. I've done this across all routers I've ever purchased, as I prefer to use the main non-guest wireless access point (WAP) just for me as I have a very secure password that I rather not share with anyone.

    It only occurred to me a few days ago that my reason for having a guest WAP is flawed. After all, the only difference between the personal and guest WAP's is a throw-away password I change regularly. There is no beneficial security in that. It is time to make good use of UniFi’s Guest Control settings and prevent access to internal network devices. I have a very simple network setup and the only two network devices I want to block access to is my Synology NAS and IP Security Camera.

    UniFi’s Guest Control settings do a lot of the grunt work out the box and is pretty effortless to set up. Within the UniFi controller (based on my own UniFi Dream Machine), the following options are available to you:

    1. Guest Network: Create a new wireless network with its own SSID and password.
    2. Guest User Group: Set download/upload bandwidth limitations that can be attached to the Guest Network.
    3. Guest Portal: A custom interface can be created where a guest will be served a webpage to enter a password to access the wireless network - much like what you'd experience when using the internet at an airport or hotel. UniFi gives you enough creative control to make the portal interface look very professional. You  can expire the connection by a set number of hours.
    4. Guest Control: Limit access to devices within the local network via IP address.

    I don't see the need to enable all guest features the UniFi controller offers and the only two that are of interest to me is setting up a guest network and restricting access (options 1 and 4). This is a straight-forward process that will only take a few minutes.

    Guest Network

    A new wireless network will need to be created and be marked as a guest network. To do this, we need to set the following:

    • Name/SSID: MyGuestNetwork
    • Enable this wireless network: Yes
    • Security: WPA Personal. Add a password
    • Guest Policy: Yes

    All other Advanced Options can be left as they are.

    UniFi Controller - Guest Network Access Point

    Guest Control

    To make devices unavailable over your newly create guest network, you can simply add IPV4 hostname or subnet within the "Post Authorisation Restrictions" section. I've added the IP to my Synology NAS - 172.16.1.101.

    UniFi Controller - Guest Control

    If all has gone to plan when connecting to the guest WAP you will not be able to access any network connected devices.

  • Investing in a UniFi Dream Machine has been one of the wisest things I've done last year when it comes to relatively expensive purchases. It truly has been worth every penny for its reliability, security and rock-solid connection - something that is very much needed when working from home full-time.

    The Dream Machine has been very low maintenance and I just leave it to do its thing apart from carrying out some minor configuration tweaks to aid my network. The only area that I did encounter problems was accessing the Synology Disk Station Manager (DSM) web interface. I could access Synology if I used the local IP address instead of the "myusername.synology.me" domain. Generally, this would be an ok solution, but not the right one for two reasons:

    1. Using a local IP address would restrict connection to my Synology if I was working outside from another location. This was quite the deal-breaker as I do have a bunch of Synology apps installed on my Mac, such as Synology Drive that carries out backups and folder synchronisation.
    2. I kept on getting a security warning in my browser when accessing DSM regarding the validity of my SSL certificate, which is to be expected as I force all connections to be carried out over SSL.

    To my befuddlement, I had no issue accessing the data in my Synology by mapping them as network drives from my computer.

    There was an issue with my local network as I was able to access the Synology DSM web interface externally. From perusing the UniFi community forum, there have been quite a few cases where users have reported the same thing and the common phrase that came popping up in all the posts was: Broken Hairpin NAT. What is a Hairpin NAT?

    A Hairpin NAT allows you to run a server (in this case a NAS) inside your network but connect to it as if you were outside your network. For example via a web address, "myusername.synology.me" that will resolve to the internal IP of the server.

    What I needed to do was to run an internal DNS server and a local entry for "myusername.synology.me" and point that to the internal IP address of the NAS. What was probably happening is that my computer/device was trying to make a connection past the firewall and then back in again to access the NAS. Not the most efficient way to make a connection for obvious reasons and in some cases may not work. A loopback would resolve this.

    A clever user posted a solution to the issue on the UniFi forum that is very easy to follow and worked like a charm - Loopback/DNS Synology DiskStation.

    I have also saved a screenshot of the solution for posterity.

  • Since working from home, my laptop is constantly left plugged into the mains as there isn’t much of a reason to ever disconnect, especially when you have a nice office to work in. I’ve been told leaving your laptop on charge has a negative impact on the longevity of your battery.

    I’ve learnt this the hard way. The battery from my previous laptop, a Macbook Pro 2015, died a slow death until it got to a point where it soon became a glorified workstation. This seemed to happen quicker than I would have liked - within 3 years from purchase. Not something I’d expect from the build quality expected from an Apple product.

    I was brave enough to replace the battery myself giving a new lease of life! The post teaser image is proof of my efforts. That picture was taken in when I managed to carefully pry the first cells of the old battery away from the existing adhesive. This was the most hardest part of the whole process!

    My old laptop has now been replaced with the most recent iteration of the Macbook Pro, as I needed a little more power and most importantly 32GB of RAM to run intensive virtual environments. I made the conscious decision to actively take care of the battery and not repeat the mistakes I made in how I used my previous laptop. This is easier said than done especially when my laptop is connected via Thunderbolt to my monitor, both powering my laptop and gives dual-screen capability. It’s impossible to disconnect!

    My only option was to find a “battery charge limiter” application that would set a maximum battery charge. Now, there is a great debate across forums whether going to such lengths does have any positive impact on battery health. Apparently, MacOS’s battery health management should suffice for the majority of scenarios when it comes to general usage. Going by experience, this didn’t help the lifespan of my previous Macbook’s battery. Hence my scepticism.

    One indirect benefit of setting a charge limit is there will be less charge cycles counted, resulting in increased resale value should you decide to sell your laptop. Also, according to the Battery University, setting a charging threshold to 80% might get you around 1500 charge cycles.

    If the likes of Lenovo, Samsung and Sony (all running on Windows) provide support software to limit the charge threshold, there has to be some substance to this approach. Unfortunately, you’re very limited to find a similar official application for macOS. But all is not lost. Two open-source variants carry out the job satisfactorily:

    Both these apps modify the “Battery Charge Level Max” (BCLM) parameter in the SMC, which when set limit the charge level. The only thing to be aware of when using these applications is that sometimes the set charge limit can be wiped after a shutdown or restart. This is a minor annoyance I can live with. Out of the two, my preference was AlDente as I noticed the set charge limit didn’t get wiped as often when compared with Charge Limiter.

    I’ll end this post with one final link from The Battery University on the best conditions to charge any battery - How To Charge and When To Charge.

  • The older I get, the more obsessed I have become with preserving life’s memories through photos and video. With so many companies offering their storage solutions, we’re living in an age where storage is no longer something that comes at a premium. There are a wide variety of pricing and feature tiers for all, benefiting us as consumers. If you have full trust in the service provider, they are suited particularly well for the majority of consumer needs. But as a consumer, you need to be prepared to shift with potential service changes that may or may not work in your favour.

    For many years, I have always been conscious that I’m a photo hoarder and believe that there isn’t a bad photo one can take with the help of advancements in phone camera technology. If you ask any of my work colleagues, they’d probably tell you I have a problem. When we go on any of our socials, I’m the first person to whip out my phone and take pictures as they make nice mementoes to look back on and share.

    On a more personal note, during last years Diwali I came to the sudden realisation as we all sat down to my mum belting out her prayers that this will not last forever and it dawned on me that these are truly special moments. Being an Indian who is culturally inept in all the senses and cannot speak his native tongue, I would be comforted knowing that I'll have photos and video to look back on many years to come. From that moment, I decided to make an active effort to capture smaller moments like these. Maybe the pandemic has shown me not take things for granted and appreciate time with family more.

    I got a little serious in my crusade and took things a step further by acquiring as many family photos as possible by purchasing a photo scanner to digitise all prints for safekeeping. Prints fade in time, not in the digital world.

    Photo Backup Strategy

    Whether I take photos on my phone or my FujiFilm X100F camera, the end destination will always be my Synology NAS where I have the following redundancies in place:

    • RAID backup on all hard disks.
    • Nightly backups to the cloud using BackBlaze.
    • Regular backup to an external disk drive and stored off-site.

    As expected, my phone gets the most use and everything by default is stored within my Google Photos account using free unlimited storage. I then use Synology Moments that acts as my local Google Photos where my photos are automatically stored to my Synology in original quality.

    My camera gets mostly used for when I go on holiday and events. I store the RAW and processed photos on my Synology. I still upload the processed photos to Google Photos as I love its AI search capability and makes sharing easy.

    At the end of the day, the layers of redundancy you put in place depend on how important specific photos are to you. I like the idea of controlling my own backups. I take comfort knowing my data is stored in different places:

    • Synology
    • Backblaze
    • Google Photos
    • Offsite Hard Drive

    Cloud Storage and Shifting Goalposts

    The fear I had pushed to the back of my head finally came to the forefront when Google changed its storage policy.

    The recent news regarding the changes in Google Photos service gives me a sense of resolve knowing I already have my local storage solution that is already working in parallel with Google Photos. But I can’t help but feel disappointed by the turn of events though. Even though I can to some extent understand Google's change in their service, I can't help but feel slightly cheated. After all, they offered us all free unlimited storage in exchange to allow them to apply data mining and analysis algorithms to improve their services. That's the price you pay for using a free service. You are the product (this I have no grievances with)!

    Now they have enough of our data, they can feel free to cut the cord. We all know Google has a history of just killing products. Google Photos may not be killed, but life has certainly been sucked out of it.

    It may come across as if I’m solely bashing Google Photos, when in fact this is a clear example of how companies can change their service conditions for their benefit and face no repercussions. We as users have no say on the matter and just have to roll with the punches. It just seems wrong that a company would entice so many users with a free service to then strip it away. This is a classic monopolistic strategy to grab market share by pricing out its competitors to now demand money from its users.

    For me, Google Photos provided a fundamental part of the photo storage experience by making things easily accessible to family and friends. No longer will I be able to invite friends/family to contribute to shared albums unless they opt for the paid plan. Now when you’re surrounded by iPhone users, this creates another barrier of entry.

    This has cemented my stance more so to ensure have control of my assets and service, which is something I have been doing.

    Final Thoughts

    If I have carried out my photo archival process correctly, they should be accessible to future generations for many years to come and continue to live on even after I’ve expired. This should be achievable as I’ll continue to maintain this time-capsule as technology continues to evolve.

    The most important take-away: If you strip down my approach to the barebones, I’m not giving in to the monopolistic behaviour of the tech giants - Google, Apple or Microsoft. Just using them as a secondary thought to compliment my process. It’s just my NAS doing the heavy-lifting where I set the rules.

    These priceless heirlooms are a legacy and my gift for future generations to come.

  • I love my Google Nest and it truly is a revolutionary piece of kit. Not only does it display my photos but it also forms a key part of some basic smart-home automation. I really have no gripes. But there is one small area I feel it's lacking. The Radio Alarm. I'm the type of person who detests alarm sounds and prefer my sleep cycle to be shattered by something a little softer, like a radio station.

    How difficult is it for Google to add a feature that will allow one to wake up to their favourite radio station? I would have thought this key feature would be very easy to put in place, after all, the Nest Hub can carry out much more complex operations. There are varying reports that this feature is available only within the US, which I find very odd to why this is the case. Does Google not know here in the UK we also would find this feature useful?

    In the meantime, whilst I await an official release (that may not come anytime soon!) I managed to concoct a somewhat preposterous way to get some form of radio alarm automation. You will require the following:

    • An Android phone with Google Assistant capability
    • Google Nest Hub (standard or max)
    • Phone stand to sit next to your Nest Hub (optional)

    The premise of the approach I detail is to get an Android phone to fire off the alarm at the desired time and when the alarm is dismissed manually, the phone will utter a phrase that will be picked up by your Google Nest Hub and play your radio station.

    If you’re still here and intrigued by this approach, let's get to it!

    The first thing we need to do is set up a “Good Morning” routine on the Google Nest Hub, which can be done through the Google Home app on your phone. It is here where we will carry out the following:

    1. Assistant will section: Adjust media volume to 40%.
    2. And then play section: Select Play radio and enter the name of a radio station.
    3. Save the routine.

    Now when you utter the magic phrase “Good morning”, the Google Nest Hub will do exactly what we set up in our routine. Now we need to add some automation to do this for us and this is where the alarm feature on your Android phone comes into play.

    I cannot be sure if the alarm feature on all newish Android phones gives the ability to define a Google Assistant routine. If it does, you should see this as an option when setting the alarm. We need to carry out a similar process as we carried out (above) when setting a “Good Morning” routine on the Google Nest Hub:

    1. When I dismiss my alarm: Adjust media volume to 50%.
    2. Select the “Add action” button and under the “Enter command” tab, enter the following text: Hey Google. Good Morning.
    3. Leave the “And then play” section to do nothing.
    4. Save the routine.

    Your phone will ideally be placed in close proximity of your Google Nest Hub for the “Hey Google. Good Morning” utterance to be heard. In my case, I have my phone right next to the Nest Hub on my bedside cabinet to make it easy to dismiss the alarm.

    I have to concede the approach I have to take comes across quite lame. It just seems ridiculous that you have to rely on a phone to fire off a process to allow one to have the radio to play automatically. Why can’t routines be more flexible at Nest Hub level?

    I’m unable to determine whether my approach comes across naive or clever. Maybe it's somewhere in between.