
Hardwiring A Dash Cam Into An Audi A1
- Published on
- -6 min read

Purchasing a Dash Cam has been a priority for me since my pride and joy was damaged when I was in an area of London I hate to drive in. The area in question shall not be named, but I deem it as "a world without rules".
There are many varieties of Dash Cams on the market that differ in their size and features. From the offset, I had the following set list of requirements in mind:
- Small form factor
- LCD Display
- Option to add a rear camera
- GPS
- High-quality night vision
- Impact sensor - to automatically start recording if a collision occurs when away from the car
The one that met all these requirements was the RedTiger 4K Dash Cam Front Rear Camera.
Hardwire Installation
All Dash Cam's include a power connection to the 12V Cigarette socket, which is absolutely fine if you want a quick setup or are not comfortable in delving into a vehicles fuses. The only disadvantage of this approach is that the 12V socket will always remain occupied and can look slightly untidy.... Dangling wires - no thank you.
I always had in mind that if I were to get a Dash Cam, I would go down the hardwire option for a more integrated and neater look. To achieve this, a hardware kit needs to be purchased separately. There are many different varieties out there, it's just a matter of finding the right one with a suitable connector for the Dash Cam. In my case, a USB-C connector was needed.
Understanding The Fuse Box
Going down the hardwiring approach can be a little daunting and it's recommended one does their due-diligence by reading your car manual and researching online how to access the fuse box as well as getting an understanding of what each fuse does. - This took longer than the installation process itself.
For my 2018 Audi A1, I found the following resources useful:
- Nextbase - How To Fit A Dash cam
- Fusebox Info - Audi A1
- Audi A5 / S5 2007 -2018 how to fit dash cam to fuse box
- Physical Car Owner Manual - Lookup the fuse section
- Car Fuse Guide
Some of these resources were not specifically tailored to my Audi A1, but it gave me a source of reference on what to look out for during the installation process.
Accessing The Fuses
The fuses that need to accessed will be located on inside the dashboard. This could either be on the passenger or driver side depending on the most suitable fuse you wish to "piggy-back" onto.
When you pop open the side-panel of the dashboard, you'll see something that looks like the following:
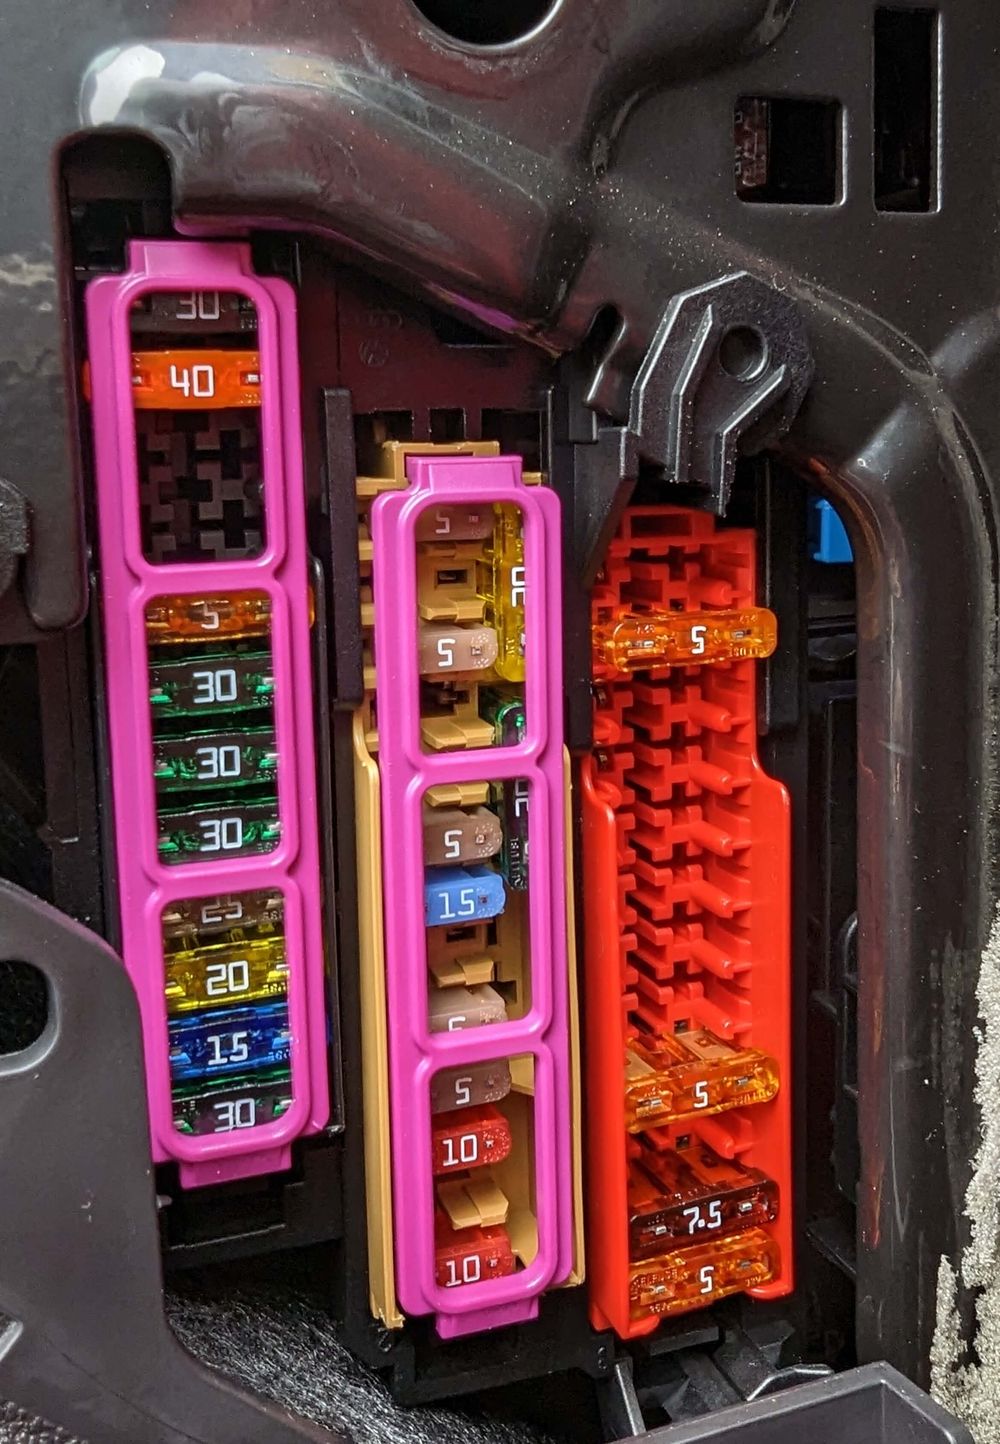
IMPORTANT: When referring to the Owner Manual, do not make the same mistake I did where I read the fuse box order wrong. In my manual, it illustrated diagrams based on a left-hand drive car, when mine is right-hand drive. This can be confirmed based on the fuse box colour order. As you can see from the image of my fuse box (above), the drivers side fuse boxes are ordered (left to right) - black, brown and red.
"Piggy-back" A Fuse and Earth Connection
The hardwire kit will contain various sized fuse wires that can be used based on the size of fuse you plan on "piggy-backing" off of.
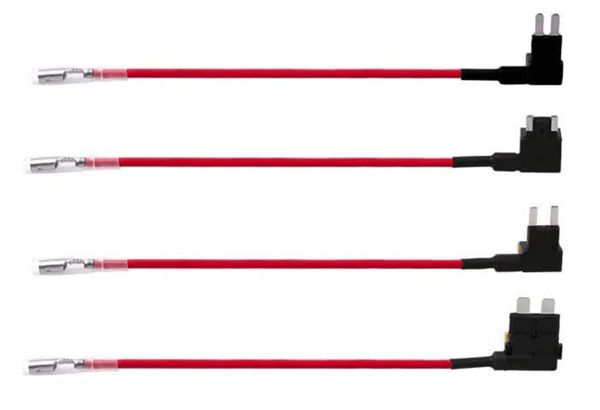
For my use, I'm concentrating on the red fuse box where regular sized fuses are present. I opted to connect the fuse wire on slot 2 where the 5A Tan fuse is present. The 5A fuse is then slotted onto the fuse wire to "piggy back" the connection.
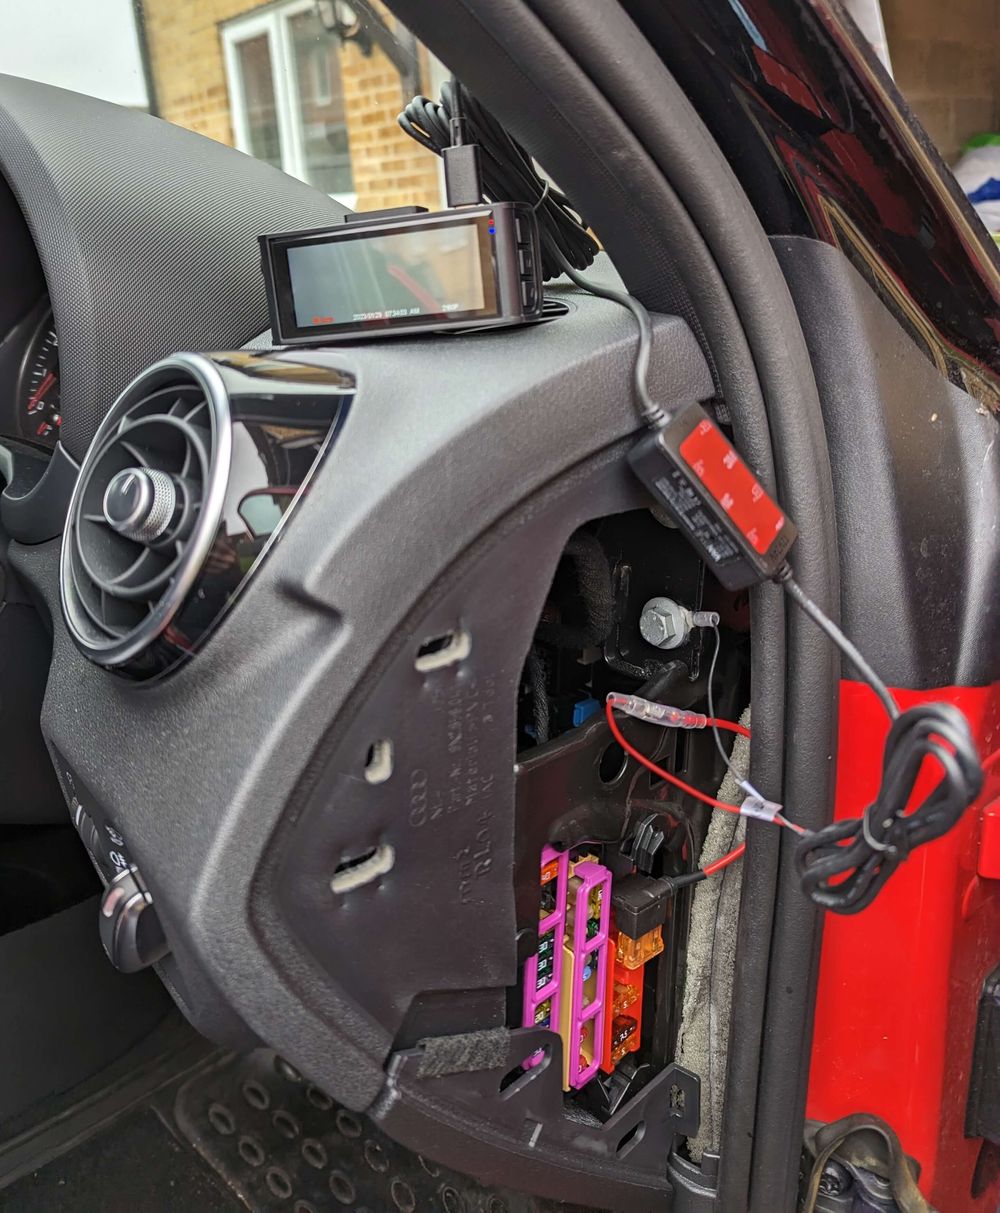
One other thing to point out here is that connection needs to be earthed to the vehicle chassis. This is done by connecting the earth cable (shaped like a hook) to a metal screw/bolt.
Fuse Slot Update
Whilst finishing the write-up of this post, I made a slight amendment to the fuse slot used. I decided to use slot 11 (7.5A Red fuse) instead. Even though the first iteration worked absolutely fine in the weeks post install, I preferred to piggy-back off the "Control unit for information electronics" rather than "ABS Control Unit" for peace of mind.
Rear Camera
I wasn't planning on installing the rear camera as the initial hard wiring required quite a bit of effort. It just happened that I had a few hours to free one free weekend and thought I'd give it a shot. Connecting the rear camera to the main dash cam unit was the easy part, but finding an inventive way to neatly tuck the wires from the front of the car all the way to the rear took a quite some time.
The end result is pretty cool - if I do say so myself. Now my car has an additional layer of surveillance.

You may have to be inventive as to how you mount the rear camera. The most ideal place would be close to the rear window on the sill. Due to the way my boot door opens, this was not an option and instead opted to mount it to the roof.
Disclaimer
The steps I have detailed in this section is based on an approach that worked for me. The information provided does not constitute professional installation advice. I cannot guarantee that the information is always up to date and will work for all vehicles.
I am not liable for any personal injury that you may suffer, or vehicle damage as a result of partaking in the installation of a dash cam. To do so, will be at your own risk.
RedTiger 4K Dash Cam Quick Review
Overall, the RedTiger dash cam is a worthy addition to maintain the security of my car. I can't complain about the camera quality and was very pleased with the resolution output. For example, vehicle number plates are crisp, even from a distance. I was very much surprised at just how well it performed in all conditions - even on poorly-lit roads.
My only gripe is a lack of backup battery or onboard memory so that your own settings are saved. Unless the device is hardwired where power is always provided, every time you turn off your car these settings will be wiped. This is a minor annoyance and luckily the default settings suffice for my usage.
The accompanying app is a little clunky and I was expecting this. But it does it's job very well and was surprised to see how much information is presented when playing back a recording. This specific RedTiger dash cam model has the ability to connect via WiFi from the app allowing me to view all recordings and download selected videos directly to my phone.
Conclusion
Hardwiring a dash cam may come across as a daunting task. My advice is to invest time in the preparation and understand where the fuse boxes are located. Most importantly, during the installation process, take things slow and plan how the wiring will run along the inside of the car.
I found the whole experience quite rewarding.
Once you have a dash cam fitted, you'd wonder how you ever lived without it.
Before you go...
If you've found this post helpful, you can buy me a coffee. It's certainly not necessary but much appreciated!

Leave A Comment
If you have any questions or suggestions, feel free to leave a comment. Your comment will not only help others, but also myself.