Blog

Tagged by 'synology'

  • I've owned my first Synology device - the DS415Play for over eight years. It has been my true day-to-day workhorse, which never faltered whilst churning through multiple downloads and uploads 24 hours a day, 7 days a week, 12 months a year since 2015. It's been one of the most reliable pieces of computer-related hardware I've ever owned.

    Unfortunately, I started to outgrow the device from a CPU, RAM and (most importantly!) hard-drive capacity standpoint and the need for regular restarting became the norm to resolve performance-related issues.

    The performance issues are also caused indirectly by the fact that my NAS isn't solely used by me, but also by my parents and wife where photos are viewed/backed up, documents are stored and videos are streamed.

    The most natural route was to move to stick with Synology and move to one of their larger and expandable NAS devices. The DS1821+ ticked all my requirements:

    • Quad-core 2.2Ghz processor
    • 8 bay Hard Drive capacity
    • Upgradeable RAM
    • NVMe Cache slots
    • Improved scalability

    Focusing on the potential for expansion should mean I won't hit the "hardware glass-ceiling" for many years, which was, unfortunately, the case with my DS415Play. I truly believe that if the DS415Play had the potential for some form of expansion, such as increasing the amount of RAM, it would solve the majority of my usage issues.

    Migrating From One Synology to Another
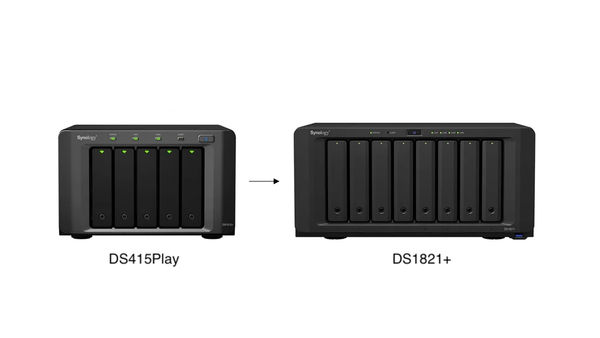
    DS415Play To DS1821+

    I was under the misconception that migrating from one Synology device to another would be as simple as moving the existing drives over. However, this was not the case due to a variety of factors:

    1. Age: Lack of straightforward compatible migration approaches from older NAS models.
    2. "Value" model discrimination: DS415Play is considered a "value" model and no straightforward migration route is available when upgrading to a "plus" model.
    3. Difference in Package Architecture: If the source and destination NAS use different package architectures may result in DSM configurations and package settings being lost after migration. You can only migrate drives to models with the same package architecture as your source NAS.
    4. Direct Ethernet Connection: Data cannot be copied over via a direct connection between both devices.

    The How To Migration tutorial provided by Synology raised more questions about how I should move my data and configuration settings. Out of the three methods proposed (Migration Assistant/HDD Migration/Hyper Backup), there was only one approach that applied to me - Hyper Backup.

    Manual Copy and Paste To USB Drive

    Before settling with Hyper Backup, I decided to carry out a direct copy-and-paste approach of each user's home directory from Synology to an external USB Drive. I thought this might be a less process-intensive and quickest way to move the data. - No Synology app-related overhead that could cause my DS415Play to grind to a halt.

    However, I quickly realised this could come to the detriment of the integrity and overall completeness of the backup. My NAS was still getting used daily and there was a high chance of missing new files and updates.

    With Hyper Backup, I could carry out a full backup initially and then schedule incremental backups nightly until I was ready to make the switch to DS1821+.

    Hyper Backup

    At the time, unbeknownst to me, this would prove to be a right pain. I knew from the start that moving around 5TB of data would be time-consuming but I didn't factor in the additional trial and error investigation time just to complete this task.

    To ensure smooth uninterrupted running, I disabled all photo and file indexing.

    Avoiding Slow Backup Speeds

    The backup procedure wasn't as straightforward as I'd hoped. Early on I experienced very slow backup speeds. This is down to the type of "Local Folder & USB" backup option selected in Hyper Backup. There is a vast difference in transfer speeds:

    • Local Folder & USB (single-version): 10MB - 60MB/s
    • Local Folder & USB: 0 - 1.2MB/s with longer gaps of no transfer speed

    To reduce any further overhead, compression and encryption were also disabled.

    Additional steps were also taken, such as reformatting the external hard drive to ext4 format and enabling the "Enable delayed allocation for EXT4" setting from the Control Panel.

    What is delayed allocation?

    All byte writes are cached into RAM and it's only when all the byte writes have finished and the file is closed then the data is copied out of the cache and then written to the drive.

    The potential disadvantage of enabling this setting is the drive is more vulnerable to data loss in the event of a power outage.

    Make Use of The High-speed USB Port

    Older Synology models have front and rear USB ports. To further aid in faster data transfer, be sure to connect the external hard drive to the rear USB port as this will be USB 3.0 - a better option over the slower USB 2.0 port provided at the front.

    Backup Strategy

    Once I had Hyper Backup running in the most efficient way, I created three backup tasks so the restore process could be staggered:

    1. User Home Directories: Everything within the /homes path.
    2. Photos: DS Photo-related files that have yet to properly be migrated over to Synology Photos
    3. Application Settings*: Settings and configuration for the key apps that I use. This doesn't include any physical files the app manages.

    * Only the "Local Folder & USB" backup type has the option to allow application settings to be solely backed up. Transfer speeds were not a concern as the settings have a very minimal file size.

    Once a full backup was completed, a nightly schedule was set to ensure all backups were up-to-date whilst I waited for some new hard drives for the DS1821+.

    Restore

    Restoring the backed-up data was a lot more straightforward than the backup process itself. The only delay was waiting for the new hard drives to arrive.

    New Hard Drives

    Due to the limitations posed by the only migration approach applicable to me, new drives had to be purchased. This was an unexpected additional cost as I hoped to re-use the 8TB worth of drives I already had in my DS415Play.

    I decided to invest in larger capacity drives to make the most of the 8-bays now at my disposal. Two 8TB Western Digital Reds are just what was required.

    Setup and Restore Process

    Utilising new hard drives was actually a refreshing way to start getting things going with the DS1821+, as any missteps I made as a new Synology owner when originally setting up the DS415Play could be corrected.

    Once the drives were installed, the following restore process was carried out:

    1. Install DSM 7.1.
    2. Create Drive Storage Pools.
    3. Install applications.
    4. Re-create all user profiles using the same details and usernames.
    5. Using Hyper Backup, copy all files into each home directory.
    6. Ensure each user's home folder and child directories are assigned with the correct permissions and are only accessible by the user account.
    7. Restore the /photo directory.
    8. Login to Synology Account in Control Panel and restore all DSM configuration settings from online backup - minus user profiles.
    9. Restore application settings (backup task number 3) using Hyper Backup.

    It was only after restoring the DSM configuration settings (point 8), that I realised user profiles including permissions could be restored.

    DSM Configuration Backup Items

    • File Sharing: Shared Folder, File Services, User & Group, Domain/LDAP
    • Connectivity: External Access, Network, Security, Terminal & SNMP
    • System: Login Portal, Regional Options, Notification, Update & Restore
    • Services: Application Privileges, Index Service, Task Scheduler

    Over Network File Restoration

    I decided to limit the use of over-network file copying to just the final leg of the restoration journey to handle some of the less important/replaceable files.

    I would only recommend over-network file copying if you have a fast and stable home network. My UniFi Dream Machine was more than able to handle the amount of data to the DS1821+.

    What Will Become of The DS415Play?

    There is still life in my old trusty DS415Play as it can still handle low-intensive tasks where background processes are kept to a minimum. Any form of file indexing on a large scale would not be suitable.

    I see the DS415Play being used purely as a network storage device avoiding the use of Synology apps. For example, a suitable use case could be an off-site backup at my parent's house.

    Final Thoughts

    Even though the migration process wasn't as smooth as I hoped it would be, there was a silver lining:

    • A Considered Setup Approach: As a long-term Synology user, I consider myself more experienced and understood more about the configuration aspects, allowing me to set up my new NAS in a better way.
    • Data Cleanse: When faced with limited migration routes, it makes you question what data is worth moving. I am somewhat of a data hoarder and being able to let go of files I rarely use was refreshing.
    • Storage Pools: I was able to set up Storage Pools and Volumes in a way that would benefit the type of data I was storing. For example, Surveillance Station recordings will write to a single hard disk, rather than constantly writing to multiple disks based on a RAID setup.

    After completing the full migration, the following thoughts crossed my mind: How long will this Synology serve me? When will I have to perform another migration?

    It has taken me eight years to outgrow the DS415Play. The DS1821+ is double in capacity and more so from a specification perspective (thanks to its upgradeability). Maybe 10 to 14 years?

    As someone who has just turned 38, I can't help but feel a sense of melancholy thinking about where I will be after that duration of time and whether the investment to preserve memories to my Synology will truly be the success I hope it will be.

  • I've owned a NAS in various forms for many years. Something that started initially as re-using an old PC attached to a home network to purchasing a mini NAS box with RAID support. All systems based on Windows Server Operating System. The main focus on early iteration was to purely serve files and media.

    In 2015, I decided to take a gamble and invest in a Synology system after hearing rave reviews from users. Opting for the DS416play seemed like a safe option from a features, pricing and (most importantly) expandability point of view.

    After the move to Synology, everything I had beforehand felt so archaic and over-engineered. To this very day, my DS416play is chugging along housing around 4.5TB of data consisting of a combination of documents, videos, pictures and laptop image backups. All four hard drive slots have been filled providing a total of 8TB of storage space.

    Being a piece of hardware that is on 24/7 and acts as an extension of my laptop storage (via Synology Drive and MountainDuck), I'm pleased to see that after 7 years of constant use it's still ticking along. But I feel this year I'm due an upgrade as only recently the hardware has been playing up and starting to feel a little sluggish, which is only resolved via a restart. This is to be expected from a server running on an Intel Celeron processor and 1GB of RAM.

    So is having your own dedicated NAS a worthwhile investment? - Yes.

    Some of the positive and negative points listed below revolve around the ownership of a Synology NAS, as this is the only type of NAS I've had the most experience with.

    Positives

    You're not a slave to a storage providers terms where they can change what they offer or pricing structure. Just take a look back at what Google did with their photo service.

    Easy to setup, where you require little knowledge to get up and running (based on using a Synology). I'm no network wizard by any means and Synology allows me to get set up and use all features using basic settings initially and tinker with the more advanced areas if necessary.

    Access for many users without any additional costs. I've created accounts for my parents, sister and wife so they can access all that the server has to offer, such as photos, movies and documents. This comes at no additional cost and is very easy to give access via Synology apps.

    Cost of ownership will decrease over time after your initial setup costs (detailed in the negative section). Providing you don't have any hardware issues, which is very doubtful as my own NAS has been issue free since purchase and running 24/7, no reinvestment is required. The only area where you may need to invest is in additional drives for more storage allocation, but the cost for these are nominal.

    Always accessible 24/7 locally and remotely to myself and all the users I have set up. There isn't a day that goes by where my NAS isn't used. Most of the time I use the additional NAS storage as an extension to my laptop that has very little hard-drive space through MountainDuck application.

    Solid Eco-system consisting of applications that you need and which are accessible on mobile and tablet devices. This is where Synology is steps ahead of its competitors as they invest in software as well as hardware. The core applications are Synology Drive, DS Video and Synology Photos.

    Backup's can be easily configured for on-site and off-site. This can be done through RAID configuration and using the CloudSync application to backup to one of the many well-known cloud providers.

    Negatives

    Initial setup costs can be quite high on the offset as you not only need to purchase an adequate NAS server as well as multiple hard-disk drives that will fit into your long-term expansion plan. You need to ask yourself:

    • How much data do you currently need to store?
    • What's the estimated rate of storage consumption over the next few years?
    • Does the NAS have enough hard-disk drive slots for your needs?

    If I could go back and start my Synology NAS journey again, I'd invest more in purchasing larger hard disks.

    Synology Drive On-demand Sync is a non-existent feature on Mac OS, which makes it difficult to store large files without taking up your own workstation disk space. I and many other Mac OS users have been waiting very patiently for this key feature that is already fully functioning on Windows OS. MountainDuck is a workaround but annoyingly takes you out of the otherwise solid Synology eco-system.

    Repairability can be somewhat restrictive depending on the model purchased. The majority of the components such as CPU, RAM and PSU are soldered directly onto the motherboard and if one piece were to fail, you are left with an oversized paper-weight. It is only the more expensive models that allows you to replace/upgrade the RAM.

    Conclusion

    In my view, a NAS is a very worthy investment even by today's standards. You are spoilt for choice - there is a NAS for everyone based on your needs whether you're looking for something basic or advanced. The amount of choice now available proves the popularity and is something that users are not ignoring.

    If you want true freedom and ownership over your data and don't mind a little bit of setup to get you there, a NAS would be right up your street. You'll find even more uses if the NAS you've purchased has developed applications that might prevent you from having to purchase another subscription to an online service. This would help in aiding a quicker return of investment from the original cost of the hardware. For example, through Synology I've found the following replacements for common services:

    • Google Photos > Synology Photos
    • Google Drive/OneDrive > Synology Drive
    • Evernote > Note Station
    • Nest Security Camera > Surveillance Station

    I for one is fully invested and looking for my next upgrade depending on what happens first: Hardware dies or used up all storage capacity where more drive slots are required. The Synology DS1621+ seems to be right up my street.

  • Investing in a UniFi Dream Machine has been one of the wisest things I've done last year when it comes to relatively expensive purchases. It truly has been worth every penny for its reliability, security and rock-solid connection - something that is very much needed when working from home full-time.

    The Dream Machine has been very low maintenance and I just leave it to do its thing apart from carrying out some minor configuration tweaks to aid my network. The only area that I did encounter problems was accessing the Synology Disk Station Manager (DSM) web interface. I could access Synology if I used the local IP address instead of the "myusername.synology.me" domain. Generally, this would be an ok solution, but not the right one for two reasons:

    1. Using a local IP address would restrict connection to my Synology if I was working outside from another location. This was quite the deal-breaker as I do have a bunch of Synology apps installed on my Mac, such as Synology Drive that carries out backups and folder synchronisation.
    2. I kept on getting a security warning in my browser when accessing DSM regarding the validity of my SSL certificate, which is to be expected as I force all connections to be carried out over SSL.

    To my befuddlement, I had no issue accessing the data in my Synology by mapping them as network drives from my computer.

    There was an issue with my local network as I was able to access the Synology DSM web interface externally. From perusing the UniFi community forum, there have been quite a few cases where users have reported the same thing and the common phrase that came popping up in all the posts was: Broken Hairpin NAT. What is a Hairpin NAT?

    A Hairpin NAT allows you to run a server (in this case a NAS) inside your network but connect to it as if you were outside your network. For example via a web address, "myusername.synology.me" that will resolve to the internal IP of the server.

    What I needed to do was to run an internal DNS server and a local entry for "myusername.synology.me" and point that to the internal IP address of the NAS. What was probably happening is that my computer/device was trying to make a connection past the firewall and then back in again to access the NAS. Not the most efficient way to make a connection for obvious reasons and in some cases may not work. A loopback would resolve this.

    A clever user posted a solution to the issue on the UniFi forum that is very easy to follow and worked like a charm - Loopback/DNS Synology DiskStation.

    I have also saved a screenshot of the solution for posterity.

  • The older I get, the more obsessed I have become with preserving life’s memories through photos and video. With so many companies offering their storage solutions, we’re living in an age where storage is no longer something that comes at a premium. There are a wide variety of pricing and feature tiers for all, benefiting us as consumers. If you have full trust in the service provider, they are suited particularly well for the majority of consumer needs. But as a consumer, you need to be prepared to shift with potential service changes that may or may not work in your favour.

    For many years, I have always been conscious that I’m a photo hoarder and believe that there isn’t a bad photo one can take with the help of advancements in phone camera technology. If you ask any of my work colleagues, they’d probably tell you I have a problem. When we go on any of our socials, I’m the first person to whip out my phone and take pictures as they make nice mementoes to look back on and share.

    On a more personal note, during last years Diwali I came to the sudden realisation as we all sat down to my mum belting out her prayers that this will not last forever and it dawned on me that these are truly special moments. Being an Indian who is culturally inept in all the senses and cannot speak his native tongue, I would be comforted knowing that I'll have photos and video to look back on many years to come. From that moment, I decided to make an active effort to capture smaller moments like these. Maybe the pandemic has shown me not take things for granted and appreciate time with family more.

    I got a little serious in my crusade and took things a step further by acquiring as many family photos as possible by purchasing a photo scanner to digitise all prints for safekeeping. Prints fade in time, not in the digital world.

    Photo Backup Strategy

    Whether I take photos on my phone or my FujiFilm X100F camera, the end destination will always be my Synology NAS where I have the following redundancies in place:

    • RAID backup on all hard disks.
    • Nightly backups to the cloud using BackBlaze.
    • Regular backup to an external disk drive and stored off-site.

    As expected, my phone gets the most use and everything by default is stored within my Google Photos account using free unlimited storage. I then use Synology Moments that acts as my local Google Photos where my photos are automatically stored to my Synology in original quality.

    My camera gets mostly used for when I go on holiday and events. I store the RAW and processed photos on my Synology. I still upload the processed photos to Google Photos as I love its AI search capability and makes sharing easy.

    At the end of the day, the layers of redundancy you put in place depend on how important specific photos are to you. I like the idea of controlling my own backups. I take comfort knowing my data is stored in different places:

    • Synology
    • Backblaze
    • Google Photos
    • Offsite Hard Drive

    Cloud Storage and Shifting Goalposts

    The fear I had pushed to the back of my head finally came to the forefront when Google changed its storage policy.

    The recent news regarding the changes in Google Photos service gives me a sense of resolve knowing I already have my local storage solution that is already working in parallel with Google Photos. But I can’t help but feel disappointed by the turn of events though. Even though I can to some extent understand Google's change in their service, I can't help but feel slightly cheated. After all, they offered us all free unlimited storage in exchange to allow them to apply data mining and analysis algorithms to improve their services. That's the price you pay for using a free service. You are the product (this I have no grievances with)!

    Now they have enough of our data, they can feel free to cut the cord. We all know Google has a history of just killing products. Google Photos may not be killed, but life has certainly been sucked out of it.

    It may come across as if I’m solely bashing Google Photos, when in fact this is a clear example of how companies can change their service conditions for their benefit and face no repercussions. We as users have no say on the matter and just have to roll with the punches. It just seems wrong that a company would entice so many users with a free service to then strip it away. This is a classic monopolistic strategy to grab market share by pricing out its competitors to now demand money from its users.

    For me, Google Photos provided a fundamental part of the photo storage experience by making things easily accessible to family and friends. No longer will I be able to invite friends/family to contribute to shared albums unless they opt for the paid plan. Now when you’re surrounded by iPhone users, this creates another barrier of entry.

    This has cemented my stance more so to ensure have control of my assets and service, which is something I have been doing.

    Final Thoughts

    If I have carried out my photo archival process correctly, they should be accessible to future generations for many years to come and continue to live on even after I’ve expired. This should be achievable as I’ll continue to maintain this time-capsule as technology continues to evolve.

    The most important take-away: If you strip down my approach to the barebones, I’m not giving in to the monopolistic behaviour of the tech giants - Google, Apple or Microsoft. Just using them as a secondary thought to compliment my process. It’s just my NAS doing the heavy-lifting where I set the rules.

    These priceless heirlooms are a legacy and my gift for future generations to come.

  • In light of my hosting issues over the last week, I decided it was time to take measures in ensuring all websites under my hosting provider are always backed up automatically. I generally take hosting backups offsite on an ad-hoc basis and entrust the hosting provider to keep up their end of the bargain by doing this on my behalf.

    If you are with a hosting provider (like I was previously - A2 Hosting), who talks the talk but can't actually walk the walk in regards to the service they offer, you will more than likely end up having backup woes. It's always best practice to take control of your own backups and if this can be automated, makes life so much easier!

    All Plesk panels have a "Backup Manager" area where you can action manual or scheduled backup processes. Depending on your hosting provider, the features shown in this area might be varied. Some have the option to backup straight to your Dropbox account. What we will be focusing on is remotely backing up our website data to our Synology NAS using FTP.

    Before we log into Plesk to select our Remote Backup option, we need to carry out some setup on our Synology.

    Port Forwarding for FTP and FTPS Protocols

    Most likely, your router will have a limited number of ports open to allow outside internet traffic to enter the local network. To make the most of your Synology, there is a recommended number of ports you need to open to make use of all the services.

    We are interested in opening to the following ports:

    • FTP: 21
    • FTPS: 990

    I prefer to send over any data using FTPS just for better security.

    You will have to login to your router settings to open ports. I would provide some instructions on how to do this, but every router is different. I just managed to find these settings hidden away in my own Billion router.

    Synology Setup

    Setting up FTP is pretty straight-forward. Just make sure you have administrative privileges to access the Control Panel.

    Enable FTP

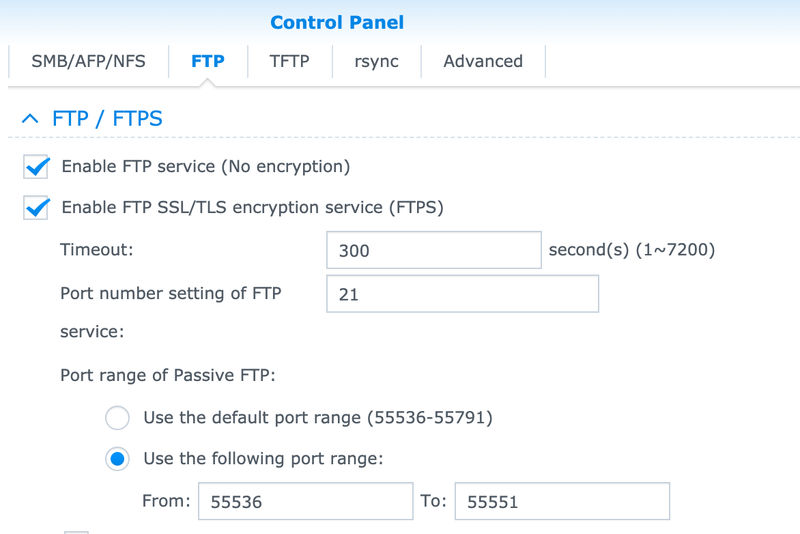
    In Control Panel, go to: File services > FTP Tab.

    All we need to do here is to enable two FTP settings:

    • Enable FTP service (no encryption)
    • Enable FTP SSL/TLS encryption (FTPS)

    Synology Control Panel - Enable FTP

    The reason why I selected the "Enable FTP service (no encryption)" option is purely for initial testing purposes. If there are any issues when making a connection via FTP from a new service for the first time, I just like to ensure if a successful connection can be made via standard FTP. After my testing is done, I would disable this option.

    Create a Synology User

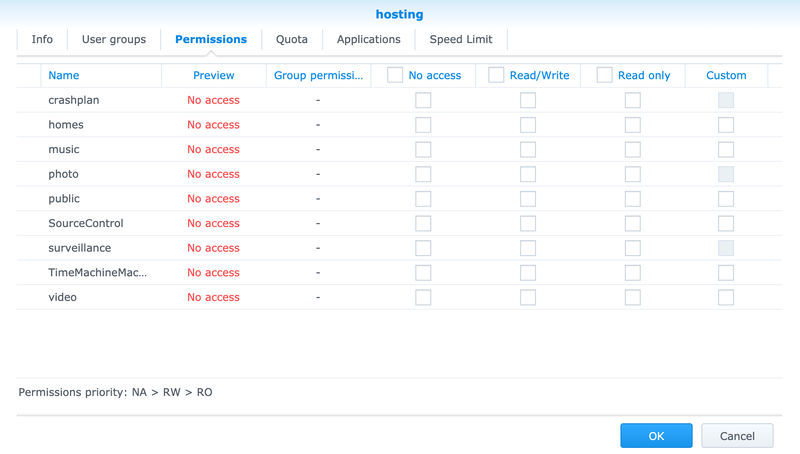
    I prefer to create a new user specifically for FTP connections rather than my main own account, as I have the ability to lock down access to only read and write permissions in its home directory. No Synology services or applications will be accessible.

    Synology FTP User Permissions

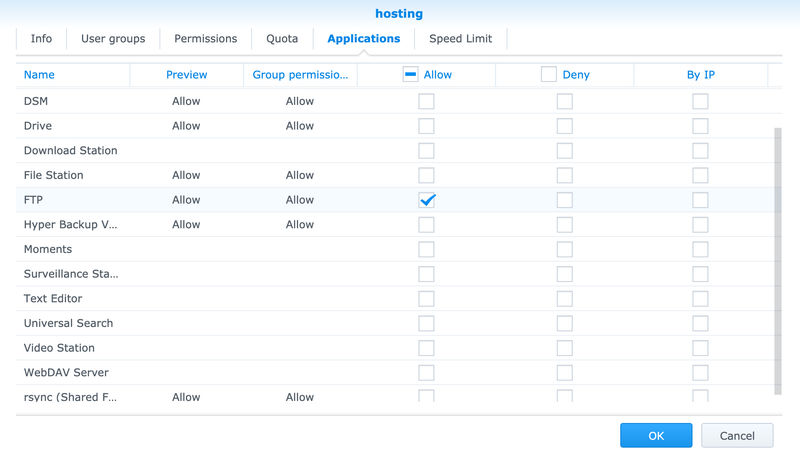
    The only application I allow my user to access is "FTP".

    Synology FTP User Application Permissions

    Plesk Backup Manager Setup

    FTP Configuration

    In Backup Manager, go to "Remote Storage Settings and select "FTP". Enter the following settings along with your user credentials:


    On clicking the "OK" or "Apply" button should return no errors. But if there are errors, check the logs and ensure you haven't missed any permissions for your Synology user.

    Set Backup Schedule

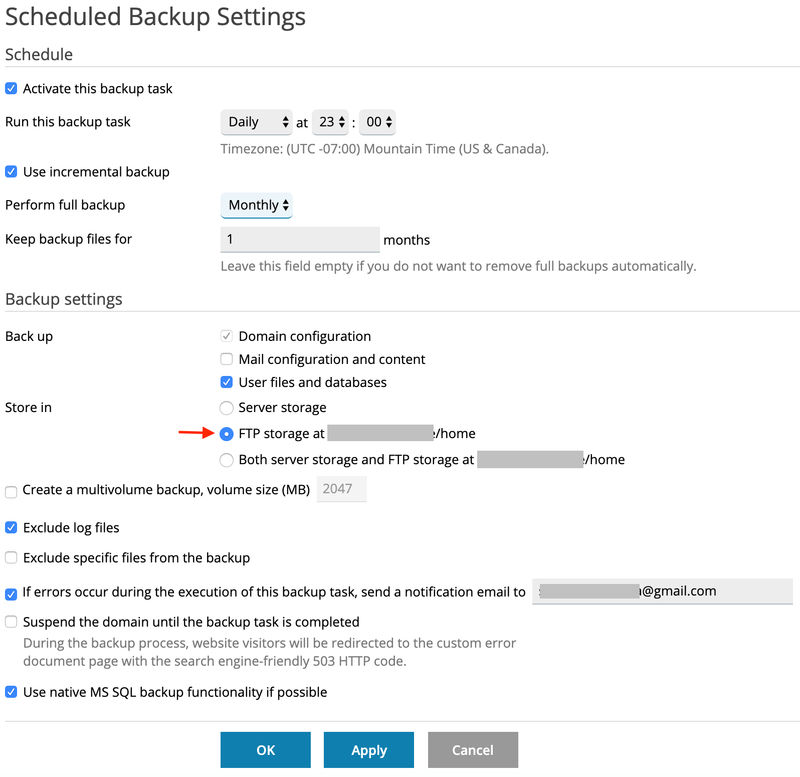
    Now we have set our remote storage settings, we now need to put a schedule in place to generate a backup on as often as we require. It's up to on how often you set the regularity of the backups. I've set mine to run daily at 11pm and retain these backups for a month.

    Plesk Scheduled Backup

    Make sure you set the Backup settings to store the backup in your newly created FTP storage.

    A Word To The Wise

    Just because we now have automatic backups running protecting us from any foreseen hosting issues, this doesn't mean we're all in the clear. Backups are useless to us if they don't work. I check my backups at least once a week and ensure the most recently backed up file is free from corruption and can be opened.