Blog

Tagged by 'router'

  • I've owned my UniFi Dream Machine router router for a little over two years, and I'm still getting accustomed to the wide array of configuration options available in the device admin settings. My usual rule of thumb is to only fiddle with the settings if absolutely necessary.

    Today was the day when I needed to change one setting on my router so that my download and upload speeds were not limited. Embarrassingly, I've been criticising Virgin Media, my internet service provider (ISP), for not keeping their half of the bargain in supplying me with appropriate broadband speed as promised, only to discover that it was all along my Dream Machine. Very unexpected.

    In the UniFi Network settings, look out for an option called "Smart Queues" where the download and upload speeds limits can be increased or disabled in its entirety.

    UniFi Smart Queue Setting

    What is "Smart Queues" and why would we need it? "Smart Queues" helps decongest networks with lots of clients and constant load. When enabled it will reduce the maximum throughput in order to minimise latency over the network when the connection is at full capacity. Low latency is important for voice/video calls and fast-paced online multiplayer gaming. The following StackOverflow post adds further clarity on the subject:

    Most routers and modems have a design flaw called "bufferbloat"; when your Internet connection gets fully loaded (congested), they mismanage their queues of packets waiting to be sent, and let the queue grow out of control, which just adds latency with no benefit. SQM is the fix for bufferbloat.

    SQM is only tangentially related to QoS. Traditional QoS schemes prioritize some kinds of traffic over others, so when there is congestion, the lower-priority traffic gets slammed with congestion-related latency, and the high-priority traffic hopefully skates by without problems. In contrast, SQM tries to keep the latency low on all traffic even in the face of congestion, without prioritizing one kind of traffic over another.

    I made a decision to disable "Smart Queues" as there isn't enough network traffic used in my household to warrant any form of QoS consideration. This setting can be found by logging into the router Network section > Settings > Internet > WAN Networks > Advanced.

    Once disabled, the difference in internet speed is like night and day.

    Before:

    Internet Speed - Before

    After:

    Internet Speed - After

  • On my UniFi Dream Machine, I have set up a guest wireless network for those who come to my house and need to use the Internet. I've done this across all routers I've ever purchased, as I prefer to use the main non-guest wireless access point (WAP) just for me as I have a very secure password that I rather not share with anyone.

    It only occurred to me a few days ago that my reason for having a guest WAP is flawed. After all, the only difference between the personal and guest WAP's is a throw-away password I change regularly. There is no beneficial security in that. It is time to make good use of UniFi’s Guest Control settings and prevent access to internal network devices. I have a very simple network setup and the only two network devices I want to block access to is my Synology NAS and IP Security Camera.

    UniFi’s Guest Control settings do a lot of the grunt work out the box and is pretty effortless to set up. Within the UniFi controller (based on my own UniFi Dream Machine), the following options are available to you:

    1. Guest Network: Create a new wireless network with its own SSID and password.
    2. Guest User Group: Set download/upload bandwidth limitations that can be attached to the Guest Network.
    3. Guest Portal: A custom interface can be created where a guest will be served a webpage to enter a password to access the wireless network - much like what you'd experience when using the internet at an airport or hotel. UniFi gives you enough creative control to make the portal interface look very professional. You  can expire the connection by a set number of hours.
    4. Guest Control: Limit access to devices within the local network via IP address.

    I don't see the need to enable all guest features the UniFi controller offers and the only two that are of interest to me is setting up a guest network and restricting access (options 1 and 4). This is a straight-forward process that will only take a few minutes.

    Guest Network

    A new wireless network will need to be created and be marked as a guest network. To do this, we need to set the following:

    • Name/SSID: MyGuestNetwork
    • Enable this wireless network: Yes
    • Security: WPA Personal. Add a password
    • Guest Policy: Yes

    All other Advanced Options can be left as they are.

    UniFi Controller - Guest Network Access Point

    Guest Control

    To make devices unavailable over your newly create guest network, you can simply add IPV4 hostname or subnet within the "Post Authorisation Restrictions" section. I've added the IP to my Synology NAS - 172.16.1.101.

    UniFi Controller - Guest Control

    If all has gone to plan when connecting to the guest WAP you will not be able to access any network connected devices.

  • Investing in a UniFi Dream Machine has been one of the wisest things I've done last year when it comes to relatively expensive purchases. It truly has been worth every penny for its reliability, security and rock-solid connection - something that is very much needed when working from home full-time.

    The Dream Machine has been very low maintenance and I just leave it to do its thing apart from carrying out some minor configuration tweaks to aid my network. The only area that I did encounter problems was accessing the Synology Disk Station Manager (DSM) web interface. I could access Synology if I used the local IP address instead of the "myusername.synology.me" domain. Generally, this would be an ok solution, but not the right one for two reasons:

    1. Using a local IP address would restrict connection to my Synology if I was working outside from another location. This was quite the deal-breaker as I do have a bunch of Synology apps installed on my Mac, such as Synology Drive that carries out backups and folder synchronisation.
    2. I kept on getting a security warning in my browser when accessing DSM regarding the validity of my SSL certificate, which is to be expected as I force all connections to be carried out over SSL.

    To my befuddlement, I had no issue accessing the data in my Synology by mapping them as network drives from my computer.

    There was an issue with my local network as I was able to access the Synology DSM web interface externally. From perusing the UniFi community forum, there have been quite a few cases where users have reported the same thing and the common phrase that came popping up in all the posts was: Broken Hairpin NAT. What is a Hairpin NAT?

    A Hairpin NAT allows you to run a server (in this case a NAS) inside your network but connect to it as if you were outside your network. For example via a web address, "myusername.synology.me" that will resolve to the internal IP of the server.

    What I needed to do was to run an internal DNS server and a local entry for "myusername.synology.me" and point that to the internal IP address of the NAS. What was probably happening is that my computer/device was trying to make a connection past the firewall and then back in again to access the NAS. Not the most efficient way to make a connection for obvious reasons and in some cases may not work. A loopback would resolve this.

    A clever user posted a solution to the issue on the UniFi forum that is very easy to follow and worked like a charm - Loopback/DNS Synology DiskStation.

    I have also saved a screenshot of the solution for posterity.

  • Ever since I’ve been forced to work from home over the last 3 months, I noticed in the first few weeks of the coronavirus lockdown my network performance has been subpar. Not ideal when a stable internet connection is ones only gateway to the outside world and enable you to work from home.

    My current network setup is quite simple and consists of:

    • ISP router - set to modem mode
    • Billion 7800DXL wireless router
    • Synology 4-bay NAS
    • Wireless Access Point
    • Wireless Security Camera

    The bottle-neck out of the whole setup is the Billion router. It’s not a basic router by any means and it has served me well since I last upgraded my network back in 2014. After being in use 24/7 over the last 6 years, signs of wear were starting to show. My internet connection would just randomly drop or wind to a halt. Carrying out a factory reset did not resolve the connection stability. Next step was to check for the latest firmware, but it seems that Billion has a really short firmware release cycle - not something you’d expect for a router costing just under £200. The last firmware was released in 2015, which I had already installed.

    I had to make a decision to either waste time on faffing around with the Billion router or look for a replacement. I decided on the latter.

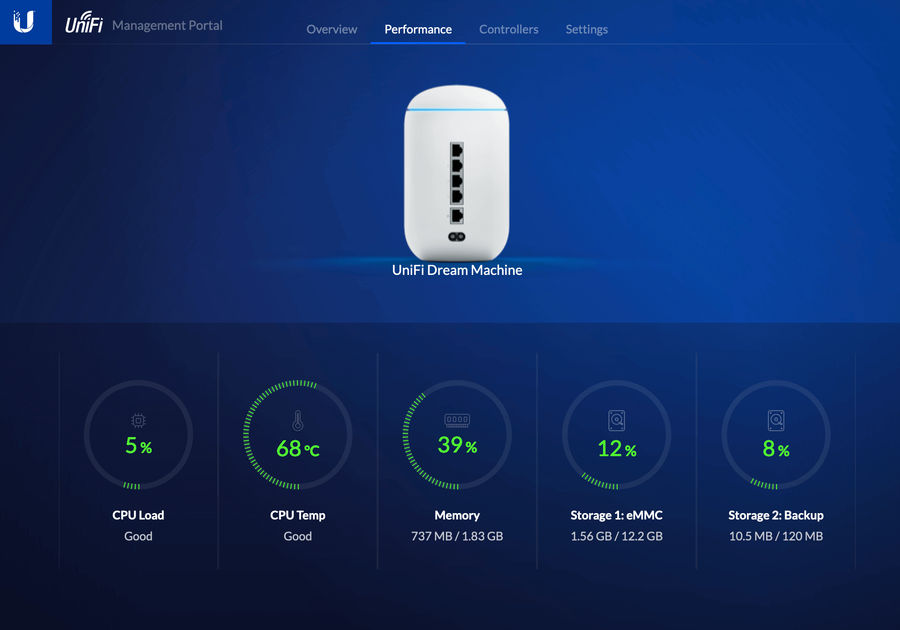
    UniFi Dream Machine Router

    UniFi Dream Machine Boxed

    I knew straight-away what router I wanted to purchase - UniFi Dream Machine by Ubiquiti. I was sold on the name alone!

    Ubiquiti are known for making high-quality network solutions that are suitable for consumers and businesses alike. You can start off with a small setup based on your infrastructure needs knowing at a later point (if needed) you have the option to purchase additional hardware and upscale your network. From the reviews I’ve read online, the company really makes nice hardware that can seamlessly integrate with one another - part of the Ubiquiti eco-system.

    I was so tempted to go overkill on my new network set up just so I could do some additional tinkering, but the Dream Machine Router provides all the functionality I need and more.

    Form Factor

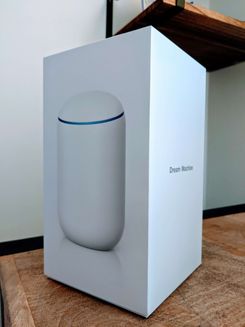
    The Dream Machine isn’t like any other router I’ve purchased previously where the form factor has been a boring horizontal slab with two or three antennae poking out - a piece of hardware I would always hide away in my cabinet. But the Dream Machine is a nice looking piece of kit and even comes across very applesque. It can stand proud and upright in full view for all to see. Plus it has has a really cool blue ring light.

    It’s definitely heavier than any of my previous routers, which isn’t surprising from the amount of tech being crammed into this oversized mint tic tac, containing:

    • ARM Cortex Processor
    • Cooling Fan
    • 4 Port Gigabit Switch
    • Integrated Wireless Antenna 2.4/5GHz

    Setup

    I love the fact that from the moment you take the router out the box and connect to mains, you can literally get online and everything set up in no longer than 10 mins all from within the UniFi Network Controller mobile app. I don’t think I’ve ever been so excited to go through setting up a network device before. The mobile app makes things really simple that even my parents wouldn’t have a problem in carrying out the setup steps. I think I spent more time thinking about what I should call my wireless network. :-)

    I won’t go into too much detail here on the setup steps, but they consist of the following:

    • Find and connect to the device via Bluetooth.
    • Create a UI.com account, or login using your existing credentials.
    • Set auto-optimise settings.
    • Setup Wi-Fi network.
    • Set a firmware update schedule.
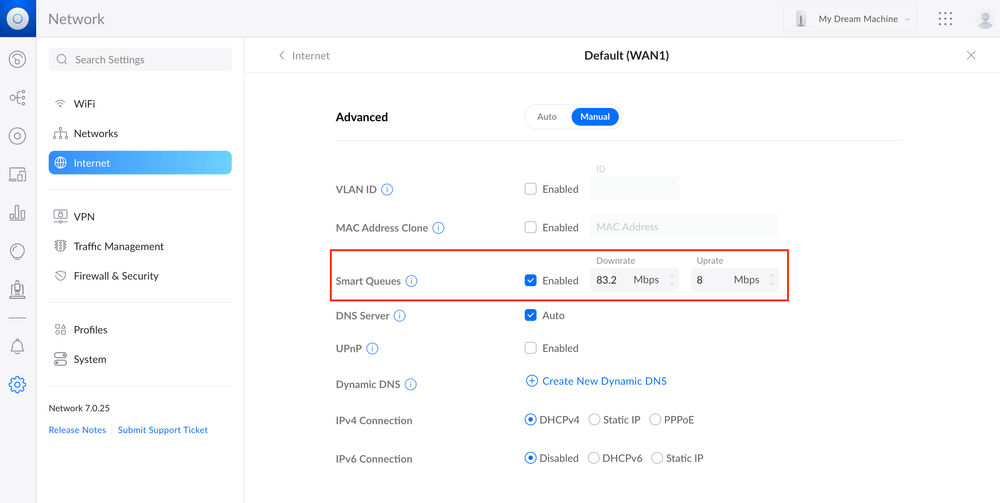
    • Perform network speed test to dial in with the speeds provided by your ISP.

    Once those steps are carried out, you just need to let the device go through its configuration process. Once complete, you can join the network wirelessly.

    If in the future, you decide to expand your network with additional UniFi devices, the setup process will be the same.

    “Prosumer” Configuration/Monitoring

    For a device that costs around £300, don’t think for one second the UniFi mobile app is the only route to making configuration changes. The mobile app is a protective bubble for the standard consumer who just wants a secure and reliable wireless setup without being too exposed to the inner workings. If I didn’t have a home NAS and didn’t feel the need to control how certain wireless access points could connect to devices, the mobile app would have more than sufficed.

    UniFi Network Controller App Home Screen

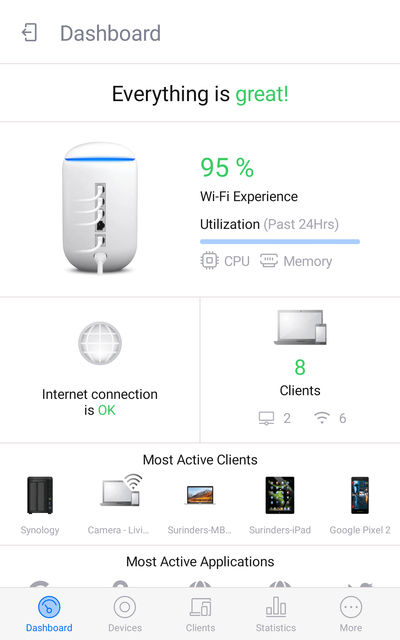
    Phew! The UniFi Network Controller App is telling me "Everything is great!".

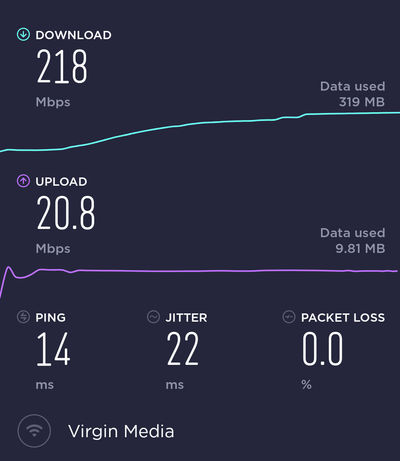
    I get a real kick out of seeing the vast array of network analytics and see how my internet usage has increased since working from home. You have at your disposal overall statistics on hardware performance, internet speed, threat maps, device and application usage to name a few.

    UniFi Traffic Stats

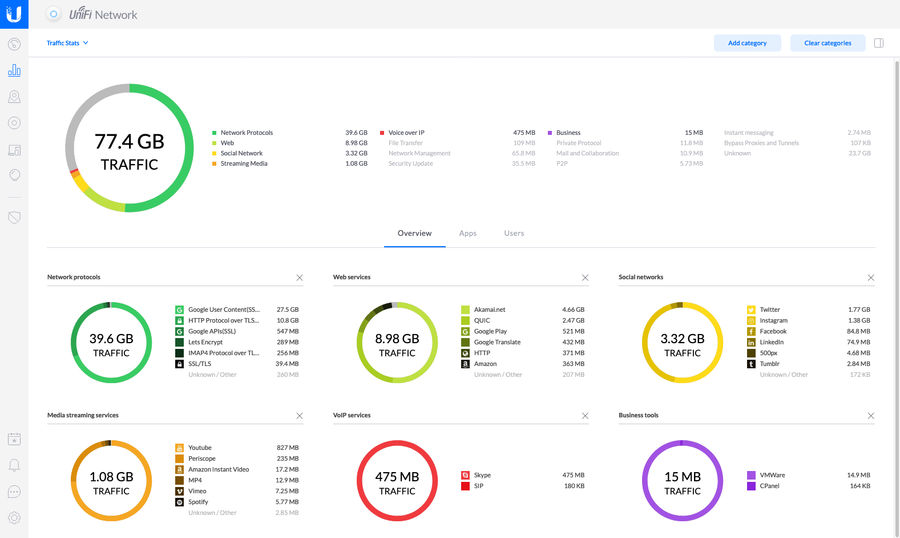
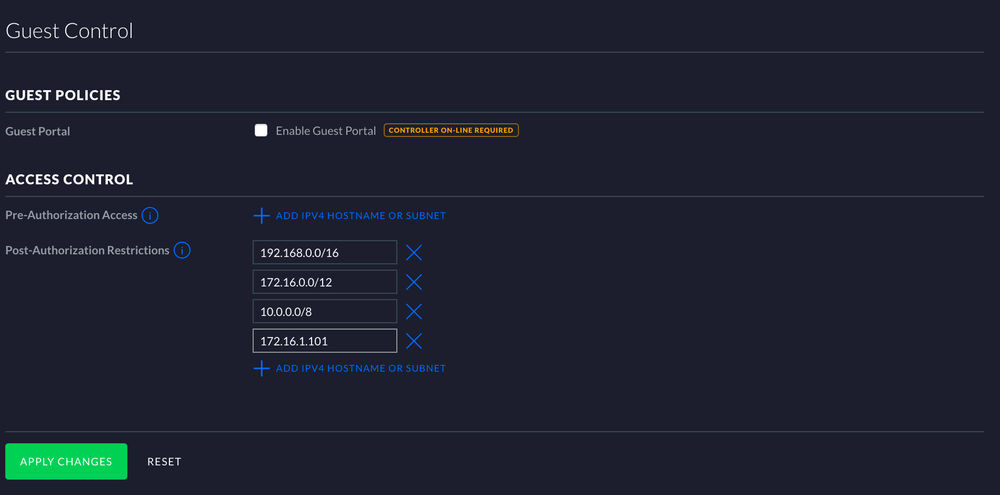
    If like me, you require more control over your network, this can be done by logging into the web interface, which is just as intuitive as the mobile app. Here I was able to configure port forwarding, network groups, firewall and guest network. Trust me, there is a tonne more configuration options you can change really easily making you feel like a network pro!

    UniFi Web Interface

    Security

    In addition to wanting a more stable and reliable network device, security also played a big factor in the reason why I purchased a Ubiquiti device.

    Unlike all the routers I’ve had in the past that probably only received 2-3 updates in their lifetime, Ubiquiti has turned that on its head. By just looking at their software release page, it’s a hive on activity. Up-to-date firmware enhances the longevity of the device by fixing any possible vulnerabilities as well as ensuring the device continues to function at its optimum level. To ensure you are always running the most up-to-date firmware, Ubiquiti have made the process very easy. The device will automatically install newly released firmware automatically based on your set schedule.

    There is also an option to enable Threat Management (currently in beta) that will protect your network from attacks, malware and malicious activity. Does this feature slow down the incoming traffic? The answer is no. The device has a whopping 850Mbps throughput limit. Amazing!

    Conclusion

    I purchased the Ubiquiti Dream Machine a couple of weeks into the start of the Covid-19 lockdown and I’m happy to report my network is more speedy then I could’ve hoped for. This is something you immediately notice when performing large file downloads/uploads. In fact, my parents log onto my Synology remotely and even they have noted an improvement.

    I’ll admit even after numerous research before making the purchase, I was still questioning whether spending such a large amount on a wireless router was worth it. But this concern was soon quashed knowing I have a piece of hardware that is more future-proof than what its competitors are currently offering and can later tie into a larger network architecture when needed.

    By buying this router you’ll be living the network dream!