Earlier this week I wrote about the reasons to why I decided to use Cloudflare for my website. I've been working on utilising Cloudflare's API to purge the cache on demand for when files need to be updated within the CDN. To do this, I decided to write a method that will primarily use one API endpoint - /purge_cache. This endpoint allows a maximum of 30 URL's at one time to be purged, which is flexible enough to fit the majority of day-to-day use cases.
To communicate with the API, we need to provide three pieces of information:
- Account Email Address
- Zone ID
- API Key
The last two pieces of information can be found within the dashboard of your Cloudflare account.
Code - CloudflareCacheHelper Class
The CloudflareCacheHelper class consists of a single method PurgeSelectedFiles() and the following class objects used for serializing and deserializing our responses from API requests:
- CloudflareFileInfo
- CloudflareZone
- CloudflareResultInfo
- CloudflareResponse
Not all the properties within each of the class objects are being used at the moment based on the requests I am making. But the CloudflareCacheHelper class will be updated with more methods as I delve further into Cloudflare's functionality.
public class CloudflareCacheHelper
{
    public string _userEmail;
    public string _apiKey;
    public string _zoneId;

    private readonly string ApiEndpoint = "https://api.cloudflare.com/client/v4";

    /// <summary>
    /// By default the Cloudflare API values will be taken from the Web.Config.
    /// </summary>
    public CloudflareCacheHelper()
    {
        _apiKey = ConfigurationManager.AppSettings["Cloudflare.ApiKey"];
        _userEmail = ConfigurationManager.AppSettings["Cloudflare.UserEmail"];
        _zoneId = ConfigurationManager.AppSettings["Cloudflare.ZoneId"];
    }

    /// <summary>
    /// Set the Cloudflare API values explicitly.
    /// </summary>
    /// <param name="userEmail"></param>
    /// <param name="apiKey"></param>
    /// <param name="zoneId"></param>
    public CloudflareCacheHelper(string userEmail, string apiKey, string zoneId)
    {
        _userEmail = userEmail;
        _apiKey = apiKey;
        _zoneId = zoneId;
    }

    /// <summary>
    /// A collection of file paths (max of 30) will be accepted for purging cache.
    /// </summary>
    /// <param name="filePaths"></param>
    /// <returns>Boolean value on success or failure.</returns>
    public bool PurgeSelectedFiles(List<string> filePaths)
    {
        CloudflareResponse purgeResponse = null;

        if (filePaths?.Count > 0)
        {
            try
            {
                HttpWebRequest purgeRequest = WebRequest.CreateHttp($"{ApiEndpoint}/zones/{_zoneId}/purge_cache");
                purgeRequest.Method = "POST";
                purgeRequest.ContentType = "application/json";
                purgeRequest.Headers.Add("X-Auth-Email", _userEmail);
                purgeRequest.Headers.Add("X-Auth-Key", _apiKey);

                #region Create list of Files for Submission In The Structure The Response Requires

                CloudflareFileInfo fileInfo = new CloudflareFileInfo
                {
                    Files = filePaths
                };

                byte[] data = Encoding.ASCII.GetBytes(JsonConvert.SerializeObject(fileInfo));

                purgeRequest.ContentLength = data.Length;

                using (Stream fileStream = purgeRequest.GetRequestStream())
                {
                    fileStream.Write(data, 0, data.Length);
                    fileStream.Flush();
                }

                #endregion

                using (WebResponse response = purgeRequest.GetResponse())
                {
                    using (StreamReader purgeStream = new StreamReader(response.GetResponseStream()))
                    {
                        string responseJson = purgeStream.ReadToEnd();

                        if (!string.IsNullOrEmpty(responseJson))
                            purgeResponse = JsonConvert.DeserializeObject<CloudflareResponse>(responseJson);
                    }
                }
            }
            catch (Exception ex)
            {
                throw ex;
            }

            return purgeResponse.Success;
        }

        return false;
    }

    #region Cloudflare Class Objects

    public class CloudflareFileInfo
    {
        [JsonProperty("files")]
        public List<string> Files { get; set; }
    }

    public class CloudflareZone
    {
        [JsonProperty("id")]
        public string Id { get; set; }

        [JsonProperty("type")]
        public string Type { get; set; }

        [JsonProperty("name")]
        public string Name { get; set; }

        [JsonProperty("content")]
        public string Content { get; set; }

        [JsonProperty("proxiable")]
        public bool Proxiable { get; set; }

        [JsonProperty("proxied")]
        public bool Proxied { get; set; }

        [JsonProperty("ttl")]
        public int Ttl { get; set; }

        [JsonProperty("priority")]
        public int Priority { get; set; }

        [JsonProperty("locked")]
        public bool Locked { get; set; }

        [JsonProperty("zone_id")]
        public string ZoneId { get; set; }

        [JsonProperty("zone_name")]
        public string ZoneName { get; set; }

        [JsonProperty("modified_on")]
        public DateTime ModifiedOn { get; set; }

        [JsonProperty("created_on")]
        public DateTime CreatedOn { get; set; }
    }

    public class CloudflareResultInfo
    {
        [JsonProperty("page")]
        public int Page { get; set; }

        [JsonProperty("per_page")]
        public int PerPage { get; set; }

        [JsonProperty("count")]
        public int Count { get; set; }

        [JsonProperty("total_count")]
        public int TotalCount { get; set; }
    }

    public class CloudflareResponse
    {
        [JsonProperty("result")]
        public CloudflareZone Result { get; set; }

        [JsonProperty("success")]
        public bool Success { get; set; }

        [JsonProperty("errors")]
        public IList<object> Errors { get; set; }

        [JsonProperty("messages")]
        public IList<object> Messages { get; set; }

        [JsonProperty("result_info")]
        public CloudflareResultInfo ResultInfo { get; set; }
    }

    #endregion
}
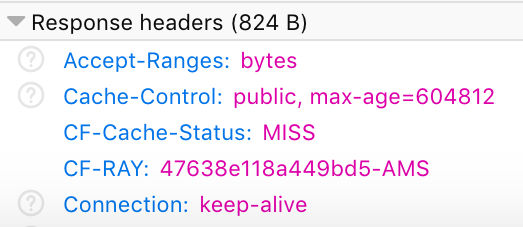
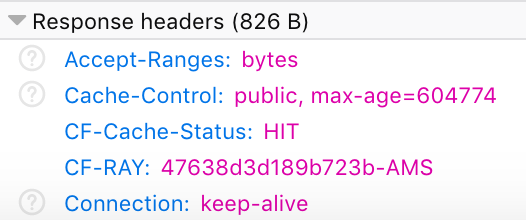
Example - Purging Cache of Two Files
A string collection of URL's can be passed into the method to allow for the cache of a batch of files to be purged in a single request. If all goes well, the success response should be true.
CloudflareCacheHelper cloudflareCache = new CloudflareCacheHelper();

bool isSuccess = cloudflareCache.PurgeSelectedFiles(new List<string> {
                                    "https://www.surinderbhomra.com/getmedia/7907d934-805f-4bd3-86e7-a6b2027b4ba6/CloudflareResponseMISS.png",
                                    "https://www.surinderbhomra.com/getmedia/89679ffc-ca2f-4c47-8d41-34a6efdf7bb8/CloudflareResponseHIT.png"
                                });
Rate Limits
The Cloudflare API sets a maximum of 1,200 requests in a five minute period. Cache-Tag purging has a lower rate limit of up to 2,000 purge API calls in every 24 hour period. You may purge up to 30 tags in one API call.