Blog

Tagged by 'javascript'

  • While manually importing data into a Google Sheet to complete the boring chore of data restructuring, I wondered if there was any way that the initial import might be automated. After all, it would be much more efficient to link directly to an external platform to populate a spreadsheet.

    Google App Scripts provides a UrlFetchApp service giving us the ability to make HTTP POST and GET requests against an API endpoint. The following code demonstrates a simple API request to a HubSpot endpoint that will return values from a Country field by performing a GET request with an authorization header.

    function run() {
      apiFetch();
    }
    
    function apiFetch() {
      // API Endpoint options, including header options.
      var apiOptions = {
         "async": true,
         "crossDomain": true,
         "method" : "GET",
         "headers" : {
           "Authorization" : "Bearer xxx-xxx-xxxxxxx-xxxxxx-xxxxx",
           "cache-control": "no-cache"
         }
       };
    
      // Fetch contents from API endpoint.
      const apiResponse = UrlFetchApp.fetch("https://api.hubapi.com/crm/v3/properties/contact/country?archived=false", apiOptions);
      
      // Parse response as as JSON object.
      const data = JSON.parse(apiResponse.getContentText());
    
      // Populate "Sheet1" with data from API.
      if (data !== null && data.options.length > 0) {
          // Select the sheet.
          const activeSheet = SpreadsheetApp.getActiveSpreadsheet();
          const sheet = activeSheet.getSheetByName("Sheet1");
    
          for (let i = 0; i < data.options.length; i++) {
            const row = data.options[i];
    
            // Add value cells in Google sheet.
            sheet.getRange(i+1, 1).setValue(row.label);
          }
      }
    }
    

    When this script is run, a request is made to the API endpoint to return a JSON response containing a list of countries that will populate the active spreadsheet.

    The Google App Script official documentation provides even more advanced options for configuring the UrlFetchAppservice to ensure you are not limited in how you make your API requests.

    In such little code, we have managed to populate a Google Sheet from an external platform. I can see this being useful in a wide variety of use cases to make a Google Sheet more intelligent and reduce manual data entry.

    In the future, I'd be very interested in trying out some AI-related integrations using the ChatGPT API. If I manage to think of an interesting use case, I'd definitely write a follow-up blog post.

  • There are times when you need to call multiple API endpoints to return different data based on the same data structure. Normally, I'd go down the approach of manually creating multiple Axios GET requests and then inserting the endpoint responses into a single object array. But there is a more concise and readable way to handle such tasks.

    With the help of DummyJson.com, we will be using the product search endpoint to search for different products to consolidate into a single array of product objects: /products/search?q=.

    As you can see from the code below, we start off by populating an array with a list of API endpoints where multiple GET request can be carried out for each endpoint from our array. The requests variable contains an array of promises based on each of these GET requests.

    Finally, axios.all() allows us to to make multiple HTTP requests to our endpoints altogether. This function can only iterate through a collection of promises. For more information regarding this Axios function, I found the following article very insightful for a better understanding: Using axios.all to make concurrent requests.

    // List all endpoints.
    let endpoints = [
      'https://dummyjson.com/products/search?q=Laptop',
      'https://dummyjson.com/products/search?q=phone',
    ];
    
    // Perform a GET request on all endpoints.
    const requests = endpoints.map((url) => axios.get(url));
    
    // Loop through the requests and output the data.
    axios.all(requests).then((responses) => {
    	let data = [];
    
      responses.forEach((resp) => {
    	  data.push(...resp.data.products)
      });
      
      // Output consolidated array to the page.
      const template = $.templates("#js-product-template");
      const htmlOutput = template.render(data);
    
      $("#result").html(htmlOutput);
    });
    

    As we're looping through each request, we push the response to our data array. It is here where we merge all requests together into a single array of objects. To make things a little more easier to display the results to the page, I use the jsrender.js templating plugin.

    A working demo can be seen on JsFiddle.

  • I've been delving further into the world of Google App Scripts and finding it my go-to when having to carry out any form of data manipulation. I don't think I've ever needed to develop a custom C# based import tool to handle the sanitisation and restructuring of data ever since learning the Google App Script approach.

    In this post, I will be discussing how to search for a value within a Google Sheet and return all columns within the row the searched value resides. As an example, let's take a few columns from a dataset of ISO-3166 Country and Region codes as provided by this CSV file and place them in a Google Sheet named "Country Data".

    The "Country Data" sheet should have the following structure:

    name alpha-2 alpha-3 country-code
    Australia AU AUS 036
    Austria AT AUT 040
    Azerbaijan AZ AZE 031
    United Kingdom of Great Britain and Northern Ireland GB GBR 826
    United States of America US USA 840

    App Script 1: Returning A Single Row Value

    Our script will be retrieving the two-letter country code by the country name - in this case "Australia". To do this, the following will be carried out:

    1. Perform a search on the "Country Data" sheet using the findAll() function.
    2. The getRow() function will return single row containing all country information.
    3. A combination of getLastColumn() and getRange() functions will output values from the row.
    function run() {
      var twoLetterIsoCode = getCountryTwoLetterIsoCode("Australia"); 
    }
    
    function getCountryTwoLetterIsoCode(countryName) {
      var activeSheet = SpreadsheetApp.getActiveSpreadsheet();
      var countryDataSheet = activeSheet.getSheetByName('Country Data');
    
      // Find text within sheet.
      var textSearch = countryDataSheet.createTextFinder(countryName).findAll();
    
      if (textSearch.length > 0) {
        // Get single row from search result.
        var row = textSearch[0].getRow();    
        // Get the last column so we can use for the row range.
        var rowLastColumn = countryDataSheet.getLastColumn();
        // Get all values for the row.
        var rowValues = countryDataSheet.getRange(row, 1, 1, rowLastColumn).getValues();
    
        return rowValues[0][1]; // Two-letter ISO code from the second column.
      }
      else {
        return "";
      }
    }
    

    When the script is run, the twoLetterIsoCode variable will contain the two-letter ISO code: "AU".

    App Script 2: Returning Multiple Row Matches

    If we had a dataset that contained multiple matches based on a search term, the script from the first example can be modified using the same fundamental functions. In this case, all we need to do is use a for loop and pass all row values to an array.

    The getCountryTwoLetterIsoCode() will look something like this:

    function getCountryTwoLetterIsoCode(countryName) {
      var activeSheet = SpreadsheetApp.getActiveSpreadsheet();
      var countryDataSheet = activeSheet.getSheetByName('Country Data');
    
      // Find text within sheet.
      var textSearch = countryDataSheet.createTextFinder(countryName).findAll();
    
      // Array to store all matched rows.
      var searchRows = [];
    
      if (textSearch.length > 0) {
        // Loop through matches.
        for (var i=0; i < textSearch.length; i++) {
          var row = textSearch[i].getRow();  
          // Get the last column so we can use for the row range.
          var rowLastColumn = countryDataSheet.getLastColumn();
          // Get all values for the row.
          var rowValues = countryDataSheet.getRange(row, 1, 1, rowLastColumn).getValues(); 
    
          searchRows.push(rowValues);
        }
      }
    
      return searchRows;
    }
    

    The searchRows array will contain a collection of matched rows as well as the column data. To carry out a similar output as shown in the first App Script example - the two-letter country code, the function can be called in the following way:

    // Get first match.
    var matchedCountryData = getCountryTwoLetterIsoCode("Australia")[0];
    
    // Get the second column value (alpha-2).
    var twoLetterIsoCode = matchedCountryData[0][1];
    

    Conclusion

    Both examples have demonstrated different ways of returning row values of a search term. The two key lines of code that allows us to do this are:

    // Get the last column so we can use for the row range.
    var rowLastColumn = countryDataSheet.getLastColumn();
    
    // Get all values for the row.
    var rowValues = countryDataSheet.getRange(row, 1, 1, rowLastColumn).getValues();
    
  • It's not often you happen to stumble across a piece of code written around nine or ten years ago with fond memories. For me, it's a jQuery Countdown timer I wrote to be used in a quiz for a Sky project called The British at my current workplace - Syndicut.

    It is only now, all these years later I've decided to share the code for old times sake (after a little sprucing up).

    This countdown timer was originally used in quiz questions where the user had a set time limit to correctly answer a set of multiple-choice questions as quickly as possible. The longer they took to respond, the fewer points they received for that question.

    If the selected answer was correct, the countdown stopped and the number of points earned and time taken to select the answer was displayed.

    Demonstration of the countdown timer in action:

    Quiz Countdown Demo

    Of course, the version used in the project was a lot more polished.

    Code

    JavaScript

    const Timer = {
        ClockPaused: false,
        TimerStart: 10,
        StartTime: null,
        TimeRemaining: 0,
        EndTime: null,
        HtmlContainer: null,
    
        "Start": function(htmlCountdown) {
            Timer.StartTime = (new Date()).getTime() - 0;
            Timer.EndTime = (new Date()).getTime() + Timer.TimerStart * 1000;
    
            Timer.HtmlContainer = $(htmlCountdown);
    				
            // Ensure any added styles have been reset.
            Timer.HtmlContainer.removeAttr("style");
    
            Timer.DisplayCountdown();
            
            // Ensure message is cleared for when the countdown may have been reset.
            $("#message").html("");     
            
            // Show/hide the appropriate buttons.
            $("#btn-stop-timer").show();
            $("#btn-start-timer").hide();
            $("#btn-reset-timer").hide();
        },
        "DisplayCountdown": function() {
            if (Timer.ClockPaused) {
                return true;
            }
    
            Timer.TimeRemaining = (Timer.EndTime - (new Date()).getTime()) / 1000;
    
            if (Timer.TimeRemaining < 0) {
                Timer.TimeRemaining = 0;
            }
    
            //Display countdown value in page.
            Timer.HtmlContainer.html(Timer.TimeRemaining.toFixed(2));
    
            //Calculate percentage to append different text colours.
            const remainingPercent = Timer.TimeRemaining / Timer.TimerStart * 100;
            if (remainingPercent < 15) {
                Timer.HtmlContainer.css("color", "Red");
            } else if (remainingPercent < 51) {
                Timer.HtmlContainer.css("color", "Orange");
            }
    
            if (Timer.TimeRemaining > 0 && !Timer.ClockPaused) {
                setTimeout(function() {
                    Timer.DisplayCountdown();
                }, 100);
            } 
            else if (!Timer.ClockPaused) {
                Timer.TimesUp();
            }
        },
        "Stop" : function() {
            Timer.ClockPaused = true;
            
            const timeTaken = Timer.TimerStart - Timer.TimeRemaining;
            
            $("#message").html("Your time: " + timeTaken.toFixed(2));
            
            // Show/hide the appropriate buttons.        
            $("#btn-stop-timer").hide();
            $("#btn-reset-timer").show();
        },
        "TimesUp" : function() {
            $("#btn-stop-timer").hide();
            $("#btn-reset-timer").show();
            
            $("#message").html("Times up!");        
        }
    };
    
    $(document).ready(function () {
        $("#btn-start-timer").click(function () {
        	Timer.Start("#timer");
        });
        
        $("#btn-reset-timer").click(function () {
        	Timer.ClockPaused = false;
        	Timer.Start("#timer");
        });
        
        $("#btn-stop-timer").click(function () {
            Timer.Stop();
        });
    });
    

    HTML

    <div id="container">
      <div id="timer">
        -.--
      </div>
      <br />
      <div id="message"></div>
      <br />  
      <button id="btn-start-timer">Start Countdown</button>
      <button id="btn-stop-timer" style="display:none">Stop Countdown</button>
      <button id="btn-reset-timer" style="display:none">Reset Countdown</button>
    </div>
    

    Final Thoughts

    When looking over this code after all these years with fresh eyes, the jQuery library is no longer a fixed requirement. This could just as easily be re-written in vanilla JavaScript. But if I did this, it'll be to the detriment of nostalgia.

    A demonstration can be seen on my jsFiddle account.

  • Whenever there is a need to restructure an Excel spreadsheet to an acceptable form to be used for a SaaS platform or custom application, my first inclination is to build something in C# to get the spreadsheet into a form I require.

    This week I felt adventurous and decided to break the mundane job of formatting a spreadsheet using an approach I've been reading up on for some time but just never got a chance to apply in a real-world scenario - Google App Scripts.

    What Is A Google App Script?

    Released in 2009, Google App Scripts is a cloud-based platform that allows you to automate tasks across Google Workspace products such as Drive, Docs, Sheets, Calendar, Gmail, etc. You could think of App Scripts as similar to writing a macro in Microsoft Office. They both can automate repeatable tasks and extend the standard features of the application.

    The great thing about Google App Script development is being able to use popular web languages (HTML/CSS/JavaScript) to build something custom. Refreshing when compared to the more archaic option of using VBA in Microsoft Office.

    Some really impressive things can be achieved using App Scripts within the Google ecosystem.

    Google Sheets App Script

    The Google App Script I wrote fulfils the job of taking the contents of cells in a row from one spreadsheet to be copied into another. The aim is to carry out automated field mapping, where the script would iterate through each row from the source spreadsheet and create a new row in the target spreadsheet where the cell value would be placed in a different column.

    This example will demonstrate a very simple approach where the source spreadsheet will contain five columns where each row contains numbers in ascending order to then be copied to the target spreadsheet in descending order.

    Before we add the script, we need to create two spreadsheets:

    • Source sheet: Source - Numbers Ascending
    • Target sheet: Destination - Numbers Descending

    The source sheet should mirror the same structure as the screenshot (below) illustrates.

    Google Sheet - Source

    The target sheet just needs to contain the column headers.

    The App Script can be created by:

    1. Navigating to Extensions > App Scripts from the toolbar. This will open a new tab presenting an interface to manage our scripts.
    2. In the "Files" area, press the "+" and select "Script".
    3. Name the script file: "export-cells-demo.gs".

    Add the following code:

    // Initialiser.
    function run() {
      sendDataToDestinationSpreadSheet();
    }
    
    // Copies values from a source spreadsheet to the target spreadsheet.
    function sendDataToDestinationSpreadSheet() {
      var activeSheet = SpreadsheetApp.getActiveSpreadsheet();
    
      // Get source spreadsheet by its name.
      var sourceSheet = activeSheet.getSheetByName('Source - Numbers Ascending');
    
      // Select the source spreadsheet cells.
      var sourceColumnRange = sourceSheet.getRange('A:E');
      var sourceColumnValues = sourceColumnRange.getValues();
    
      // Get target spreadsheet by its name..
      var targetSheet = activeSheet.getSheetByName('Destination - Numbers Descending');
    
      // Iterate through all rows from the source sheet.
      // Start index at 1 to ignore the column header.
      for(var i = 1; i < sourceColumnValues.length; i++) {
        // Get the cell value for the row.
        var column1 = sourceColumnValues[0,i][0];
        var column2 = sourceColumnValues[0,i][1];
        var column3 = sourceColumnValues[0,i][2];
        var column4 = sourceColumnValues[0,i][3];
        var column5 = sourceColumnValues[0,i][4];
        
        // Use getRange() to get the value position by declaring the row and column number.
        // Use setValue() to copy the value into target spreadsheet column.
        targetSheet.getRange(i+1, 1).setValue(column5);
        targetSheet.getRange(i+1, 2).setValue(column4);
        targetSheet.getRange(i+1, 3).setValue(column3);
        targetSheet.getRange(i+1, 4).setValue(column2);
        targetSheet.getRange(i+1, 5).setValue(column1);
      }
    }
    

    The majority of this script should be self-explanatory with the aid of comments. The only part that requires further explanation is where the values in the target sheet are set, as this is where we insert the numbers for each row in descending order:

    ...
    ...
    targetSheet.getRange(i+1, 1).setValue(column5);
    targetSheet.getRange(i+1, 2).setValue(column4);
    targetSheet.getRange(i+1, 3).setValue(column3);
    targetSheet.getRange(i+1, 4).setValue(column2);
    targetSheet.getRange(i+1, 5).setValue(column1);
    ...
    ...
    

    The getRange function accepts two parameters: Row Number and Column Number. In this case, the row number is acquired from the for loop index as we're using the same row position in both source and target sheets. However, we want to change the position of the columns in order to display numbers in descending order. To do this, I set the first column in the target sheet to contain the value of the last column from the source sheet and carried on from there.

    All the needs to be done now is to run the script by selecting our "run()" function from the App Scripts toolbar and pressing the "Run" button.

    The target spreadsheet should now contain the numbered values for each row in descending order.

    Google Sheet - Target

    Voila! You've just created your first Google App Script in Google Sheets with simple field mapping.

    Conclusion

    Creating my first Google App Script in a real-world scenario to carry out some data manipulation has opened my eyes to the possibilities of what can be achieved without investing additional time developing something like a Console App to do the very same thing.

    There is a slight learning curve involved to understand the key functions required to carry out certain tasks, but this is easily resolved with a bit of Googling and reading through the documentation.

    My journey into Google App Scripts has only just begun and I look forward to seeing what else it has to offer!

  • I've worked on numerous projects that required the user to upload a single or a collection of photos that they could then manipulate in some manner, whether it was adding filtering effects or morphing their face for TV show promotion.

    In any of these projects, the user's uploaded photo must be kept for a specific amount of time - long enough for the user to manipulate their image. The question that had always arisen in terms of GDPR, as well as development perspective, was: How long should the users' uploaded photos be stored?

    Previously, these photos were stored in the cloud in a temporary blob storage container, with an hourly task that removed images older than 6 hours. This also ensured that the storage container remained small in size, lowering usage costs.

    Then one day, it hit me... What if a user's uploaded photos could be stored locally through their own browser before any form of manipulation? Enter local storage...

    What Is Local Storage?

    Local storage allows data to be stored in the browser as key/value pairs. This data does not have a set expiration date and is not cleared when the browser is closed. Only string values can be stored in local storage - this will not be a problem, and we'll see in this post how we'll store a collection of images along with some data for each.

    Example: Storing Collection of Photos

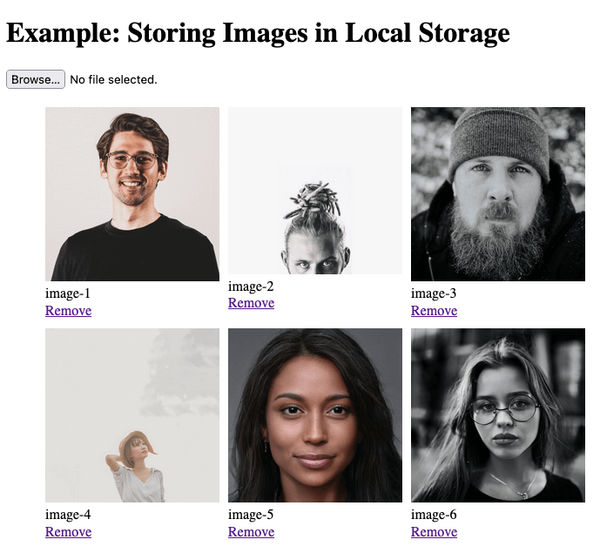
    The premise of this example is to allow the user to upload a collection of photos. On successful upload, their photo will be rendered and will have the ability to remove a photo from the collection. Adding and removing a photo will also cause the browser's localStorage` to be updated.

    Screenshot: Storing Images in Local Storage

    A live demo of this page can be found on my JSFiddle account: https://jsfiddle.net/sbhomra/bts3xo5n/.

    Code

    HTML

    <div>
      <h1>
        Example: Storing Images in Local Storage
      </h1>
      <input id="image-upload" type="file" />
      <ul id="image-collection">    
      </ul>
    </div>
    

    JavaScript

    const fileUploadLimit = 1048576; // 1MB in bytes. Formula: 1MB = 1 * 1024 * 1024.
    const localStorageKey = "images";
    let imageData = [];
    
    // Render image in HTML by adding to the unordered list.
    function renderImage(imageObj, $imageCollection) {
      if (imageObj.file_base64.length) {
        $imageCollection.append("<li><img src=\"data:image/png;base64," + imageObj.file_base64 + "\"  width=\"200\" /><br />" + imageObj.name + "<br /><a href=\"#\" data-timestamp=\"" + imageObj.timestamp + "\" class=\"btn-delete\">Remove</a></li>")
      }
    }
    
    // Add image to local storage.
    function addImage(imageObj) {
      imageData.push(imageObj);
      localStorage.setItem(localStorageKey, JSON.stringify(imageData));
    }
    
    // Remove image from local storage by timestamp.
    function removeImage(timestamp) {
      // Remove item by the timestamp.
      imageData = imageData.filter(img => img.timestamp !== timestamp);
    
      // Update local storage.
      localStorage.setItem(localStorageKey, JSON.stringify(imageData));
    }
    
    // Read image data stored in local storage.
    function getImages($imageCollection) {
      const localStorageData = localStorage.getItem(localStorageKey);
    
      if (localStorageData !== null) {
        imageData = JSON.parse(localStorage.getItem(localStorageKey))
    
        for (let i = 0; i < imageData.length; i++) {
          renderImage(imageData[i], $imageCollection);
        }
      }
    }
    
    // Delete button action to fire off deletion.
    function deleteImageAction() {
      $(".btn-delete").on("click", function(e) {
        e.preventDefault();
    
        removeImage($(this).data("timestamp"));
    
        // Remove the HTML markup for this image.
        $(this).parent().remove();
      })
    }
    
    // Upload action to fire off file upload automatically.
    function uploadChangeAction($upload, $imageCollection) {
      $upload.on("change", function(e) {
        e.preventDefault();
    
        // Ensure validation message is removed (if one is present).
        $upload.next("p").remove();
    
        const file = e.target.files[0];
    
        if (file.size <= fileUploadLimit) {
          const reader = new FileReader();
    
          reader.onloadend = () => {
            const base64String = reader.result
              .replace('data:', '')
              .replace(/^.+,/, '');
    
            // Create an object containing image information.
            let imageObj = {
              name: "image-" + ($imageCollection.find("li").length + 1),
              timestamp: Date.now(),
              file_base64: base64String.toString()
            };
    
            // Add To Local storage
            renderImage(imageObj, $imageCollection)
            addImage(imageObj);
    
            deleteImageAction();
    
            // Clear upload element.
            $upload.val("");
          };
    
          reader.readAsDataURL(file);
        } else {
          $upload.after("<p>File too large</p>");
        }
      });
    }
    
    // Initialise.
    $(document).ready(function() {
      getImages($("#image-collection"));
    
      // Set action events.
      uploadChangeAction($("#image-upload"), $("#image-collection"));
      deleteImageAction();
    });
    

    The key functions to look at are:

    • addImage()
    • removeImage()
    • getImages()

    Each of these functions uses JSON methods to store uploaded photos as arrays of objects. Each photo contains: name, timestamp and a base64 string. One common piece of functionality used across these functions is the use of JSON methods to help us store our collection of photos in local storage:

    • JSON.stringify() - to convert an array to a string.
    • JSON.parse() - to convert a JSON string into an object array for manipulation.

    When saving or retrieving your saved value from local storage, a unique identifier through a "key" needs to be set. In my example, I've set the following global variable that is referenced whenever I need to use the "localStorage" methods.

    const localStorageKey = "images";
    

    When saving to localStorage, we will have to stringify our array of objects:

    localStorage.setItem(localStorageKey, JSON.stringify(imageData));
    

    Retrieving our array requires us to convert the value from a string back into an object:

    imageData = JSON.parse(localStorage.getItem(localStorageKey))
    

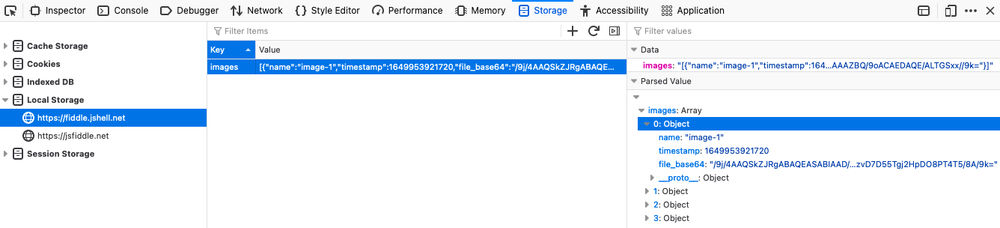
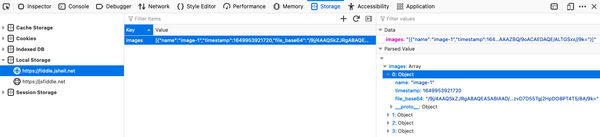
    After we've uploaded some images, we can see what's stored by going into your browsers (for Firefox) Web Developer Tools, navigating to the "Storage" tab and selecting your site. If using Chrome, go to the "Applications" tab and click on "Local Storage".

    Browser Developer Tools Displaying localStorage Values

    Storage Limits

    The maximum length of values that can be stored varies depending on the browser. The data size currently ranges between 2MB and 10MB.

    When I decided to use local storage to store user photos, I was concerned about exceeding storage limits, so I set an upload limit of 1MB per photo. When I get the chance to use my code in a real-world scenario, I intend to use Hermite Resize to implement some image compression and resizing techniques.

  • I created a simple GatsbyJS pagination component that would work in a similar way to my earlier ASP.NET Core version, where the user will be able to paginate through a list using the standard "Previous" and "Next" links as well as selecting individual page numbers.

    Like the ASP.NET Core version, I have tried to make this pagination component very portable, so there shouldn't be any issues in adding this straight into your project. Plug and play!

    import * as React from 'react'
    import { Link } from 'gatsby'
    import PropTypes from 'prop-types'
    
    // Create URL path for numeric pagination
    const getPageNumberPath = (currentIndex, basePath) => {
      if (currentIndex === 1) {
        return basePath
      }
      
      return `${basePath}/page-${(currentIndex)}`
    }
    
    // Create an object array of pagination numbers. 
    // The number of page numbers to render is set to 5.
    const getPaginationGroup = (basePath, currentPage, pageCount, noOfPagesNos = 5) => {
        let startPage = currentPage;
    
        if (startPage === 1 || startPage === 2 || pageCount < noOfPagesNos)
            startPage = 1;
        else
            startPage -= 2;
    
        let maxPage = startPage + noOfPagesNos;
    
        if (pageCount < maxPage) {
            maxPage = pageCount + 1
        }
    
        if (maxPage - startPage !== noOfPagesNos && maxPage > noOfPagesNos) {
            startPage = maxPage - noOfPagesNos;
        }
    
        let paginationInfo = [];
    
        for (let i = startPage; i < maxPage; i++) {        
            paginationInfo.push({
                number: i,
                url: getPageNumberPath(i, basePath),
                isCurrent: currentPage === i
            });
        }
    
        return paginationInfo;
    };
    
    export const Pagination = ({ pageInfo, basePath }) => {
        if (!pageInfo) 
            return null
    
        const { currentPage, pageCount } = pageInfo
    
        // Create URL path for previous and next buttons
        const prevPagePath = currentPage === 2 ? basePath : `${basePath}/page-${(currentPage - 1)}`
        const nextPagePath = `${basePath}/page-${(currentPage + 1)}`
        
        if (pageCount > 1) { 
            return (
                    <ol>
                        {currentPage > 1 ? 
                            <li>
                                <Link to={prevPagePath}>
                                    Go to previous page
                                </Link>
                            </li> : null}       
                        {getPaginationGroup(basePath, currentPage, pageCount).map((item, i) => {
                            return (
                                <li key={i}>
                                    <Link to={item.url} className={`${item.isCurrent ?  "is-current" : ""}`}>
                                        Go to page {item.number}
                                    </Link>
                                </li>
                            )
                        })}
                        {currentPage !== pageCount ?
                            <li>
                                <Link to={nextPagePath}>
                                    Go to next page
                                </Link>
                            </li> : null}
                    </ol>
            )
        }
        else {
            return null
        }
      }
    
    Pagination.propTypes = {
        pageInfo: PropTypes.object,
        basePath: PropTypes.string
    }
    
    export default Pagination;
    

    This component requires just two parameters:

    1. pageInfo: A page context object created when Gatsby generates the site pages. The object should contain two properties consisting of the current page the that is being viewed (currentPage) and total number of pages (pageCount).
    2. basePath: The parent URL of where the pagination component will reside. For example, if your listing page is "/customers", this will be the base path. The pagination component will then prefix this to construct URL's in the format of - "/customers/page-2".
  • There will be times where you will want to customise the slug based on fields from your markdown file. In my case, I wanted all my blog post URL's in the following format: /Blog/yyyy/MM/dd/Blog-Post-Title. There are two ways of doing this:

    1. Enter the full slug using a “slug” field within your markdown file.
    2. Use the onCreateNode() function found in the gatsby-node.js file to dynamically generate the slug.

    My preference would be option 2 as it gives us the flexibility to modify the slug structure in one place when required. If for some reason we had to update our slug structure at a later date, it would be very time consuming (depending on how many markdown files you have) to update the slug field within each markdown file if we went ahead with option 1.

    This post is suited for those who are storing their content using markdown files. I don’t think you will get much benefit if your Gatsby site is linked to a headless CMS, as the slugs are automatically generated within the platform.

    The onCreateNode() Function

    This function is called whenever a node is created or updated, which makes it the most ideal place to add the functionality we want to perform. It is found in the gatsby-node.js file

    What we need to do is retrieve the fields we would like to form part of our slug by accessing the nodes frontmatter. In our case, all we require is two fields:

    1. Post Date
    2. Slug
    exports.onCreateNode = ({ node, actions, getNode }) => {
        const { createNodeField } = actions
      
        if (node.internal.type === `MarkdownRemark`) {
          const relativeFilePath = createFilePath({ node, getNode, trailingSlash: false });
          const postDate = moment(node.frontmatter.date); // Use moment.js to easily change date format.
          const url = `/Blog/${postDate.format("YYYY/MM/DD")}${node.frontmatter.slug}`;
    
          createNodeField({
            name: `slug`,
            node,
            value: url,
          });
        }
      }
    

    After making this change, you will need to re-run the gatsby develop command.

  • I've been doing some personal research into improving my own JavaScript development. I decided to get more familiar with the new version of JavaScript - ES6. ES6 is filled to the brim with some really nice improvements that make JavaScript development much more concise and efficient. After having the opportunity to work on React and React Native projects, I had a chance in putting my new found ES6 knowledge to good use!

    If I had to describe ES6 in a sentence:

    JavaScript has gone on a diet and cut the fat. Write less, do more!

    I have only scratched the surface to what ES6 has to offer and will continue to add more to the list as I learn. If you are familiar with server-side development, you might notice some similarities from a syntax perspective. That in itself shows how far ES6 has pushed the boundaries.

    Arrow Functions

    Arrow functions are beautiful and so easy on the eye when scrolling through vast amounts of code. You'll see with arrow functions, you'll have the option to condense a function that consists of many lines all the way down to single line.

    The traditional way we are all familiar with:

    // The "old school" way..
    function addSomeNumbers(a, b) {
        return a + b;
    }
    
    console.log(addSomeNumbers(1, 2));
    // Output: 3
    

    ES6:

    // ES6.
    const addSomeNumbers = (a, b) => {
        return a + b;
    }
    
    console.log(addSomeNumbers(1, 2));
    // Output: 3
    

    The traditional and ES6 way can still be used in the same way to achieve our desired output. But we can condense out arrow function further:

    // Condensed ES6 arrow function.
    const addSomeNumbers = (a, b) => a + b;
    
    console.log(addSomeNumbers(1, 2));
    // Output: 3
    

    Default Function Parameters

    When developing using server-side languages, such as C# you have the ability to set default values on the parameters used for your functions. This is great, since you have more flexibilty in using a function over a wider variety of circumstances without the worry of compiler errors if you haven't satisfied all function parameters.

    Lets expand our "addSomeNumbers()" function from our last section to use default parameters.

    // Condensed ES6 arrow function with default parameters.
    const addSomeNumbers = (a=0, b=0) => a + b;
    
    console.log(addSomeNumbers());
    // Output: 0
    

    This is an interesting (but somewhat useless) example where I am using "addSomeNumbers()" function without passing any parameters. As a result the value 0 is returned and even better - no compiler error.

    Destructuring

    Destructuring sounds scary and complex. In its simple terms, destructuring is the process of adding values to an object or array to an existing variable more straightforward. Lets start of with a simple object and how we can output these values:

    // Some info on my favourite Star Trek starship...
    const starship = {
      registry: "NCC-1701-E",
        captain: "Jean Luc Picard",
        launch_date: "October 30, 2372",
        spec: {
          max_warp: 9.995,
          mass: "3,205,000 metric tons",
          length: "685.7 meters",
          width: "250.6 meters",
          height: "88.2 meters"
      }
    };
    

    We would normally output the these values in the following way:

    var registry = starship.registry; // Output: NCC-1701-E
    var captain = starship.captain; // Output: Jean Luc Picard
    var launchDate = starship.launch_date; // Output: October 30, 2372
    

    This works well, but the process of returning those values is a little repetitive and spread over many lines. Lets get a bit more focus and go down the ES6 route:

    const { registry, captain, launch_date } = starship;
    
    console.log(registry); // Output: NCC-1701-E 
    

    How amazing is that? We've managed to select a handful of these fields on one line to do something with.

    My final example in the use of destructuring will evolve around an array of items - in this case names of starship captains:

    const captains = ["James T Kirk", "Jean Luc Picard", "Katherine Janeway", "Benjamin Sisko"]
    

    Here is how I would return the first two captains in ES5 and ES6:

    // ES5
    var tos = captains[0];
    var tng = captains[1];
    
    // ES6
    const [tos, tng ] = captains;
    

    You'll see similarities to our ES6 approach for getting the values out of an array as we did when using an object. The only thing I need to look into is how to get the first and last captain from my array? Maybe that's for a later post.

    Before I end the destructuring topic, I'll add this tweet - a visual feast on the basis of what destructuring is...

    Destructuring. Courtesy of @NikkitaFTW pic.twitter.com/j8OX3VyrTL
    — Burke Holland (@burkeholland) May 31, 2018

    Spread Operator

    The spread operator has to be my favourite ES6 feature, purely because in my JavaScript applications I do a lot of data manipulation. If you can get your head around destructuring and the spread operator, you'll find working with data a lot easier. A spread operator is "...". Yes three dots - ellipsis if you prefer. This allows you to copy the values of an object to be used as a basis of a new object.

    In its basic form:

    const para1 = ["to", "boldly", "go"];
    const para2 = [...para1, "where", "no", "one"];
    const para3 = [...para2, "has", "gone", "before"];
    
    console.log(para1); // Output: ["to", "boldly", "go"]
    console.log(para2); // Output: ["to", "boldly", "go", "where", "no", "one"]
    console.log(para3); // Output: ["to", "boldly", "go", "where", "no", "one", "has", "gone", "before"]
    

    As you can see from my example above, the spread operator used on variables "para1" and "para2" creates a shallow copy of the array values into our new array. Gone are the days of having to use a for loop to get the values.

  • For one of my side projects, I was asked to use Butter CMS to allow for basic blog integration using JavaScript. I have never heard or used Butter CMS before and was intrigued to know more about the platform.

    Butter CMS is another headless CMS variant that allows a developer to utilise API endpoints to push content to an application via an arrange of approaches. So nothing new here. Just like any headless CMS, the proof is in the pudding when it comes to the following factors:

    • Quality of features
    • Ease of integration
    • Price points
    • Quality of documentation

    I haven't had a chance to properly look into what Butter CMS fully has to offer, but from what I have seen from working on the requirements for this side project I was pleasently surprised. Found it really easy to get setup with minimal amount of fuss! For this project I used Butter CMS's Blog Engine package, which does exactly what it says on the tin. All the fields you need for writing blog posts are already provided.

    JavaScript Code

    My JavaScipt implementation is pretty basic and provides the following functionality:

    • Outputs a list of posts consisting of title, date and summary text
    • Pagination
    • Output a single blog post

    All key functionality is derived from the "ButterCMS" JavaScript file:

    /*****************************************************/
    /*                    Butter CMS                                 */
    /*****************************************************/
    var ButterCMS =
    {
        ButterCmsObj: null,
    
        "Init": function () {
            // Initiate Butter CMS.
            this.ButterCmsObj = new ButterCmsBlogData();
            this.ButterCmsObj.Init();
        },
        "GetBlogPosts": function () {
            BEButterCMS.ButterCmsObj.GetBlogPosts(1);
        },
        "GetSinglePost": function (slug) {
            BEButterCMS.ButterCmsObj.GetSinglePost(slug);
        }
    };
    
    /*****************************************************/
    /*                Butter CMS Data                         */
    /*****************************************************/
    function ButterCmsBlogData() {
        var apiKey = "<Enter API Key>",
            baseUrl = "/",
            butterInstance = null,
            $blogListingContainer = $("#posts"),
            $blogPostContainer = $("#post-individual"),
            pageSize = 10;
    
        // Initialise of the ButterCMSData object get the data.
        this.Init = function () {
            getCMSInstance();
        };
    
        // Returns a list of blog posts.
        this.GetBlogPosts = function (pageNo) {
            // The blog listing container needs to be cleared before any new markup is pushed.
            // For example when the next page of data is requested.
            $blogListingContainer.empty();
    
            // Request blog posts.
            butterInstance.post.list({ page: pageNo, page_size: pageSize }).then(function (resp) {
                var body = resp.data,
                    blogPostData = {
                        posts: body.data,
                        next_page: body.meta.next_page,
                        previous_page: body.meta.previous_page
                    };
    
                for (var i = 0; i < blogPostData.posts.length; i++) {
                    $blogListingContainer.append(blogPostListItem(blogPostData.posts[i]));
                }
    
                //----------BEGIN: Pagination--------------//
    
                $blogListingContainer.append("<div>");
    
                if (blogPostData.previous_page) {
                    $blogListingContainer.append("<a class=\"page-nav\" href=\"#\" data-pageno=" + blogPostData.previous_page + " href=\"\">Previous Page</a>");
                }
    
                if (blogPostData.next_page) {
                    $blogListingContainer.append("<a class=\"page-nav\" href=\"#\" data-pageno=" + blogPostData.next_page + " href=\"\">Next Page</a>");
                }
    
                $blogListingContainer.append("</div>");
    
                paginationOnClick();
    
                //----------END: Pagination--------------//
            });
        };
    
        // Retrieves a single blog post based on the current URL of the page if a slug has not been provided.
        this.GetSinglePost = function (slug) {
            var currentPath = location.pathname,
                blogSlug = slug === null ? currentPath.match(/([^\/]*)\/*$/)[1] : slug;
    
            butterInstance.post.retrieve(blogSlug).then(function (resp) {
                var post = resp.data.data;
    
                $blogPostContainer.append(blogPost(post));
            });
        };
    
        // Renders the HTML markup and fields for a single post.
        function blogPost(post) {
            var html = "";
    
            html = "<article>";
    
            html += "<h1>" + post.title + "</h1>";
            html += "<div>" + blogPostDateFormat(post.created) + "</div>";
            html += "<div>" + post.body + "</div>";
            
            html += "</article>";
    
            return html;
        }
    
        // Renders the HTML markup and fields when listing out blog posts.
        function blogPostListItem(post) {
            var html = "";
    
            html = "<h2><a href=" + baseUrl + post.url + ">" + post.title + "</a></h2>";
            html += "<div>" + blogPostDateFormat(post.created) + "</div>";
            html += "<p>" + post.summary + "</p>";
    
            if (post.featured_image) {
                html += "<img src=" + post.featured_image + " />";
            }
    
            return html;
        }
    
        // Set click event for previous/next pagination buttons and reload the current data.
        function paginationOnClick() {
            $(".page-nav").on("click", function (e) {
                e.preventDefault();
                var pageNo = $(this).data("pageno"),
                    butterCmsObj = new ButterCmsBlogData();
    
                butterCmsObj.Init();
                butterCmsObj.GetBlogPosts(pageNo);
            });
        }
    
        // Format the blog post date to dd/MM/yyyy HH:mm
        function blogPostDateFormat(date) {
            var dateObj = new Date(date);
    
            return [dateObj.getDate().padLeft(), (dateObj.getMonth() + 1).padLeft(), dateObj.getFullYear()].join('/') + ' ' + [dateObj.getHours().padLeft(), dateObj.getMinutes().padLeft()].join(':');
        }
    
        // Get instance of Butter CMS on initialise to make one call.
        function getCMSInstance() {
            butterInstance = new Butter(apiKey);
        }
    }
    
    // Set a prototype for padding numerical values.
    Number.prototype.padLeft = function (base, chr) {
        var len = (String(base || 10).length - String(this).length) + 1;
    
        return len > 0 ? new Array(len).join(chr || '0') + this : this;
    };
    

    To get a list of blog posts:

    // Initiate Butter CMS.
    BEButterCMS.Init();
    
    // Get all blog posts.
    BEButterCMS.GetBlogPosts();
    

    To get a single blog post, you will need to pass in the slug of the blog post via your own approach:

    // Initiate Butter CMS.
    BEButterCMS.Init();
    
    // Get single blog post.
    BEButterCMS.GetSinglePost(postSlug);