Blog

Categorised by 'Sharepoint'.

  • I needed to create a web part that simply output all information from an Announcements list. Sounds simple doesn’t it? But I came across a compiler error when using the “Created By” and “Modified By” columns. The error was telling me that the columns I am trying to read in my code do not exist.

    After some Googling, I found out that SharePoint has something called “Internal Field Names”, whereby the display name of a column isn’t the actual column name. The full list of internal field names can be found at Michael Yeager's MSDN Blog.

    If ever in doubt, you can find out the internal field names within SharePoint, by carrying out the following:

    1. Go to your list and select “List Settings” from the ribbon.

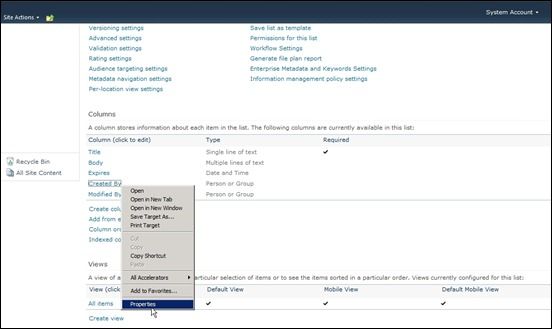
    2. Navigate to the where the list of columns are displayed and right click on the column in question. Select “Properties”.

    SP2010 Hidden Field Right Click

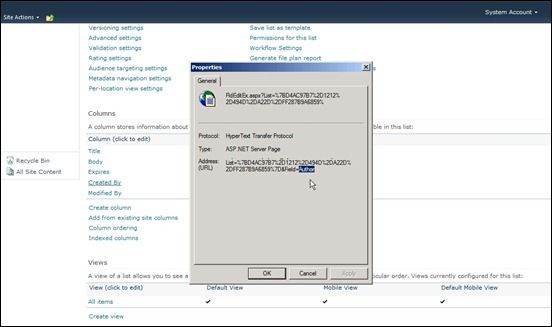
    1. When the link property window opens, scroll to the end of the “Address: (URL)” section. You will find a query string parameter called “Field”. This query string parameter contains the real field name.

    SP2010 Hidden Field Properties

    Confusing isn’t it? Well I guess it wouldn’t be SharePoint if the most simplest task failed to confuse a developer.

  • One of the best development features in making customisations within a SharePoint environment is the SPMetal tool. The SPMetal tool generates entity classes in order to use LINQ syntax to retrieve items from lists. The SPMetal.exe resides in the 14/bin folder. I will show you a quick demonstration on how I have generated a DataContext class using the SPMetal executable.

    You will need to create two files:

    1. XML file – containing the list or library name we are interested in generating our class from. In the code snippet (below), the list I am interested in is called Quicklinks.
    <?xml version="1.0" encoding="utf-8"?>
    <Web xmlns="http://schemas.microsoft.com/SharePoint/2009/spmetal">
      <List Name="Quicklinks" Member="Quicklinks" />
      <ExcludeOtherLists />
    </Web>
    

    Save the XML file into the 14/bin director and name it “SPMetalConfig.xml”.

    1. Batch File – will contain the SharePoint command prompt needed to fire the SPMetal executable. Creating a batch file is not required. You can run the command as normal through Windows Command Line. I just find it a lot easier to manage and make changes using a batch file.
    SET SPMETALDIR="C:\Program Files\Common Files\Microsoft Shared\Web Server Extensions\14\BIN\" 
    
    cd %SPMETALDIR% 
    
    spmetal.exe /web:http://myintranet /code:QuicklinksOMEnitites.cs /parameters:SPMetalConfig.xml
    

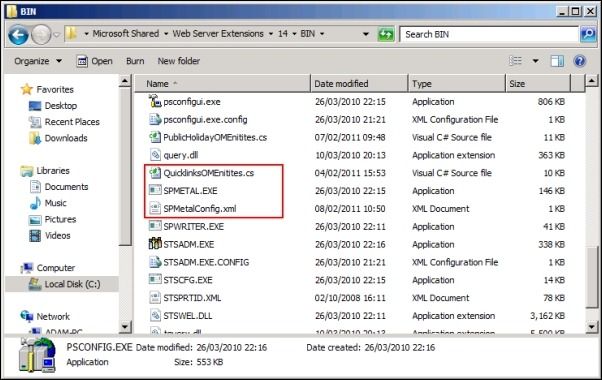
    Once this has run, a class called “QuicklinksOMEnitites.cs” will be generated in the 14/bin folder.

    SPMetal.exe

    One thing I did find when using SPMetal for retrieving list data to be output to a custom webpart was that it is only able to retrieve data from a site collection the list resides. But this is probably to be expected. So if the webpart was used in a separate site collection, no data will be shown. In order to get around this, SPMetal will not suffice. You will need to go through the code route and do the following:

    SPSecurity.RunWithElevatedPrivileges(delegate()
    {
        using (SPWeb intranetSite = new SPSite("http://myintranet/sites/depts/").OpenWeb())
        {
            SPList quickLinks = intranetSite.Lists.TryGetList("Quicklinks");
            
            if (quickLinks != null)
            {
                //Do something with list data.
            }                           
        }
    }); 
    
  • I have been developing custom web parts and SharePoint customisations for a couple years now. During the early stages of SharePoint development I found a great deal of confusion when trying to retrieve information from different areas of an intranet through using the SPSite and SPWeb methods.

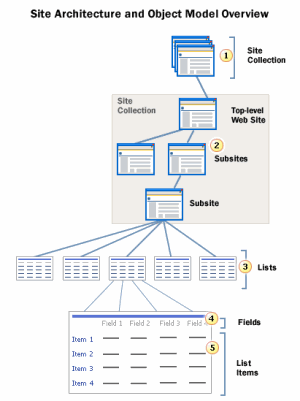
    I think any other developer who is starting out SharePoint development may encounter the same issue. What I found useful was the “Site Architecture and Object Model Overview” diagram from the MSDN site.

    SharePoint Site Architecture

    It nicely breaks down the architecture of a SharePoint site. I highly recommend that you take look at the following links containing more diagrams:

    Whilst I am talking about SPSite’s and SPWebs’s in this post, I’ll give you quick overview on how they work using the (above) diagram. Basically, the top level site collection (SPSite) contains your root web (SPWeb) and subsites (SPWebs under SPWebs). So, a subsite will be any site (SPWeb) under the top level web site in a site collection (SPSite).

  • In ASP.NET you would think when you use the “.Count” method that it would be able to simply return the total number of elements within a collection. In majority of cases this is right. Well, apart from when you use the “.Count” method against a collection of profiles within SharePoint. For example:

    UserProfileManager profileManager = new UserProfileManager(myContext);
    
    //Get total number of profiles
    int numberOfProfiles = profileManager.Count;
    

    I found that I came across two issues when using the code above:

    1. The incorrect number of profiles was returned.
    2. For some reason, when I deployed the code to a live server environment I kept on getting errors from the line where the count was being returned.

    From researching this issue on various blog posts and forums, it seems that UserProfileManager.Count does indeed have issues in returning the count correctly. The only way to get around this is to enumerate through the UserProfileManager:

    UserProfileManager profileManager = new UserProfileManager(myContext);
    
    int counter = 0;
    
    IEnumerator profileEnumerator = profileManager.GetEnumerator();
    while (profileEnumerator.MoveNext())
    {
        counter++;
    }
    
    //Number of profiles
    int totalNumberOfProfiles = counter;
    

    This will give us an accurate number of profiles that are stored within SharePoint and without any silly errors.

  • I have been building a custom .NET web part page to use in my SharePoint intranet. The .NET page has quite a lot of custom HTML and jQuery design elements, so using CSS and JavaScript files were essential.

    As you know, when we want to use elements from our CSS and JavaScript files we normally add the following lines of HTML at the top of our page:

    <!-- CSS -->
    <link type="text/css" rel="stylesheet" href="site.css" />
    
    <!-- JavaScript -->
    <script src="jQuery.js" type="text/javascript" />
    

    If you added those lines of code in a custom SharePoint page, you’ll find that the page will ignore them. Thankfully, SharePoint has given us some controls to add these references.

    At this point its worth stating that I stored all my required JavaScript and CSS files within the “Style Library” directory situated in the root of any SharePoint 2010 intranet. In order to get these files I used controls called”CssRegistration” and “ScriptLink”:

    <!-- CSS -->
    <SharePoint:CssRegistration ID="CssRegistration1" Name="/Style Library/Home/CSS/jcarousel.css" runat="server" After="corev4.css" />
    
    <!-- JavaScript -->
    <SharePoint:ScriptLink ID="ScriptLink1" Name="~sitecollection/Style Library/Home/JS/jquery-1.4.4.min.js" runat="server" />
    

    If you have stored your CSS and JavaScript within the physical file directory situated in the 14 hive folder, you will need to modify the above example to the following:

    <!-- CSS -->
    <SharePoint:CSSRegistration Name="<% $SPUrl:~SiteCollection/Style Library/Core Styles/jcarousel.css%>" runat="server"/>
    
    <!-- JavaScript -->
    <SharePoint:ScriptLink ID="ScriptLink1" Name="<% $SPUrl:~SiteCollection/Style Library/Core Styles/jquery.js%>" runat="server" />
    

    The only difference between this example and our earlier example is that when we have just added “SPUrl” to get files relative to the current site collection.

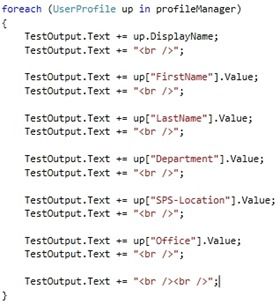
  • I am writing a custom webpart that will output user profile information from SharePoint 2010. My code requires me to get quite a few fields. Most of these fields are not “intellisensable” and cannot be accessed directly without having to manually enter the field name, as you can see from my code snippet below.

    User Profile Properties Code

    But its really easy to get the user field properties incorrect. A good example, is retrieving the office location. You would think the property name would be called “OfficeLocation” but its actually called “SPS-Location”.

    Luckily SharePoint allows us to view and access all the user profile properties we require and even create our own custom fields.

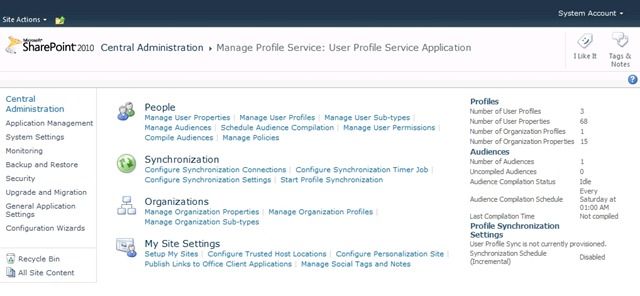
    Lets start by opening Central Administration and navigate to Manage Service Applications > User Profile Service Application, which will take you to the following page:

    User Profile Service Application

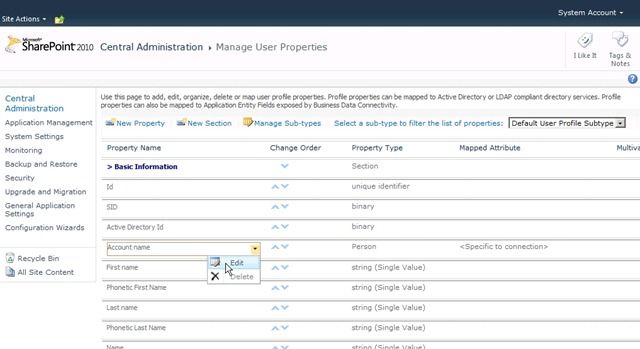
    Click on “Manage User Properties” to view a list of all user field properties SharePoint uses. To either rename the display name or view the actual property name, click on a field and press “Edit”.

    Manage User Properties

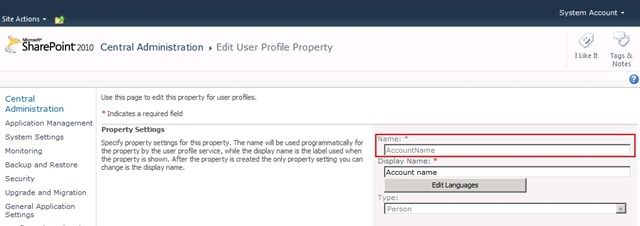
    The “Name” field (as highlighted below) is not editable and for a very good reason too! These are the property ID’s that we will call when wanting to retrieve their value. All default field names are not editable.

    Edit User Property

    As I stated earlier, you can create your own properties and call them whatever you want. But SharePoint already provides us with so many out-of-the-box, you probably won’t need to create anymore anytime soon.

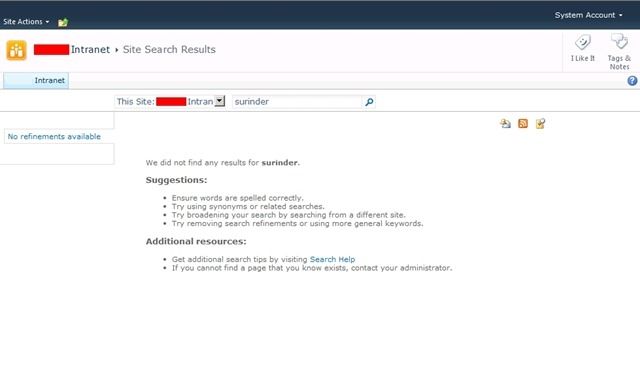
  • In my last post, I showed you how to create an Enterprise Search page that consisted of both “Site” and “People” searches. Depending on how you have setup your search within Central Administration, you may find the “People” search not returning any results.

    Before we start, there are a few things you need to check. Firstly, ensure you have the necessary search services in working order. If you can carry out site searches you should be fine. Secondly, ensure the User Profile service has been setup sufficiently so that features such as MySites and Profile databases are working.

    In a straight-forward world, you would think that completing the steps above would be enough for SharePoint 2010 to allow you to search users within your site. But sadly we don’t live in a straight-forward world.

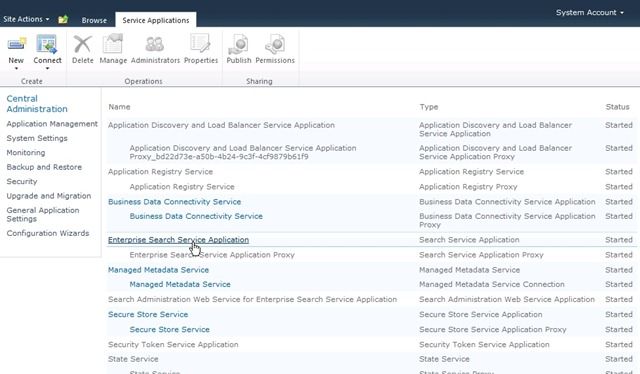
    Open Central Administration and navigate to “Manage Service Applications”. Within the list of services, select “Enterprise Search Service Application”.

    Manage Services Enterprise Search

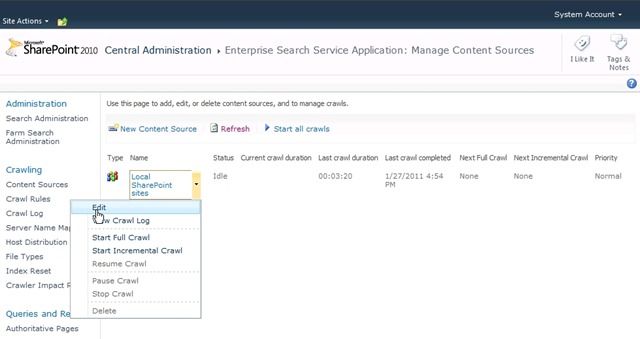
    In the “Enterprise Search Service Application” page, click on the “Content Sources” link you’ll find situated in the left hand navigation and open/edit your “Local SharePoint Sites” content source.

    Manage Content Sources

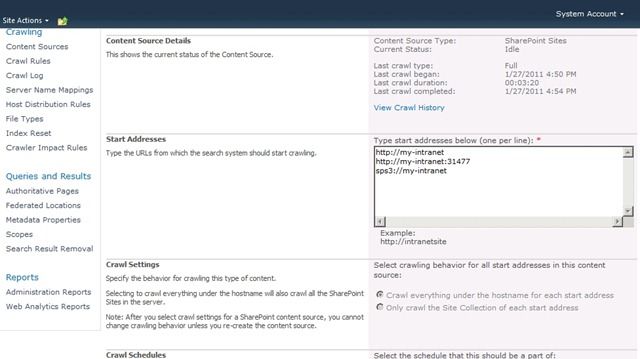
    In the Start Addresses section, you will see a box with entries similar to what I have in my SharePoint intranet below..well almost the same:

    Content Sources Start Addresses

    You will notice the line: “sps3://my-intranet” which tells SharePoint to call a specific web service hosted at that web address. In this case, the URL is the same one I use to access my main site collection. When you have added the “sps3://” line yourself press the “OK” button to save your changes.

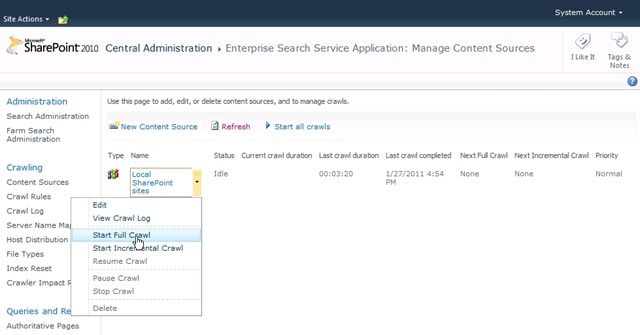
    There is just one last step we need to carry out: re-indexing our search. Navigate back to the “Enterprise Search Service Application” page and start full crawl.

    Manage Content Sources Recrawl

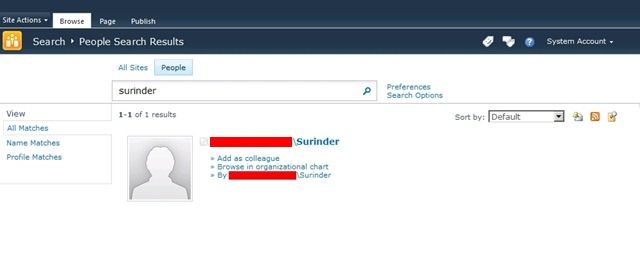
    Once this has completed all your user profiles should now be searchable.

    Enterprise People Search

  • Hooray! My first SharePoint 2010 blog post!

    I have been lucky enough to start working on my first SharePoint 2010 project. As you may know, things have definitely moved on from SharePoint 2007 to SharePoint 2010. Every new release of SharePoint seems to be a vast improvement over its predecessor that benefits both the end users and developers. But just as things get better and better, you’ll find yourself falling into the common trap of trying to apply what you have learnt in SharePoint 2007 to SharePoint 2010. I know I did.

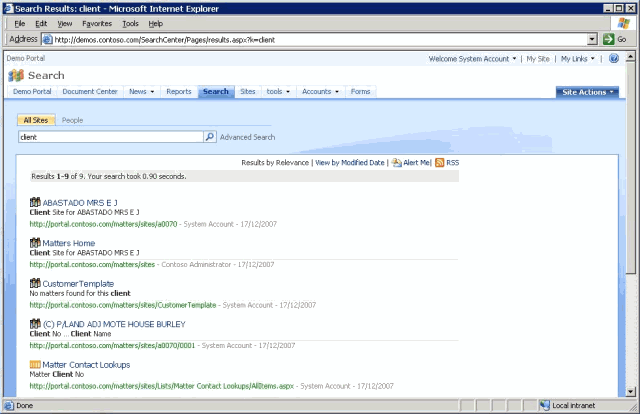
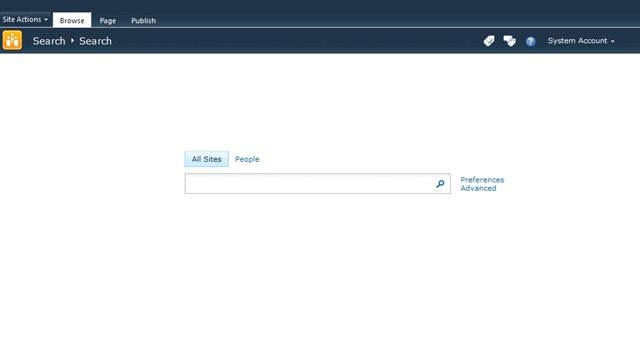
    A good example of this is having a search page that allows users to search “All Sites” or “People”, something we would see in a SharePoint 2007 search page as standard:

    MOSS 2007 Search

    I was surprised to find out that this wasn’t the search I would get by default. The SharePoint 2010 search is quite basic and out-of-the-box as you can see from the screenshot below:

    Sharepoint 2010 Original Search

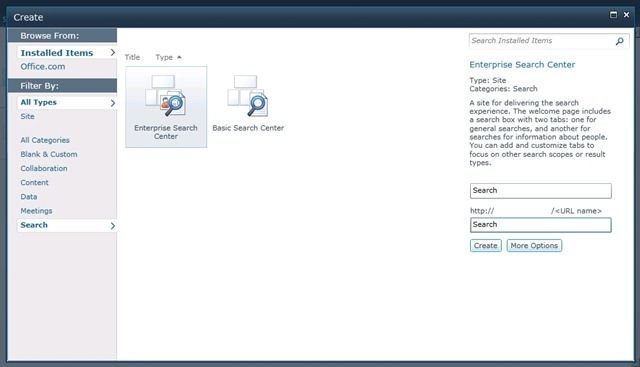
    In order to get a search page that includes both Site and People search (or as Enterprise Search as SharePoint 2010 now calls it), you have to carry out an additional step that simply requires creating a new site. So, go to “Site Actions” and click on “New Site”. When the popup opens, select the “Search” category and select “Enterprise Search”. Enter a page and name and URL name and click “Create”.

    Sharepoint 2010 New Site Enterprise Search

    If everything goes well, you should see a search page which looks like something like this:

    Sharepoint 2010 Enterprise Search Page

    Cool! So you now have the ability to carry out Site and People searches. But you may find the People search will not work if you carried out the same mistake I did where I missed out a key setting in Central Administration. I will blog about that within the next few days. TO BE CONTINUED...

    Post Updated: 30/01/2011 - Enable People Search in SharePoint 2010

  • In SharePoint 2003, you will notice when you change the name of a site, the change is not reflected in the intranet URL. Modifying the site name within “Site Settings” will only change the title that is displayed when you visit the site.

    You have two options to change the site name you see in the URL:

    1. Delete and recreate your site.
    2. Backup your current site and restore content elsewhere on the intranet.

    You really wouldn’t want to consider the first option if your SharePoint site currently stores high volume of information. The best option would be to carry out a backup and restore using SharePoint’s “stsadm” command prompt. The time it takes to run the backup and restore process will entirely depend on the size of your site.

    So here’s the scenario. We have an intranet that currently contains a site called “InsuranceClaims”. However, this site needs to add additional data relating to employee health schemes. The site name in the web address needs to be renamed to “InsuranceAndHealthClaims”. In order to make this change, the following needs to be carried out:

    1. Backup the “InsuranceClaims” site using the stsadm backup command. The site has been backed up to a file called insurancebackup.bak.
    stsadm.exe -o backup -url http://intranet.computing-studio.com/sites/insuranceclaims -filename C:\insurancebackup.bak
    
    1. Create a new site called “InsuranceAndHealthClaims” from the SharePoint intranet.
    2. Restore the contents of the backup to the new site using the stsadm restore command.
    stsadm.exe -o restore -url http://intranet.computing-studio.com/sites/insuranceandhealthclaims -filename C:\insurancebackup.bak
    

    Providing all goes well when you run the backup and restore stsadm commands, you should get a “Operation completed successfully” message.

  • As promised, I have been busy creating a custom web part to display Microsoft Charts within my SharePoint reporting dashboard. Before you even think of wanting to use Microsoft Chart in a SharePoint environment, there are a few boring tasks you need to carry out beforehand:

    Step 1: Copy Charting Files To SharePoint

    1. Download Microsoft Chart here.
    2. Ensure the System.Web.DataVisualization.dll is in the GAC of your SharePoint server. If not, go to your Microsoft Chart installation directory (C:\Program Files\Microsoft Chart Controls\Assemblies). You will find all the dll’s here.
    3. Copy the charting images from the MS Chart project directory.
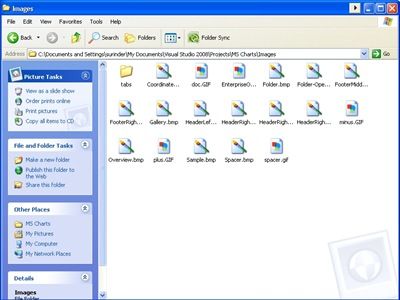
    Image Directory 4. On your SharePoint server, go to the 12 hive and create a new folder called “MicrosoftChartControls” in the Images directory.
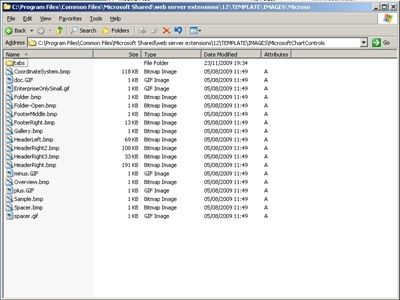
    SharePoint Image Directory

    Step 2: Modify SharePoint’s Web.Config File

    1. Add “System.Web.DataVisualization” to the SafeControls section.
    <SafeControls>
        ...
        ... 
        <SafeControl Assembly="System.Web.DataVisualization, Version=3.5.0.0, Culture=neutral, PublicKeyToken=31bf3856ad364e35"  Namespace="System.Web.UI.DataVisualization.Charting" TypeName="*" Safe="True" AllowRemoteDesigner="True"/>
    </SafeControls>
    
    1. Add the “ChartImg.axd” path to httpHandlers section.
    <httpHandlers>
        ...
        ...
        <add verb="*" path="ChartImg.axd" type="System.Web.UI.DataVisualization.Charting.ChartHttpHandler, System.Web.DataVisualization, Version=3.5.0.0, Culture=neutral, PublicKeyToken=31bf3856ad364e35" validate="false"/>
    </httpHandlers>
    
    1. Add a new AppSetting after the </system.workflow.componentmodel.workflowcompiler> tag. As you can see, this AppSetting contains the URL to where our charting images are stored.
    </System.Workflow.ComponentModel.WorkflowCompiler>
    <appSettings>
        <add key="ChartImageHandler" value="storage=memory;timeout=20;URL=/_layouts/Images/MicrosoftChartControls/" />
    </appSettings>
    
    1. Lastly, ensure you add your own custom web part charting control to the SafeControls section as I have done.
    <SafeControl Assembly="MOSSCharts, Version=1.0.0.0, Culture=neutral, PublicKeyToken=d463a6b3aa294272" Namespace="MOSSCharts" TypeName="*" Safe="True" AllowRemoteDesigner="True" />
    

    If you still have problems with SharePoint failing to recognise the charting API, view this MSDN Forum posting.

    My Custom Chart Example – Bar Chart

    I decided it would be more useful to create a charting web part that would display graphical data from a database, instead of using randomised or hard coded values. My charting web part contains the following properties:

    • Chart Title
    • Database Connection String – in the real world you wouldn’t include this property. But it just makes it so much more easier to change database connection strings.
    • Series 1 Query – will contain a SQL Query based on the results you want returned.
    • Series 1 X Data – the column data you want displayed in the Bar Chart X Axis.
    • Series 1 Y Data - the column data you want displayed in the Bar Chart Y Axis.
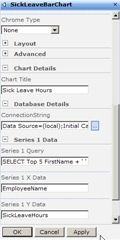
    Chart Properties

    Based on the properties above, your chart will look something like this:

    Custom Chart

    This is how you can create the Bar Chart web part:

    using System;
    using System.Collections.Generic;
    using System.Linq;
    using System.Text;
    using System.Web.UI;
    using System.Web.UI.DataVisualization.Charting;
    using System.Drawing;
    using System.Data;
    using System.Data.Sql;
    using Microsoft.SharePoint;
    using System.Web.UI.WebControls.WebParts;
    using System.Data.SqlClient;
    using System.ComponentModel;
    using Microsoft.SharePoint.WebPartPages;
    using System.Web.UI.WebControls;
     
    namespace MOSSCharts
    {
        public class BarChart : Microsoft.SharePoint.WebPartPages.WebPart
        {
            private string chartName;
            [WebBrowsable(true), Personalizable(true)]
            [Category("Chart Details")]
            [FriendlyName("Chart Title")]
            public string ChartName
            {
                get { return chartName; }
                set { chartName = value; }
            }
     
            private string connectionString;
            [WebBrowsable(true), Personalizable(true)]
            [Category("Database Details")]
            public string ConnectionString
            {
                get { return connectionString; }
                set { connectionString = value; }
            }
     
            private string querySeries1;
            [WebBrowsable(true), Personalizable(true)]
            [Category("Series 1 Data")]
            [FriendlyName("Series 1 Query")]
            public string QuerySeries1
            {
                get { return querySeries1; }
                set { querySeries1 = value; }
            }
     
            private string xColumnDataSeries1;
            [WebBrowsable(true), Personalizable(true)]
            [Category("Series 1 Data")]
            [FriendlyName("Series 1 X Data")]
            public string XColumnDataSeries1
            {
                get { return xColumnDataSeries1; }
                set { xColumnDataSeries1 = value; }
            }
     
            private string yColumnDataSeries1;
            [WebBrowsable(true), Personalizable(true)]
            [Category("Series 1 Data")]
            [FriendlyName("Series 1 Y Data")]
            public string YColumnDataSeries1
            {
                get { return yColumnDataSeries1; }
                set { yColumnDataSeries1 = value; }
            }
     
            protected override void CreateChildControls()
            {
                SPSecurity.RunWithElevatedPrivileges(delegate()
                {
                    try
                    {
                        //**************************************************************
                        //Create Connection String
                        //**************************************************************
                        SqlConnection sqlConn = new SqlConnection(ConnectionString);
     
                        //**************************************************************
                        // Create Chart Control
                        //**************************************************************
                        Chart barChart = new Chart();
                        barChart.Width = 412;
                        barChart.Height = 296;
     
                        //Specify palatte to use
                        barChart.Palette = ChartColorPalette.BrightPastel;
     
                        if (!String.IsNullOrEmpty(ChartName))
                        {
                            Title t = new Title(ChartName, Docking.Top, new System.Drawing.Font("Trebuchet MS", 14, System.Drawing.FontStyle.Bold), System.Drawing.Color.FromArgb(26, 59, 105));
                            barChart.Titles.Add(t);
                        }
     
                        //Create chart area
                        barChart.ChartAreas.Add("ChartArea1");
     
                        // Show as 3D
                        barChart.ChartAreas["ChartArea1"].Area3DStyle.Enable3D = true;
     
                        // Show columns as clustered
                        barChart.ChartAreas["ChartArea1"].Area3DStyle.IsClustered = false;
     
                        // Show X axis end labels
                        barChart.ChartAreas["ChartArea1"].AxisX.LabelStyle.IsEndLabelVisible = true;
     
                        // Set rotation angles
                        barChart.ChartAreas["ChartArea1"].Area3DStyle.Inclination = 15;
                        barChart.ChartAreas["ChartArea1"].Area3DStyle.Rotation = 20;
                         
                        //**************************************************************
                        // Add series data to chart 
                        //**************************************************************
     
                        //Create Series 1 if there is data
                        if (!String.IsNullOrEmpty(XColumnDataSeries1) && !String.IsNullOrEmpty(YColumnDataSeries1) && !String.IsNullOrEmpty(QuerySeries1))
                        {
                            //Add a new series
                            barChart.Series.Add("Series1");
     
                            // Set series chart type
                            barChart.Series["Series1"].ChartType = SeriesChartType.Column;
     
                            // Draw as 3D Cylinder
                            barChart.Series["Series1"]["DrawingStyle"] = "Cylinder";
     
                            barChart.Series["Series1"].BorderColor = Color.FromArgb(26, 59, 105);
                            barChart.Series["Series1"].Color = Color.CornflowerBlue;
                            barChart.Series["Series1"].BackSecondaryColor = Color.Navy;
                            barChart.Series["Series1"].BackGradientStyle = GradientStyle.DiagonalLeft;
    
                            barChart.Series["Series1"]["PointWidth"] = "0.8";
     
                            SqlCommand sqlCmdSeries1 = new SqlCommand(QuerySeries1, sqlConn);
     
                            barChart.DataSource = sqlCmdSeries1;
     
                            barChart.Series["Series1"].XValueMember = XColumnDataSeries1;
                            barChart.Series["Series1"].YValueMembers = YColumnDataSeries1;
    
                        }
     
                        barChart.DataBind();
     
                        Controls.Add(barChart);
                    }
                    catch (Exception ex)
                    {
                        Label lblError = new Label();
                        lblError.Text = "An error has occurred. Please ensure you have entered correct chart details";
     
                        Controls.Add(lblError);
                    }
                });
            }
        }
    }
    

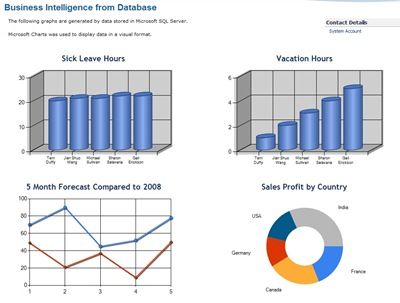
    The code (above) provides a basis to display a database driven chart within SharePoint. With some further tweaks, your Reporting Dashboard could look something like this:
    SharePoint Report Dashboard

    If you would like the code for some of my other charts displayed within my Reporting Dashboard, please leave a comment.