Blog

Categorised by 'Gatsby JS'.

  • Disqus is a popular commenting system used on many websites and seems to be the go-to for bloggers who want to add some form of engagement from their readers. I’ve used Disqus ever since I had a blog and never experienced any problems even throughout the different iterations this site has gone through over the years.

    No complaints here, for a free service that encompasses both function and form.

    Even since I redeveloped my site in July, I’ve attempted to make page performance of paramount importance and put pages on a strict diet by removing unnecessary third-party plugins. Even though I was fully aware that Disqus adds bloat, I just assumed it's a necessary evil. However, I felt I really had to do something after reading a blog post by Victor Zhou on the reasons why he decided to move away from Disqus. The reasons are pretty damning.

    Disqus increases both the page load requests and weight. I can confirm these findings myself. On average, Disqus was adding around 1.6MB-2MB of additional bloat to my blog pages. This is the case even when a blog post had no comments. As a result, the following Google Lighthouse scores took a little beating:

    • Performance: 82/100
    • Best Practices: 75/100

    Pretty bad when you take into consideration that most of the pages on my site consist of text and nothing overly complex.

    Migrating to another commenting provider as Victor Zhou had done could be an option. There are other options I've noticed my fellow bloggers use, such as:

    Each one of these options has its pros and cons whether that might be from a pricing or feature standpoint. I decided to remain with Disqus for the moment as migrating comments is another task I don't currently have time to perform. I would be content in keeping Disqus if I could find a way to negate the page bloat by lazy-loading Disqus on demand.

    I've seen other Disqus users going down the lazy-loading approach within their builds, but couldn't find anything specifically for a Gatsby JS site. Luckily, the solution is quite straightforward and requires minimal code changes.

    Code

    The GatsbyJS gatsby-plugin-disqus plugin makes it easy to integrate Disqus functionality. All that needs to be done is to add the following component to the page:

    ...
    ...
    let disqusConfig = {
            url: `${site.siteMetadata.siteUrl+postUrl}`,
            identifier: postId,
            title: postTitle,
        }
    ...
    ...
    ...
    <Disqus config={disqusConfig} />
    ...
    ...
    

    The only way to add lazyload functionality to this plugin is by controlling when it should be rendered. I decided to render Disqus through a simple button click.

    import { useStaticQuery, graphql } from "gatsby";
    import React, { useState } from 'react';
    import { Disqus } from 'gatsby-plugin-disqus';
    
    const DisqusComponent = ({ postId, postTitle, postUrl }) => {
        const [disqusIsVisible, setDisqusVisibility] = useState(false);
    
        // Set Disqus visibility state on click.
        const showCommentsClick = event => {
          setDisqusVisibility(true);
        };
    
        let disqusConfig = {
            url: postUrl,
            identifier: postId,
            title: postTitle,
        }
    
        return (
          <>
            {!disqusIsVisible && (
              <div>
                <button onClick={showCommentsClick}>Load Comments</button>
              </div>
            )}
            {disqusIsVisible && (
              <Disqus config={disqusConfig} />
            )}
          </>
        )
    }
    

    The code above is an excerpt from a React component I place within a blog post page. React state is used to set the visibility via the showCommentsClick() onClick function. When this event is fired, two things happen:

    1. The "Load Comments" button disappears.
    2. Disqus comments are rendered.

    We can confirm the lazyloading capability works by looking at the "Network" tab in Chrome Developer Tools. You probably won't notice the page speed improvement in delaying the load of Disqus, but within the "Network" tab you'll see a lower number of requests.

    Disqus Lazy-Loading Demo

    Conclusion

    Changing the way Disqus loads on a webpage may come across as a little pedantic and an insignificant performance improvement. I believe where performance savings can be made, it should be done. Since I have rolled out the Disqus update across all pages based on the approach discussed here, the Google Lighthouse scores have increased to:

    • Performance: 95/100
    • Best Practices: 92/100

    For the first time, my website has a Google Lighthouse score ranging between 95-100 across all testing criteria.

    Conclusion - Part 2

    As I neared the end of writing this post, I just happened to come across another Gatsby Disqus plugin - disqus-react, that another blogger Janosh wrote about. This is the officially supported React plugin written by the Disqus team and contains lazy-load functionality:

    All Disqus components are lazy-loaded, meaning they won’t negatively impact the load times of your posts (unless someone is specifically following a link to one of the comments in which case it takes a little longer than on a purely static site).

    Could this really be true? Was this post written in vain?

    Janosh had stated he is using this plugin on his website and out of curiosity, I decided to download the disqus-react git repo and run the code examples locally to see how Disqus gets loaded onto the page.

    I ran both Google Lighthouse and checked Chrome's "Network" tab and after running numerous tests, no lazy-loading functionality was present. I could see Disqus JS files and avatar images being served on page load. I even bulked up the blog post body content to ensure Disqus was not anywhere in view - maybe the component will only load when in view? This made no difference.

    Unless anyone else can provide any further insight, I will be sticking to my current implementation.

  • ActiveCampaign is a comprehensive marketing tool that helps businesses automate their email marketing strategies and create targeted campaigns. If the tracking code is used, visitors can be tracked to understand how they interact with your content and curate targeted email campaigns for them.

    I recently registered for a free account to test the waters in converting readers of my blog posts into subscribers to create a list of contacts that I could use to send emails to when I have published new content. For this website, I thought I'd create a Contact Form that will serve the purpose of allowing a user to submit a query as well as being added to a mailing list in the process.

    ActiveCampaign provides all the tools to easily create a form providing multiple integration options, such as:

    • Simple JavaScript embed
    • Full embed with generated HTML and CSS
    • Link to form
    • WordPress
    • Facebook

    As great as these out-of-the-box options are, we have no control over how our form should look or function within our website. For my use, the Contact Form should utilise custom markup, styling, validation and submission process.

    Step 1: Creating A Form

    The first step is to create our form within ActiveCampaign using the form builder. This can be found by navigating to Website > Forms section. When the "Create a form" button is clicked, a popup will appear that will give us options on the type of form we would like to create. Select "Inline Form" and the contact list you would like the form to send the registrations to.

    My form is built up based on the following fields:

    • Full Name (Standard Field)
    • Email
    • Description (Account Field)

    ActiveCampaign Form Builder

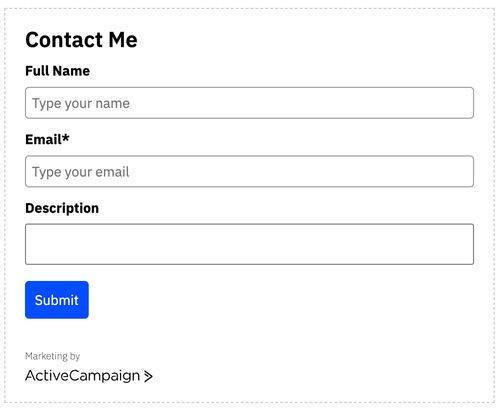
    As we will be creating a custom-built form later, we don't need to worry about anything from a copy perspective, such as the heading, field labels or placeholder text.

    Next, we need to click on the "Integrate" button on the top right and then the "Save and exit" button. We are skipping the form integration step as this is of no use to us.

    Step 2: Key Areas of An ActiveCampaign Form

    There are two key areas of an ActiveCampaign form we will need to acquire for our custom form to function:

    1. Post URL
    2. Form Fields

    To get this information, we need to view the HTML code of our ActiveCampaign Contact form. This can be done by going back to the forms section (Website > Forms section) and selecting "Preview", which will open up our form in a new window to view.

    ActiveCampaign Form Preview

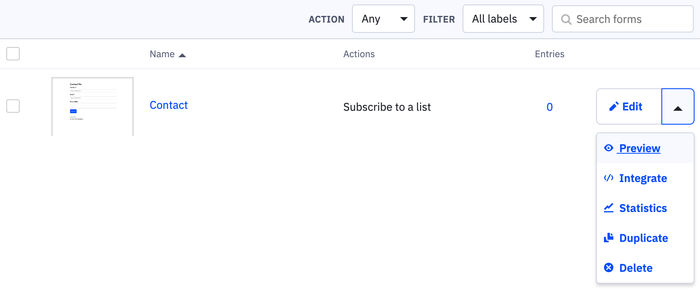
    In the preview window, open up your browser Web Inspector and inspect the form markup. Web Inspector has to be used rather than the conventional "View Page Source" as the form is rendered client-side.
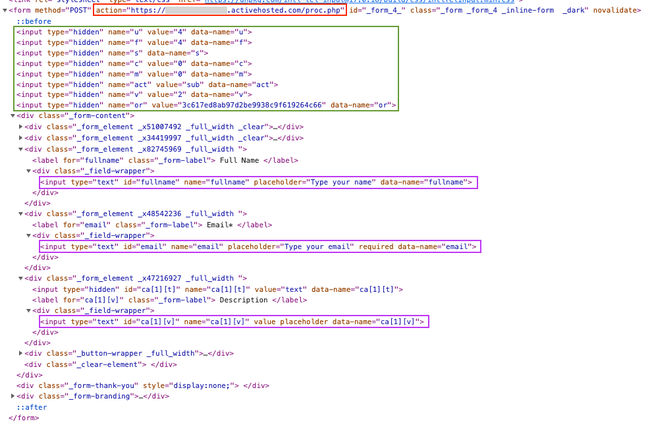
    ActiveCampaign Form Code

    Post URL

    The <form /> tag contains a POST action (highlighted in red) that is in the following format: https://myaccount.activehosted.com/proc.php. This URL will be needed for our custom-built form to allow us to send values to ActiveCampaign.

    Form Fields

    An ActiveCampaign form consists of hidden fields (highlighted in green) and traditional input fields (highlighted in purple) based on the structure of the form we created. We need to take note of the attribute names and values when we make requests from our custom form.

    Step 3: Build Custom Form

    Now that we have the key building blocks for what an ActiveCampaign form uses, we can get to the good part and delve straight into the code.

    import React, { useState } from 'react';
    import { useForm } from "react-hook-form";
    
    export function App(props) {
      const { register, handleSubmit, formState: { errors } } = useForm();
        const [state, setState] = useState({
            isSubmitted: false,
            isError: false
          });    
    
        const onSubmit = (data) => {
            const formData = new FormData();
    
            // Hidden field key/values.
            formData.append("u", "4");
            formData.append("f", "4");
            formData.append("s", "s");
            formData.append("c", "0");
            formData.append("m", "0");
            formData.append("act", "sub");
            formData.append("v", "2");
            formData.append("or", "c0c3bf12af7fa3ad55cceb047972db9");
    
            // Form field key/values.
            formData.append("fullname", data.fullname);
            formData.append("email", data.email);
            formData.append("ca[1][v]", data.contactmessage);
            
            // Pass FormData values into a POST request to ActiveCampaign.
            // Mark form submission successful, otherwise return error state. 
            fetch('https://myaccount.activehosted.com/proc.php', {
                method: 'POST',
                body: formData,
                mode: 'no-cors',
            })
            .then(response => {
                setState({
                    isSubmitted: true,
                });
            })
            .catch(err => {
                setState({
                    isError: true,
                });
            });
        }
    
      return (
        <div>
            {!state.isSubmitted ? 
                <form onSubmit={handleSubmit(onSubmit)}>
                    <fieldset>
                        <legend>Contact</legend>
                        <div>
                            <div>
                                <div>
                                    <label htmlFor="fullname">Name</label>
                                    <input id="fullname" name="fullname" placeholder="Type your name" className={errors.fullname ? "c-form__textbox error" : "c-form__textbox"} {...register("fullname", { required: true })} />
                                    {errors.fullname && <div className="validation--error"><p>Please enter your name</p></div>}
                                </div>
                            </div>
                            <div>
                                <div>
                                    <label htmlFor="email">Email</label>
                                    <input id="email" name="email" placeholder="Email" className={errors.contactemail ? "c-form__textbox error" : "c-form__textbox"} {...register("email", { required: true, pattern: /^[a-z0-9._%+-]+@[a-z0-9.-]+\.[a-z]{2,4}$/ })} />
                                    {errors.email && <div className="validation--error"><p>Please enter a valid email</p></div>}
                                </div>
                            </div>
                            <div>
                                <div>
                                    <label htmlFor="contactmessage">Message</label>
                                    <textarea id="contactmessage" name="contactmessage" placeholder="Message" className={errors.contactmessage ? "c-form__textarea error" : "c-form__textarea"} {...register("contactmessage", { required: true })}></textarea>
                                    {errors.contactmessage && <div className="validation--error"><p>Please enter your message</p></div>}
                                </div>
                            </div>
                            <div>
                                <input type="submit" value="Submit" />
                            </div>
                        </div>
                    </fieldset>
                    {state.isError ? <p>Unfortunately, your submission could not be sent. Please try again later.</p> : null}    
                </form>
                : <p>Thank you for your message. I will be in touch shortly.</p>}
        </div>
      );
    }
    

    The form uses FormData to store all hidden field and text input values. You'll notice the exact same naming conventions are used as we have seen when viewing the source code of the ActiveCampaign form.

    All fields need to be filled in and a package called react-hook-form is used to perform validation and output error messages for any field that is left empty. If an error is encountered on form submission, an error message will be displayed, otherwise, the form is replaced with a success message.

    Demo

    ActiveCampaign Custom Form Demo

    We will see Obi-Wan Kenobi's entry added to ActiveCampaign's Contact list for our test submission.

    ActiveCampaign Contact List

    Conclusion

    In this post, we have demonstrated how a form is created within ActiveCampaign and understand the key areas of what the created form consists of in order to develop a custom implementation using GatsbyJS or React.

    Now all I need to do is work on the front-end HTML markup and add this functionality to my own Contact page.

  • As I have been delving deeper into adding more functionality to my Gatsby site within the Netlify eco-system, it only seemed natural that I should install the CLI to make development faster and easier to test builds locally before releasing them to my Netlify site. There have been times when I have added a new feature to my site to only find it breaks during the build process eating up those precious build minutes.

    One thing that I found a miss from the Netlify CLI documentation were the steps to running a site locally, in my case a Gatsby JS site. The first time I ran the netlify dev command, I was greeted by an empty browser window served under http://localhost:8888.

    There were a couple of steps I was missing to test my site within a locally run Netlify setup.

    1) Build Site

    The Gatsby site needs to be compiled so all HTML, CSS and JavaScript files are generated as physical files on your machine. When the following command is run, all files will be generated within the /public folder of your project:

    gatsby build
    

    The build command creates a version of your site with production-ready optimisations by packaging up your site’s configurations, data and creating all the static HTML pages. Unlike the serve command, you cannot view the site once the build has been completed. Only files are generated, which is exactly what we need.

    2) Run Netlify Dev Command From Build Directory

    Now that we have a built version of the site generated locally within the /public folder, we need to run the Netlify Dev command against this directory by running the following:

    netlify dev -dir public
    

    As you can see, the dir flag is used to run our site from where the compiled site files reside. I originally had a misconception in thinking the Netlify Dev command would build my Gatsby site as well, when in fact it does not.

    Conclusion

    If you have a site hosted by Netlify, using the CLI should is highly recommended as it provides you that extra step in ensuring any updates made can be tested prior to deployment. My site uses Netlify features such as redirects and plugins, which I now can test locally instead of going down the previously inefficient route of:

    1. Deploying changes to Netlify.
    2. Waiting for the build process to complete.
    3. Test changes within the preview site.
    4. If all is good, publish the site. If not, resolve error and deploy again.

    This endless cycle of development hell is now avoided thanks to the safety net the Netlify CLI provides.

    Further Reading

  • I’ve recently updated my website from the ground up (something I will write in greater detail in a future post) and when it came to releasing all changes to Netlify, I was greeted by the following error in the build log:

    7:39:29 PM: $ gatsby build
    7:39:30 PM: error Gatsby requires Node.js 14.15.0 or higher (you have v12.18.0).
    7:39:30 PM: Upgrade Node to the latest stable release: https://gatsby.dev/upgrading-node-js
    

    Based on the error, it appears that the Node version installed on my machine is older than what Netlify requires... In fact, I was surprised to discover that it was very old. So I updated Node on my local environment as well as all of the NPM packages for my website.

    I now needed to ensure my website hosted in Netlify was using the same versions.

    The quickest way to update Node and NPM versions is to add the following environment variables to your site:

    NODE_VERSION = "14.15.0"
    NPM_VERSION = "8.5.5"
    

    You can also set the Node and NPM versions by adding a netlify.toml file to the root of your website project before committing your build to Netlify:

    [build.environment]
        NODE_VERSION = "14.15.0"
        NPM_VERSION = "8.5.5" 
    
  • I created a simple GatsbyJS pagination component that would work in a similar way to my earlier ASP.NET Core version, where the user will be able to paginate through a list using the standard "Previous" and "Next" links as well as selecting individual page numbers.

    Like the ASP.NET Core version, I have tried to make this pagination component very portable, so there shouldn't be any issues in adding this straight into your project. Plug and play!

    import * as React from 'react'
    import { Link } from 'gatsby'
    import PropTypes from 'prop-types'
    
    // Create URL path for numeric pagination
    const getPageNumberPath = (currentIndex, basePath) => {
      if (currentIndex === 1) {
        return basePath
      }
      
      return `${basePath}/page-${(currentIndex)}`
    }
    
    // Create an object array of pagination numbers. 
    // The number of page numbers to render is set to 5.
    const getPaginationGroup = (basePath, currentPage, pageCount, noOfPagesNos = 5) => {
        let startPage = currentPage;
    
        if (startPage === 1 || startPage === 2 || pageCount < noOfPagesNos)
            startPage = 1;
        else
            startPage -= 2;
    
        let maxPage = startPage + noOfPagesNos;
    
        if (pageCount < maxPage) {
            maxPage = pageCount + 1
        }
    
        if (maxPage - startPage !== noOfPagesNos && maxPage > noOfPagesNos) {
            startPage = maxPage - noOfPagesNos;
        }
    
        let paginationInfo = [];
    
        for (let i = startPage; i < maxPage; i++) {        
            paginationInfo.push({
                number: i,
                url: getPageNumberPath(i, basePath),
                isCurrent: currentPage === i
            });
        }
    
        return paginationInfo;
    };
    
    export const Pagination = ({ pageInfo, basePath }) => {
        if (!pageInfo) 
            return null
    
        const { currentPage, pageCount } = pageInfo
    
        // Create URL path for previous and next buttons
        const prevPagePath = currentPage === 2 ? basePath : `${basePath}/page-${(currentPage - 1)}`
        const nextPagePath = `${basePath}/page-${(currentPage + 1)}`
        
        if (pageCount > 1) { 
            return (
                    <ol>
                        {currentPage > 1 ? 
                            <li>
                                <Link to={prevPagePath}>
                                    Go to previous page
                                </Link>
                            </li> : null}       
                        {getPaginationGroup(basePath, currentPage, pageCount).map((item, i) => {
                            return (
                                <li key={i}>
                                    <Link to={item.url} className={`${item.isCurrent ?  "is-current" : ""}`}>
                                        Go to page {item.number}
                                    </Link>
                                </li>
                            )
                        })}
                        {currentPage !== pageCount ?
                            <li>
                                <Link to={nextPagePath}>
                                    Go to next page
                                </Link>
                            </li> : null}
                    </ol>
            )
        }
        else {
            return null
        }
      }
    
    Pagination.propTypes = {
        pageInfo: PropTypes.object,
        basePath: PropTypes.string
    }
    
    export default Pagination;
    

    This component requires just two parameters:

    1. pageInfo: A page context object created when Gatsby generates the site pages. The object should contain two properties consisting of the current page the that is being viewed (currentPage) and total number of pages (pageCount).
    2. basePath: The parent URL of where the pagination component will reside. For example, if your listing page is "/customers", this will be the base path. The pagination component will then prefix this to construct URL's in the format of - "/customers/page-2".
  • You probably haven't noticed (and you'd be forgiven if this is the case!) that my site now has the ability to search through posts. This is a strange turn of events for me as I decided to remove search capability from my site many years ago as I didn't feel it added any benefits for the user. This became evident from Google Analytics stats where searches never hit high enough numbers to warrant having it. The numbers don't lie!

    So what caused this turnaround?

    I've noticed that I'm regularly referring back through posts to refresh myself on things I've done in the past and to find solutions to issues I know I've previously written about. Having a search would make trawling through my few hundred posts a lot easier. So this is more of a personal requirement than commercial. But there is an exciting aspect to this as well - experimenting with Algolia. Using Algolia search is something I've been meaning to look into for a long time and integrating with GatbsyJS.

    The thought of having the good ol' magnifying glass back in the navigation makes me nostalgic!

    Note: In this post, I won't be covering the basic Algolia setup or the plugins needed to install as there is already a great wealth of information online. Check out my "Useful Links" section at the end of the post.

    Basic Setup

    Integrating Algolia into GatbsyJS was relatively straight-forward due to the wealth of information that others have already written and also the plugins themselves. The plugins make light work of rendering search results quickly allowing enough customisations to the HTML markup for easy implementation within any site. By default, the plugins contain the following components:

    • InstantSearch
    • SearchBox
    • Hits
    import algoliasearch from 'algoliasearch/lite';
    import PropTypes from 'prop-types';
    import { Link } from 'gatsby';
    import { InstantSearch, Hits, Highlight, SearchBox } from 'react-instantsearch-dom';
    import React from 'react';
    
    // Get API keys from the environment file.
    const appId = process.env.GATSBY_ALGOLIA_APP_ID;
    const searchKey = process.env.GATSBY_ALGOLIA_SEARCH_KEY;
    const searchClient = algoliasearch(appId, searchKey);
    
    const SearchPage = () => (
      <InstantSearch
        searchClient={searchClient}
        indexName={process.env.GATSBY_ALGOLIA_INDEX_NAME}
      >
        <SearchBox />
        <Hits hitComponent={Hit} />
      </InstantSearch>
    );
    
    function Hit(props) {
      return (
        <article className="hentry post">
          <h3 className="entry-title">
            <Link to={props.hit.fields.slug}>
              <Highlight attribute="title" hit={props.hit} tagName="mark" />
            </Link>
          </h3>
          <div className="entry-meta">
            <span className="read-time">{props.hit.fields.readingTime.text}</span>
          </div>
          <p className="entry-content">
            <Highlight hit={props.hit} attribute="summary" tagName="mark" />
          </p>
        </article>
      );
    }
    
    Hit.propTypes = {
      hit: PropTypes.object.isRequired,
    };
    
    export default SearchPage;
    

    The InstantSearch is the core component that directly interacts with Algolia's API and takes in two properties, "searchClient" and "indexName" containing the Application ID and Search Key that is acquired from the Algolia account setup. This component contains two child components, SearchBox is the search textbox and Hits that displays results from the search query.

    It is the Hits component where we can customise the HTML with our own markup by using it's "hitComponent" attribute. In my case, I created a function to generate HTML where I access the properties from the search index. What's really cool is here is we have the ability to also highlight our search term where they may occur in the results by using the Highlight component (also provided by the Algolia plugin) and adding a "tagName" attribute.

    Removing The SearchBox Component

    The standard implementation may not suit all scenarios as you may want a search term to be sent to the InstantSearch component differently. For example, it could be from a custom search textbox or (as in my case) read from a query-string parameter. It wasn't until I started delving further into the standard setup I realised you cannot just remove the SearchBox component and pass a value directly, but there is a workaround.

    I have expanded upon the code-snippet, above, to demonstrate how my search page works...

    import algoliasearch from 'algoliasearch/lite';
    import PropTypes from 'prop-types';
    import { Link } from 'gatsby';
    import { InstantSearch, Hits, Highlight, connectSearchBox } from 'react-instantsearch-dom';
    import Layout from "../components/global/layout";
    import React, { Component } from "react";
    
    // Get API keys from the environment file.
    const appId = process.env.GATSBY_ALGOLIA_APP_ID;
    const searchKey = process.env.GATSBY_ALGOLIA_SEARCH_KEY;
    const searchClient = algoliasearch(appId, searchKey);
    const VirtualSearchBox = connectSearchBox(() => <span />);
    
    class SearchPage extends Component { 
      state = {
        searchState: {
          query: '',
        },
      };
    
      componentDidMount() {   
        // Get "term" query string parameter value.
        let search = window.location.search;
        let params = new URLSearchParams(search);
        let searchTerm = params.get("term");
    
        // Send the query string value to a "searchState" object used by Algolia.
        this.setState(state => ({
          searchState: {
            ...state.searchState,
            query: searchTerm,
          },
        }));
     }
    
      render() {
          // Default "instantSearch" HTML to prompt user to enter a search term.
          var instantSearch = null;
          
          // If there is a search term, utilise Algolia's instant search.
          if (this.state.searchState.query) {
            instantSearch = <div className="entry-content">
                              <h2>You've searched for "{this.state.searchState.query}".</h2>
                              <div className="post-list archives-list">
                              <InstantSearch
                                  searchClient={searchClient}
                                  indexName={process.env.GATSBY_ALGOLIA_INDEX_NAME}
                                  searchState={this.state.searchState}
                                >
                                  <VirtualSearchBox />
                                  <Hits hitComponent={Hit} />
                                </InstantSearch>  
                              </div>
                            </div>
          }
          else {
            instantSearch = <div className="entry-content">
                              <h2>You haven't entered a search term.</h2>
                              <p>Carry out a search by clicking the <em>magnifying glass</em> in the navigation.</p>
                            </div>
          }
    
          return (
            <Layout>
              <header className="page-header">
                <h1>Search</h1>
                <p>Search the knowledge-base...</p>
              </header>
              <div id="primary" className="content-area">
                <div id="content" className="site-content" role="main">
                    <div className="layout-fixed">
                        <article className="page hentry">
                          {instantSearch}
                        </article>
                    </div>
                </div>
              </div>
          </Layout>
        )
      }
    }
    
    function Hit(props) {
      return (
        <article className="hentry post">
          <h3 className="entry-title">
            <Link to={props.hit.fields.slug}>
              <Highlight attribute="title" hit={props.hit} tagName="mark" />
            </Link>
          </h3>
          <div className="entry-meta">
            <span className="read-time">{props.hit.fields.readingTime.text}</span>
          </div>
          <p className="entry-content">
            <Highlight hit={props.hit} attribute="summary" tagName="mark" />
          </p>
        </article>
      );
    }
    
    Hit.propTypes = {
      hit: PropTypes.object.isRequired,
    };
    
    export default SearchPage
    

    My code is reading from a query-string value and passing that to a "searchState". The searchState object is created by React InstantSearch internally. Every widget inside the library has its own way of updating it. It contains parameters on the type of search that should be performed, such as query, sorting and pagination, to name a few. All we're interested in doing is updating the query parameter of this object with our search term.

    If the query parameter from the "searchState" object is empty, render search results, otherwise, display a message stating a search term is required.

    One thing to notice is the SearchBox has been replaced with a VirtualSearchBox, which uses the connector of the search box to create a virtual widget - in our case an empty span tag. This will link the InstantSearch component with the query. Having some form of search box component is compulsory.

    Conclusion

    I prefer not to use the out-of-the-box search box component as I can potentially save requests to Algolia's API, as searches aren't being made on the fly as a user enters a search term. This is the plugins default behaviour.

    Passing a search term through a query-string may come across as a little backwards, especially when it's rather nice to see search results change before your eyes as you type letter-by-letter. However, this approach misses one key element: Tracking in Google Analytics. Even though I will be primary the person making the most use of my site search, it'll be interesting to see who else uses it and what search keywords are used.

    Useful Links

  • I’ve been doing a little research into how I can make posts written in markdown more suited for my needs and decided to use this opportunity to develop my own Gatsby Markdown plugin. Ever since I moved to Gatsby, making my own Markdown plugin has been on my todo list as I wanted to see how I could render slightly different HTML markup based on the requirements of my blog post content.

    As this is my first markdown plugin, I thought it best to start small and tackle bug-bear of mine - making external links automatically open in a new window. From what I have looked online, some have suggested to just add an HTML anchor tag to the markdown as you will then have the ability to apply all attributes you’d want - including target. I’ll quote my previous post about aligning images in markdown and why I’m not keen on mixing HTML with markdown:

    HTML can be mingled alongside the markdown syntax... I wouldn't recommend this from a maintainability perspective. Markdown is platform-agnostic so your content is not tied to a specific platform. By adding HTML to markdown, you're instantly sacrificing the portability of your content.

    Setup

    We will need to create a local Gatsby plugin, which I’ve named gatsby-remark-auto-link-new-window. Ugly name... maybe you can come up with something more imaginative. :-)

    To register this to your Gatsby project, you will need start of with the following:

    • Creating a plugin folder at the root of your project (if one hasn’t been created already).
    • Add a new folder based on the name of our plugin, in this case - /plugins/gatsby-remark-auto-link-new-window.
    • Every plugin consists of two files:
      • index.js - where the plugin code to carry out our functionality will reside.
      • package.json - contains the details of our plugin, such as name, description, dependencies etc. For the moment this can just contain an empty JSON object {}. If we were to publish our plugin, this will need to be completed in its entirety.

    Now that we have our bare-bones structure, we need to register our local plugin by adding a reference to the gatsby-config.js file. Since this is a plugin to do with transforming markdown, the reference will be added inside the 'gatsby-transformer-remark options:

    {
      // ...
      resolve: 'gatsby-transformer-remark',
        options: {
          plugins: [        
            {
              resolve: 'gatsby-remark-embed-gist',
              options: {
                username: 'SurinderBhomra',
              },
            },
            {
              resolve: 'gatsby-remark-auto-link-new-window',
              options: {},
            },
            'gatsby-remark-prismjs',
          ],
        },
      // ...
    }
    

    For the moment, I’ve left the options field empty as we currently have no settings to pass to our plugin. This is something I will show in another blog post.

    To make sure we have registered our plugin with no errors, we need run our build using the gatsby clean && gatsby develop command. This command will always need to be run after every change made to the plugin. By adding gatsby clean, we ensure the build clears out all the previously built files prior to the next build process.

    Rewriting Links In Markdown

    As the plugin is relatively straight-forward, let’s go straight into the code that will be added to our index.js file.

    const visit = require("unist-util-visit")
    
    module.exports = ({ markdownAST }, pluginOptions) => {
      visit(markdownAST, "link", node => {
        // Check if link is external by checking if the "url" attribute starts with http.
        if (node.url.startsWith("http")) {
          if (!node.data) {
            // hProperties refers to the HTML attributes of the node in question.
            // Ensure this object is added to the node.
            node.data = { hProperties: {} };
          }
          
          // Assign the 'target' attribute.
          node.data.hProperties = Object.assign({}, node.data.hProperties, {
            target: "_blank",
          });
        }
      })
    
      return markdownAST
    }
    

    As you can see, I want to target all markdown link nodes and depending on the contents of the url property we will perform a custom transformation. If the url property starts with an "http" we will then add a new attribute, "target" using hProperties. hProperties refers to the HTML attributes of the targeted node.

    To see the changes take effect, we will need to re-run gatsby clean && gatsby develop.

    Now that we have understood the basics, we can beef up our plugin by adding some more functionality, such as plugin options. But that's for another post.

  • Published on
    -
    1 min read

    Aligning Images In Markdown

    Every post on this site is written in markdown since successfully moving over to GatsbyJS. Overall, the transition has been painless and found that writing blog posts using the markdown syntax is a lot more efficient than using a conventional WYSIWYG editor. I never noticed until making the move to markdown how fiddly those editors were as you sometimes needed to clean the generated markup at HTML level.

    Of course, all the efficiency of markdown does come at a minor cost in terms of flexibility. Out of the minor limitations, there was one I couldn't let pass. I needed to find a way to position images left, right and centre as majority of my previous posts have been formatted in this way. When going through the conversion process from HTML to markdown, all my posts were somewhat messed up and images were rendered 100% width.

    HTML can be mingled alongside the markdown syntax, so I do have an option to use the image tag and append styling. I wouldn't recommend this from a maintainability perspective. Markdown is platform-agnostic so your content is not tied to a specific platform. By adding HTML to markdown, you're instantly sacrificing the portability of your content.

    I found a more suitable approach would be to handle the image positioning by appending a hashed value to the end of the image URL. For example, #left, #right, or #centre. We can at CSS level target the src attribute of the image and position the image along with any additional styling based on the hashed value. Very neat!

    img[src*='#left'] {
    float: left;
    margin: 10px 10px 10px 0;
    }
    
    img[src*='#center'] {
    display: block;
    margin: 0 auto;
    }
    
    img[src*='#right'] {
    float: right;
    margin: 10px 0 10px 10px;
    }
    

    Being someone who doesn’t delve into front-end coding techniques as much as I used to, I am amazed at the type of things you can do within CSS. I’ve obviously come late to the more advanced CSS selectors party.

  • If you’re seeing this post, then this means I have fully made the transition to a static-generated website architecture using GatsbyJS. I started this process late December last year but then started taking it seriously into the new year. It’s been a learning process getting to grips with a new framework as well as a big jump for me and my site.

    Why has it been a big jump?

    Everything is static. I have downsized my website footprint exponentially. All 250+ blog posts have been migrated into markdown files, so from now on, I will be writing in markdown and (with the help of Netlify) pushing new content by a simple git commit. Until now, I have always had a website that used server-side frameworks that stored all my posts in a database. It’s quite scary moving to a framework that feels quite unnatural to how I would normally build sites and the word “static” when used in relation to a website reminds me of a bygone era.

    Process of Moving To Netlify

    I was pleasantly surprised by how easy the transition to Netlify was. There is a vast amount of resources available that makes for good reading before making the switch to live. After linking my website Bitbucket repository to a site, the only things left to do to make it live were the following:

    • Upload a _redirects file, listing out any redirects you require Netlify to handle. For GatsbyJS sites, this will need to be added to the /static directory.
    • Setup Environment variables to allow the application to easily switch between development and production states. For example, my robots.txt is set to be indexable when only in production mode.
    • Add CNAME records to your existing domain that point to your Netlify domain. For example, surindersite.netlify.com.
    • Issue a free Let’s Encrypt SSL certificate, which is easily done within the account Domain settings.

    Post live, the only thing that stumped me was the Netlify domain didn’t automatically redirect to my custom domain. This is something I thought Netlify would automatically handle once the domain records were updated. To get around this, an explicit domain 301 redirect needs to be added to your _redirects file.

    # Domain Redirect
    https://surinderbhomra.netlify.com/*     https://www.surinderbhomra.com/:splat    301!
    

    New Publishing Process

    Before making the switchover, I had to carry out some practice runs on how I would be updating my website just to be sure I could live with the new way of adding content. The process is now the following:

    1. Use “content/posts” branch to add a new blog post.
    2. Create a new .md file that consists of the date and slug. In my case, all my markdown files are named "2010-04-02---My-New-Post.md".
    3. Ensure all categories and tags in the markdown frontmatter is named correctly. This is an important step to ensure no unnecessary new categories or tags are created.
    4. Add any images used in the post to the site. The images should reference Imagekit.io.
    5. Check over the post locally.
    6. Push to master branch and let Netlify carry out the rest.

    Out of all the steps, I have only found steps 3 and 4 to require a little effort when compared to using a CMS platform, as previously, I could select from a predefined list of categories and upload images directly. Not a deal-breaker.

    Next Steps

    I had a tight deadline to ensure I made the move to Netlify before my current hosting renews for another year and still have quite a bit of improvement to make. Have you seen my Google Lighthouse score!?! It’s shockingly bad due to using the same HTML markup and CSS from my old site. I focused my efforts cramming in all the functionality to mimic how my site used to work and efficiencies in keeping build times to Netlify low.

    First thing on the list - rebuild website templates from the ground up.

  • For the Gatsby version of my website, currently in development, I am serving all my images from Imagekit.io - a global image CDN. The reasons for doing this is so I will have the ultimate flexibility in how images are used within my site, which didn’t necessarily fit with what Gatsby has to offer especially when it came to how I wanted to position images within blog post content served from markdown files.

    As I understand it, Gatsby Image has two methods of responsively resizing images:

    1. Fixed: Images that have a fixed width and height.
    2. Fluid: Images that stretch across a fluid container.

    In my blog posts, I like to align my images (just take look at my post about my time in the Maldives) as it helps break the post up a bit. I won’t be able to achieve that look by the options provided in Gatsby. It’ll look all a little bit too stacked. The only option is to serve my images from Imagekit.io, which in the grand scheme isn’t a bad idea. I get the benefit of being able to transform images on the fly, optimisation (that can be customised through Imagekit.io dashboard) and fast delivery through its content-delivery network.

    To meet my image requirements, I decided to develop a custom responsive image component that will perform the following:

    • Lazyload image when visible in viewport.
    • Ability to parse an array “srcset" sizes.
    • Set a default image width.
    • Render the image on page load in low resolution.

    React Visibility Sensor

    The component requires the use of "react-visibility-sensor” plugin to mimic the lazy loading functionality. The plugin notifies you when a component enters and exits the viewport. In our case, we only want the sensor to run once an image enters the viewport. By default, the sensor is always fired every time a block enters and exits the viewport, causing our image to constantly alternate between the small and large versions - something we don't want.

    Thanks for a useful post by Mark Oskon, he provided a solution that extends upon the react-visibility-sensor plugin and allows us to turn off the sensor after the first reveal. I ported the code from Mark's solution in a newly created component housed in "/core/visibility-sensor.js", which I then reference into my LazyloadImage component:

    import React, { Component } from "react";
    import PropTypes from "prop-types";
    import VSensor from "react-visibility-sensor";
    
    class VisibilitySensor extends Component {
      state = {
        active: true
      };
    
      render() {
        const { active } = this.state;
        const { once, children, ...theRest } = this.props;
        return (
          <VSensor
            active={active}
            onChange={isVisible =>
              once &&
              isVisible &&
              this.setState({ active: false })
            }
            {...theRest}
          >
            {({ isVisible }) => children({ isVisible })}
          </VSensor>
        );
      }
    }
    
    VisibilitySensor.propTypes = {
      once: PropTypes.bool,
      children: PropTypes.func.isRequired
    };
    
    VisibilitySensor.defaultProps = {
      once: false
    };
    
    export default VisibilitySensor;
    

    LazyloadImage Component

    import PropTypes from "prop-types";
    import React, { Component } from "react";
    import VisibilitySensor from "../core/visibility-sensor"
    
    class LazyloadImage extends Component {
        render() {
          let srcSetAttributeValue = "";
          let sanitiseImageSrc = this.props.src.replace(" ", "%20");
    
          // Iterate through the array of values from the "srcsetSizes" array property.
          if (this.props.srcsetSizes !== undefined && this.props.srcsetSizes.length > 0) {
            for (let i = 0; i < this.props.srcsetSizes.length; i++) {
              srcSetAttributeValue += `${sanitiseImageSrc}?tr=w-${this.props.srcsetSizes[i].imageWidth} ${this.props.srcsetSizes[i].viewPortWidth}w`;
    
              if (this.props.srcsetSizes.length - 1 !== i) {
                srcSetAttributeValue += ", ";
              }
            }
          }
    
          return (
              <VisibilitySensor key={sanitiseImageSrc} delayedCall={true} partialVisibility={true} once>
                {({isVisible}) =>
                <>
                  {isVisible ? 
                    <img src={`${sanitiseImageSrc}?tr=w-${this.props.widthPx}`} 
                          alt={this.props.alt}
                          sizes={this.props.sizes}
                          srcSet={srcSetAttributeValue} /> : 
                    <img src={`${sanitiseImageSrc}?tr=w-${this.props.defaultWidthPx}`} 
                          alt={this.props.alt} />}
                  </>
                }
              </VisibilitySensor>
          )
        }
    }
    
    LazyloadImage.propTypes = {
      alt: PropTypes.string,
      defaultWidthPx: PropTypes.number,
      sizes: PropTypes.string,
      src: PropTypes.string,
      srcsetSizes: PropTypes.arrayOf(
        PropTypes.shape({
          imageWidth: PropTypes.number,
          viewPortWidth: PropTypes.number
        })
      ),
      widthPx: PropTypes.number
    }
    
    LazyloadImage.defaultProps = {
      alt: ``,
      defaultWidthPx: 50,
      sizes: `50vw`,
      src: ``,
      widthPx: 50
    }
    
    export default LazyloadImage
    

    Component In Use

    The example below shows the LazyloadImage component used to serve a logo that will serve a different sized image with the following widths - 400, 300 and 200.

    <LazyloadImage 
                    src="https://ik.imagekit.io/surinderbhomra/Pages/logo-me.jpg" 
                    widthPx={400} 
                    srcsetSizes={[{ imageWidth: 400, viewPortWidth: 992 }, { imageWidth: 300, viewPortWidth: 768 }, { imageWidth: 200, viewPortWidth: 500 }]}
                    alt="Surinder Logo" />
    

    Useful Links

    https://alligator.io/react/components-viewport-react-visibility-sensor/ https://imagekit.io/blog/lazy-loading-images-complete-guide/ https://www.sitepoint.com/how-to-build-responsive-images-with-srcset/