I've had a Spotify music membership for as long as I can remember. Many other subscriptions held throughout my life have come and gone, but Spotify has stood the test of time.
A seed of doubt was planted when Spotify began raising the prices of their plans multiple times over a short period of time, beginning in April 2021. Even then, I was relatively unconcerned; it was annoying, but I felt content knowing there were no better music providers that could compete with what Spotify provided. Spotify made music very accessible to me in every way.
During the first price hike, I trialled Apple Music during a brief period of insanity only to quickly come running back to the safety of Spotify.
The penny dropped in May 2024, during the third price hike, when I began to question whether my Spotify usage was worth paying £11.99 per month. Even though I listen to music, I occasionally go through periods where I only listen to podcasts, which are freely available online and podcasting platforms.
First Steps To Considering YouTube Music As A Viable Replacement
Before making any hasty decisions, I audited all subscriptions both my wife and I use to if there is any possibility of making cost savings... Just like a Conservative party government imposing austerity measures, except my actions wouldn't lead to a Liz Truss level economic crises.
It wasn't until I discovered my wife's YouTube Premium subscription, which she had purchased through the Apple App Store for an absurdly high price. A word to the wise: Never buy subscriptions through Apple's App Store because Apple charges a commission on top. My wife was paying around £18 per month compared to £12.99 if purchased directly from the YouTube website.
I digress...
This was enough to get me thinking about upgrading to the Family tier that included:
- Ad-free videos
- Offline downloads
- YouTube Music
- Add up to 5 members to the subscription
All this costing £19.99 per month. At this price, we would be making savings if we moved away from our individual YouTube and Spotify plans. I was already sold on ad-free videos (those advertisements are so annoying!) and if I could be persuaded to subscribe to YouTube Music, this would end up being a very cost-effective option.
The writing was on the wall. My Spotify days were numbered. I looked into what was involved (if possible) in migrating all my playlists over to YouTube Music.
Requirements and Initial Thoughts of YouTube Music
Prior to carrying out any form of migration, I opted for a 30 day free trial of YouTube Music as I wanted to see if it met as many key requirements as possible.
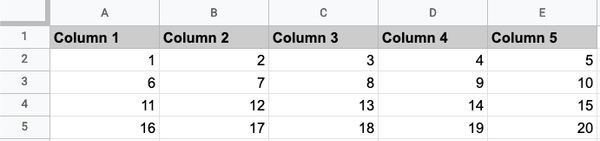
| Requirement |
Requirement Met? |
| Availability of all songs from artists I listen to including the obscure ones |
Yes |
| Podcasts |
Big yes |
| Native MacOS app |
Room for improvement |
| Ability to cast music to my speakers on my network |
Yes |
| Quality new music suggestions |
Yes |
Overall, YouTube Music met majority of my requirements. As expected, it does take a little while to familiarise one self with the interface but there are similarities when compared with Spotify.
YouTube Music - The Extension of YouTube
YouTube Music is really an extension of YouTube in how it is able to pull in specific YouTube content, whether that is music videos, podcasts or shows. All the audio related content in video form you would normally view in YouTube is encompassed here. In most cases, this is seen as an advantage, however the only aspect where the lines between music and video get blurred is in the auto-generated "Liked music" playlist.
You may find the "Liked music" playlist is already prefilled with videos you have liked on YouTube. If YouTube Music deems a liked video as music, it will also be shown here, which isn't necessarily accurate. For example, it automatically listed a Breaking Bad Parody video I liked from 9 years ago. If you prefer your randomly liked videos to stay in solely in YouTube, you have to manually disable the "Show your liked music from YouTube" feature in the settings.
The Music Catalog and New Music Recommendations
The music catalog size is on par with Spotify and there hasn't been a time where a track wasn't available. In fact, there were 3-4 tracks in my Spotify playlist that was no longer accessible, but this was not the case on YouTube Music, which was a surprise.
During times when I am in the search for new music, I found the recommendation algorithm far better than Spotify and after a couple weeks of using YouTube Music I was compiled some really good personalised mixes - something that will get even better in time. Due to its link with YouTube, I was recommended even more options of live performances, remixes and cover tracks.
What surprised me the most is the a feature I didn't even think I needed: The Offline Mixtape. There are times when I don't actually know what tracks I want to listen to when on the road and the Offline Mixtape compiles a list of tracks consisting of a combination of my liked songs and similar tracks for added variation. All automatically synchronised to my devices.
Podcasts
From the podcasts I listen to on Spotify I didn't have any issues in finding on YouTube Music. There is an added benefit of playing a podcast as audio or video (if the podcast offers this format), which is a nice touch. I was also recommended new types of podcasts that I would have never been exposed to based on what I listen to. I am sure (and correct me if I am wrong) Spotify didn't make recommendations as visible as what I am seeing in YouTube Music where podcasts are categorised. For example, the categories offered to me are: Wealth, Finances, Health, Mysteries, etc
Lack of Native Desktop App
The lack of a native desktop app detracts from my otherwise glowing review of YouTube Music. I was surprised to find that there isn't one, given that this is the norm among other music providers.
Even though Chrome allows you to download it as a Progressive Web App, it's better than nothing. It just doesn't seem integrated enough. I keep accidentally closing the YouTube Music app on my MacOS by clicking the "close" button when all I want to do is hide the window.
It can also be laggy at times, especially when Chromecasting to a smart speaker. When I change tracks, my speaker takes a few seconds to catch up.
Overall, it's good but not great. Does not have the same polish as the Spotify app. But it's definitely manageable. The lack of a native desktop app has not dissuaded me from using it. If needed, I can always use the YouTube Music app on my Pixel or iPad.
The Migration
After a satisfactory trial period using YouTube Music, I looked for ways to move all my Spotify playlists. There are many options through online services and software that can aid the migration process, which can be used for free (sometimes with limitations) or at a cost.
After carrying out some research on the various options available to me, I opted for a free CLI tool built in Python: spotify_to_ytmusic. It has received a lot of good reviews from a Reddit post and received positive feedback where users were able to migrate thousands of their songs spanning multiple playlists with ease. The only disadvantage with free options that provide unlimited migration is that they aren't necessarily straight-forward for the average user and some technical acumen is required.
The installation, setup and familiarising yourself with the CLI commands to use the spotify_to_ytmusic application is the only part that takes some time. But once you have generated API Keys in both Spotify and Google, followed the instructions as detailed in the Github repo, the migration process itself doesn't take long at all.
Conclusion
When I told one of my coworkers that I had switched to YouTube Music, I received a sceptical look and a response to confirm I am of sane mind. This exemplifies how we have simply accepted Spotify as the only acceptable music platform, blinded to alternatives.
YouTube Premium, which includes YouTube Music in one package, is an extremely good deal. Not only can you watch YouTube videos ad-free, but you also get a music library comparable to Spotify at a similar price.
If you have been questioning whether YouTube Music is worth a try. Question no more and make the move.