Blog

Tagged by 'images'

  • I've written some code that outputs images using Instagram's Developer API. The code can either output images based on a user's profile or via search term.

    As you may already know, in order to get any form of information from any external API an access token is required. Before we dive into some code, the first thing that we need to do is register ourselves as an Instagram Developer by going to: http://instagram.com/developer/.

    Next, we need to register a new client specifically for our intended use. In my case, all I want to do is to get all image information from my own Instagram profile.
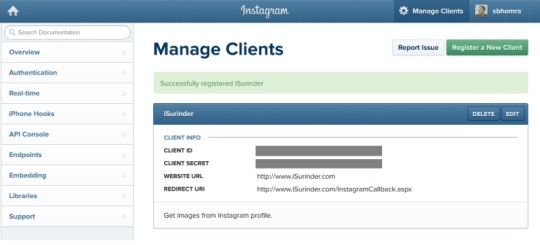
    Instagram API - Register New Client

    Here, you will be supplied with Client ID and Client Secret codes. But most importantly, you will need to set an OAuth Redirect URL (or Callback URL) for user's to authenticate your application.

    The strange thing I've noticed about the Instagram API is that a callback page is a compulsory requirement. Even if you are planning on carrying out something as simple as listing some images from your own profile where a public users intervention is not required.

    I'm not interested in their images, I'm interested in my own. I hope Instagram changes this soon. If Twitter can allow you to retrieve tweets by simply registering your application, why can't Instagram?

    From what I've read on Instagram's Google Group's is that an access token needs to only be generated once and they don't expire. But of course Instagram have stated:

    "These tokens are unique to a user and should be stored securely. Access tokens may expire at any time in the future."

    Just make sure you have some fail safe's in your code that carries out the re-authentication process within your application on the event access token has expired. In my own implementation, I've kept the callback page secret and new access token requests can be made within an Administration interface.

    So lets get to the code.

    Step 1: Authentication Request Classes

    These strongly-typed classes mirror the exact structure of the JSON returned from our authentication request. Even though we only require the "access_token" property, I've added additional information, such as details on the Instagram user making the request.

    public class AuthToken
    {
        [JsonProperty("access_token")]
        public string AccessToken { get; set; }
    
        [JsonProperty("user")]
        public InstagramUser User { get; set; }
    }
    
    public class InstagramUser
    {
        [JsonProperty("id")]
        public string ID { get; set; }
    
        [JsonProperty("username")]
        public string Username { get; set; }
    
        [JsonProperty("full_name")]
        public string FullName { get; set; }
    
        [JsonProperty("profile_picture")]
        public string ProfilePicture { get; set; }
    }
    

    It's worth noting at this point that I'm using Newtonsoft.Json framework.

    Step 2: Callback Page

    protected void Page_Load(object sender, EventArgs e)
    {
        if (!String.IsNullOrEmpty(Request["code"]) && !Page.IsPostBack)
        {
            try
            {
                string code = Request["code"].ToString();
    
                NameValueCollection parameters = new NameValueCollection();
                parameters.Add("client_id", ConfigurationManager.AppSettings["instagram.clientid"].ToString());
                parameters.Add("client_secret", ConfigurationManager.AppSettings["instagram.clientsecret"].ToString());
                parameters.Add("grant_type", "authorization_code");
                parameters.Add("redirect_uri", ConfigurationManager.AppSettings["instagram.redirecturi"].ToString());
                parameters.Add("code", code);
    
                WebClient client = new WebClient();
                var result = client.UploadValues("https://api.instagram.com/oauth/access_token", "POST", parameters);
    
                var response = System.Text.Encoding.Default.GetString(result);
    
                var jsResult = JsonConvert.DeserializeObject(response);
    
                //Store Access token in database
                InstagramAPI.StoreAccessToken(jsResult.AccessToken);
    
                Response.Redirect("/CallbackSummary.aspx?status=success", false);
            }
            catch (Exception ex)
            {  
                EventLogProvider.LogException("Instagram - Generate Authentication Key", "INSTAGRAM", ex);
    
                Response.Redirect("/CallbackSummary.aspx?status=error");
            }
        }
    }
    

    As you can see, I'm redirecting the user to a "CallbackSummary" page to show if the authentication request was either a success or failure. (Remember, the page is secured within my own Administration interface.)

    If the request is successful, the access token is stored.

    Step 3: Request Callback Page

    The last piece of the puzzle is to actually request our callback page by authorizing ourselves via Instagram API. In this case, I just have a simple page with the following mark up:

    <p>If Instagram fails to output images to the page, this maybe because a new Authorisation key needs to be generated.</p>
    <p>To generate a new key, press the button below and follow the required steps.</p>
    <a onclick="window.open('https://api.instagram.com/oauth/authorize/?client_id=<%=ConfigurationManager.AppSettings["instagram.clientid"].ToString() %>&redirect_uri=<%=ConfigurationManager.AppSettings["instagram.redirecturi"].ToString() %>&response_type=code', 'newwindow', config='height=476,width=641,toolbar=no, menubar=no, scrollbars=no, resizable=no,location=no,directories=no, status=no'); return false;" href="#" target="_parent">Generate</a>
    

    If all goes to plan, you should have successfully recieved the access token.

    I will post more Instagram code in future posts.

  • Sometimes optimising images to have an adequate image to file size ratio can be difficult when dynamically generating images using “System.Drawing”.

    Over the years, I have worked on quite a few different projects around the use of “System.Drawing” and recently I found a flexible way of being able to have control over the image quality and file size.

    Here’s a snippet of of code from my Generic Handler (.ashx) file:

    public void ProcessRequest(HttpContext context)
    {
        context.Response.ContentType = "image/jpeg";
    
        //Create a new Bitmap
        Bitmap oBitmap = new Bitmap(800, 800, PixelFormat.Format24bppRgb);
    
        //Load Background Graphic from Image
        Graphics oGraphics = Graphics.FromImage(oBitmap);
    
        #region Your Image Code
         
        //Insert your code here.
    
        #endregion
    
        #region Stage 1: Image Quality Options
        
        oGraphics.InterpolationMode = InterpolationMode.HighQualityBicubic;
        oGraphics.SmoothingMode = SmoothingMode.HighQuality;
        oGraphics.PixelOffsetMode = PixelOffsetMode.HighQuality;
        oGraphics.CompositingQuality = CompositingQuality.HighQuality;
        
        #endregion
    
        //Clear graphic resources
        oGraphics.Dispose();
    
        #region Stage 2: Image Quality Options
    
        //Output image
        ImageCodecInfo[] Info = System.Drawing.Imaging.ImageCodecInfo.GetImageEncoders();
        EncoderParameters Params = new System.Drawing.Imaging.EncoderParameters(1);
        Params.Param[0] = new EncoderParameter(Encoder.Quality, 100L); //Set image quality
        context.Response.ContentType = Info[1].MimeType;
        oBitmap.Save(context.Response.OutputStream, Info[1], Params);
    
        #endregion
    }
    

    System.Drawing.Graphics Optimisations

    In all my “System.Drawing” development projects, I’ve always set the graphic object quality options (lines 19-22) and found that it never really worked for me. The reason for this is because I always placed these settings after creating my System.Drawing.Graphics object prior to my custom code. So the image was getting optimised before any of my functionality had taken place. Rubbish!

    The key is to set all your System.Drawing.Graphics object settings just before you dispose of it. Makes sense doesn’t it? Don’t know how I made such a noob mistake.

    By default, .NET uses the web safe options when converting Bitmap to an image and setting those four properties will have a big affect on how your image looks.

    Compression Level

    This is the good bit!

    .NET gives you the ability to carry out further tweaks on how your image will be rendered by allowing us to set the compression level. The compression level can be tweaked by modifying the value passed to the “EncoderParameter” constructor (line: 34).

    For another example of how this can be used, take a look at the following MSDN article: http://msdn.microsoft.com/en-us/library/bb882583.aspx

  • I’ve been working on a .NET library to retrieve all images from a users Twitpic account. I thought it would be quite a useful .NET library to have since there have been some users requesting one (including me) on some websites and forums.

    I will note that this is NOT a completely functioning Twitpic library that makes use of all API requests that have been listed on Twitpic’s developer site. Currently, the library only contains core integration on returning information of a specified user (users/show), enough to create a nice picture gallery.

    My Twitpic .NET library will return the following information:

    • ID
    • Twitter ID
    • Location
    • Website
    • Biography
    • Avatar URL
    • Image Timestamp
    • Photo Count
    • Images

    Code Example:

    private void PopulateGallery()
    {
        var hasMoreRecords = false;
    
        //Twitpic.Get(<username>, <page-number>)
        TwitpicUser tu = Twitpic.Get("sbhomra", 1);
    
        if (tu != null)
        {
            if (tu.PhotoCount > 20)
                hasMoreRecords = true;
    
            if (tu.Images != null && tu.Images.Count > 0)
            {
                //Bind Images to Repeater
                TwitPicImages.DataSource = tu.Images;
                TwitPicImages.DataBind();
            }
            else
            {
                TwitPicImages.Visible = false;
            }
        }
        else
        {
            TwitPicImages.Visible = false;
        }
    }
    

    From using the code above as a basis, I managed to create a simple Photo Gallery of my own: /Photos.aspx

    If you experience any errors or issues, please leave a comment.

    Download: iSurinder.TwitPic.zip (5.15 kb)