A couple day ago my website got absolutely hammered by a wave of constant SQL injection attacks by the same IP over a time period of a couple hours.
I only managed to notice this whilst perusing the Event Log within the Kentico Administration interface. I don't normally check my own error logs as regularly as I should do, but since my site has recently gone through a bit of a revamp (which I'm still yet to post about), I wanted to ensure I haven't broken anything.
To be honest, I am flattered that someone would think this site is worth the time and energy in trying to hack my site. Trust me, it ain't worth it.
Even though Kentico has handled these attacks well, as a precaution I wanted to implement an additional layer of security before any further untoward activity reaches to my site. Being on a shared hosting platform my options are limited and my hands are tied to put in an infrastructure that doesn't cost the world.
Enter Cloudflare
I have always had some form of awareness of the Cloudflare content delivery network, just never put the service into practice. At one point I was looking into utilising Cloudflare to manage all my site media files over their CDN. But Cloudflare isn't just a CDN, it's able to offer much more:
- Analytics - monitor traffic as well as caching ratio and more!
- Firewall- manage access by IP, country, or query rules.
- Rate limiting- protect your site or API from malicious traffic by blocking client IP addresses that hit a URL pattern and exceed a threshold you define.
- Page rules - to allow caching to be triggered by a number of rules targeting specific areas of a site.
The great thing is that these options are part of the free plan... even though there are restrictions to the number of settings you are able to put in place. The security options alone was enough of a reason to try out Cloudflare. But for my needs, the free plan seemed to tick all the boxes. I am just scratching the surface to what Cloudflare has to offer and have already got a few of the features working alongside Kentico.
How I'm Using Cloudflare With Kentico
As security was a main concern for me, one of the first things I did was to add in some rules through the firewall and block suspicious traffic. Naturally the next was to take advantage of the CDN capabilities. I wouldn't recommend full site caching unless you have some pretty strict page rules in place as this has a chance to cause issues with the Kentico Admin interface. By default, Cloudflare doesn't cache HTML pages, which is a good thing as it gives us a plain canvas to target the areas we want to cache.
Being on the free plan, I only had three page rules at my disposal and made the decision to cache the following parts of my site.
| Area | Regex Rule | Settings |
|---|---|---|
| Media Library Files (using Permanent URL's) | *surinderbhomra.com/ |
getmedia/\* | <br>**Cache Level:** Caches Everything<br>**Edge Cache TTL:** A month<br>**Browser Cache TTL:** 16 days<br> |
| Site CSS, JavaScript and Images | *surinderbhomra.com/
resources/* | Cache Level: Caches Everything
Edge Cache TTL: A month
Browser Cache TTL: 16 days |
| ScriptResource.axd/WebResource.axd | *surinderbhomra.com/*.axd | Cache Level: Caches Everything
Edge Cache TTL: 7 days
Browser Cache TTL: 7 days |
Two cache types are used:
- Edge Cache TTL - is the setting that controls how long CloudFlare's edge servers will cache a resource before requesting a fresh copy from your server.
- Browser Cache TTL - is the time that CloudFlare instructs a visitor's browser to cache a resource. Until this time expires, the browser will load the resource from its local cache and speeding up the request.
I am caching my assets for a considerable amount of time, which begs the question how will changes to files purge the cache in Cloudflare? Luckily, Cloudflare has quite a nice API, where I have the ability to purge everything or individual files (maximum of 30 in one request).
Purge Media Library File Cache
I am in the middle of testing a GlobalEvent handler that will carry out the following steps when files are inserted or updated:
- Get path of the file.
- Check if site is using Permanent URL's. As the URL to the file will be constructured differently if enabled.
- Convert the relative path to an absolute path.
- Pass the absolute file path to Cloudflare using the following Purge Files by URL API endpoint.
Once I have carried out some further tests, I will be posting this code in a follow-up post.
Purge Site File Cache
Now attempting to purge the cache for site files such as JavaScript, CSS and images are a little more tricky as I need to keep an eye on the files changed. The easiest thing to do is I could write some code that will iterate through all the files in the /resources folder and purge everything from the CDN. Not the most elegant solution. Still, need to ponder on the correct implementation. If anyone has got any better suggestions, let me know.
How Do I Know Cloudflare Is Caching My Site Files?
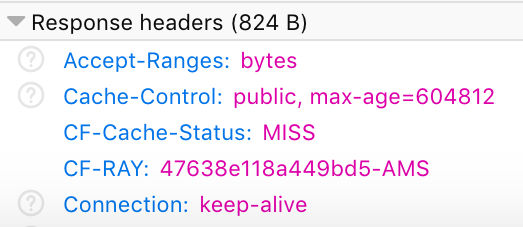
It does take a little time in Cloudflare to cache all files on a site. It all depends on pages being viewed. A page needs to be loaded in order to submit all its contents to cache. On first load, the response header CF-Cache-Status will return a "MISS", which means the content has not been served from Cloudflare.
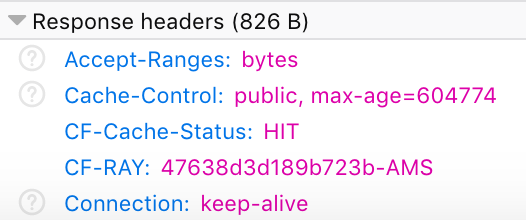
However, when you go back to the page and re-check the page headers, the CF-Cache-Status should return "HIT". If this is not the case, check your Page Rules within the Cloudflare dashboard.
Is Cloudflare Worth It?
Quick answer - Yes!
Setup is very straight-forward. All that is required is to carry out a change to your domain and point your DNS to the DNS Cloudflare assigns to you. There is no downtime in doing this. As a result, overall site performance has improved and page speed test faired much better.
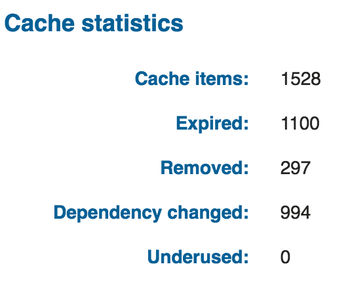
To give you a better insight for transparency, here are some statistics straight from my Cloudflare portal over a 24 hour period:
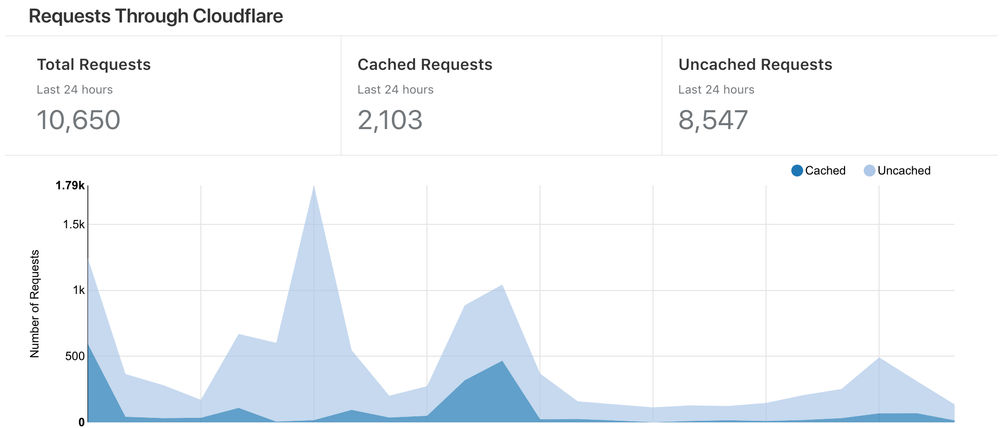
(Understandably, the number of cached items served through Cloudflare is low due to only caching specific areas)
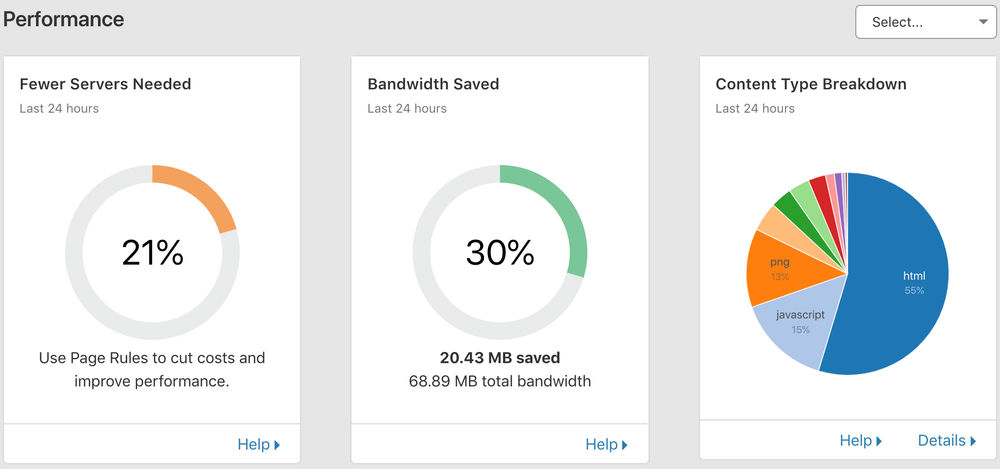
(My basic shared hosting should now be performing better as less requests are being served via the origin server)
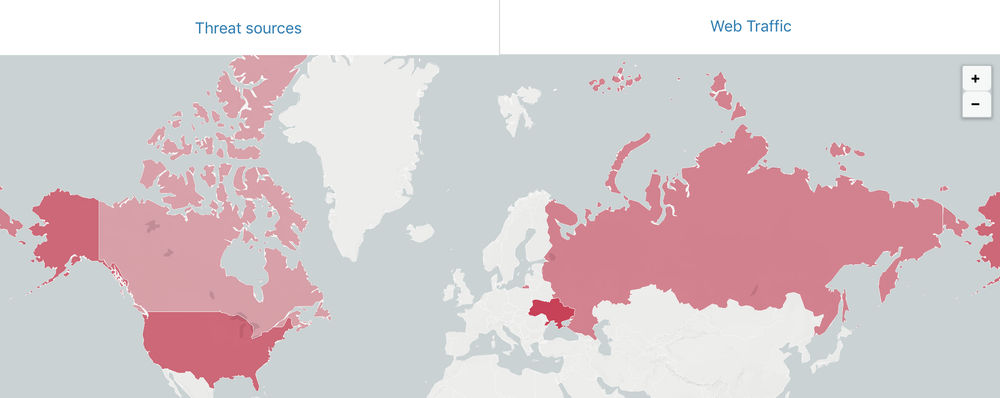
(Blocked threats - the reason why I decided to give Cloudflare a try in the first place)
I still have to carry out a lot more research in using Cloudflare to its full potential and will use my website as a test bed to see what I can achieve. My end goal is to make my website quicker and more secure!