Blog

Blogging on programming and life in general.

  • After my last blog posting (Google Is Better Than I Thought!!!), one of my mates said that he was unable integrate the Google Sitemap facility to his Blogger.com blog since there we could not find a Sitemap file. You can create a Google Sitemap for your Blogger.com site by carrying out the following:

    1. Login to your Google Sitemap account.

    2. Soon as you login you will be able to add your blogger site. In my example, I am creating a fictitious blog called "someblog.blogsite.com".

    1. Once you have added your new site you will get a message saying that your new site was added successfully.

    2. Now you will need to verify that you are the owner of the blog you have submitted (you wouldn't want anybody to track your site would you? :-P). You have two options here. You can either use a HTML file (which cannot be used on Blogger blogs) or META tag. Select META tag.

    1. A unique META tag will be generated for you:

    1. Login to your Blogger.com account and edit your Blog Template. Insert your generated META tag straight after the <head> tag and Save your template.

    2. In the Google Sitemap account click on the "Verify" button and if everything goes to plan you will be able to create a Sitemap file.

    3. Click on the "Sitemap" link from the left navigation and then click "Add Sitemap".

    4. From the Drop Down List select "Add General Web Sitemap".


    10) The Blogger RSS feed will be used as your Sitemap. So enter the full web address of your RSS feed. For example: http://someblog.blogsite.com/feeds/posts/ and press "Add General Web Sitemap" button.

    That should be it. It may take up to 24 hours for Google to crawel through your blog depending on the amount of content on your site.

    UPDATE:

    It looks like  there are 4 possibilities for referencing your Blogger Sitemap:
    > someblog.blogsite.com/rss.xml
    > someblog.blogsite.com/feeds/posts/full
    > someblog.blogsite.com/feeds/posts/default?alt=rss
    > someblog.blogsite.com/atom.xml

  • Published on
    -
    1 min read

    Google Is Better Than I Thought!!!

    google-as-a-giant-robot I decide to test how well my site postings was being tracked on Google and I was quite surprised that my site had not been tracked for over a month, which meant that all my recent posts were not submitted to the search engine. However, I found that you can manually tell Google to update your website through XML sitemaps. Pretty much all well known blog formats have sitemaps functionality. For example, http://blogs.sampleblog.co.uk/sitemap.axd. As you can see the .axd page is the XML Sitemap file.

    Using Google's manual update is as simple as going to the following web address: http://www.google.com/ping?sitemap=[sitemap URL]. Once you have carried this out Google will display a link to check your tracking status and gives you additional information on when your site was last tracked. Amazing!

    From carrying out further research on the Internet, Microsoft Live Search has incorporated the Sitemap ping back service in the exact same way. Instead you will need to go to the following web address: http://webmaster.live.com/ping.aspx?siteMap=[sitemap URL].

  • Published on
    -
    1 min read

    "Timeout expired" in SQL Server 2005

    If you are running a query that needs to make changes to quite a few rows within a database (in my case 8700 rows). You might get an error exception pop up which says the following:

    "Timeout expired.  The timeout period elapsed prior to completion of the operation or the server is not responding."

    After some investigating I found that there are two ways to overcome this error:

    1. Use Database Engine Query (or formally known as Query Analyser) to run your query instead of using SQL Panel in table view. I think that the SQL Query panel within table view is only used for smaller query operations. Thats just my guess because it didn't work for me. When using Database Engine query there is pretty much no limit to the amount of data you need.

    2. Override connection timeout in SQL Server Options:


    I found an option to change the timeout limit in the least place I expected. Under the "Designers" selection within SQL Server Options you will be able to change the timeout amount. But you cannot uncheck the override amount, you will have to specify the amount of seconds you require. 

  • Published on
    -
    1 min read

    Windows Disk Cleanup Alternative

    To keep a PC running smoothly, regular maintenance is critical. Many users shy away from maintenance tasks, thinking it is a long, drawn out manual affair, but the Disk Cleanup Utility can easily determine which files on a hard drive may no longer be needed and delete those files. In addition to freeing up potentially significant amounts of hard drive space, using a Disk Cleanup on a regular basis can significantly improve system performance.

    I have always used Microsoft Windows Disk Cleanup and I was interested in seeing if there were any free software that could do a better job. After trawling through the net I was surprised to find how many programs claim to help you get back your PC into original working condition by removing all the clutter. Just as I expected most of the Disk Cleaning utilities were not free. But I did find one cleanup utility that fitted the mark quite nicely called Cleanup (well what else would it be called Tongue out!).

    CleanUp is a powerful and easy-to-use application that removes temporary files created while surfing the web, empties the Recycle Bin, deletes files from your temporary folders and more. It frees disk space and reduces the "clutter" on your computer helping it to run more efficiently. It also can be used as a way to protect your privacy on the Internet. You can even instruct CleanUp to securely delete files making it impossible to retrieve their contents using lower-level disk tools - just another way of protecting your privacy.

    You can download the program here.

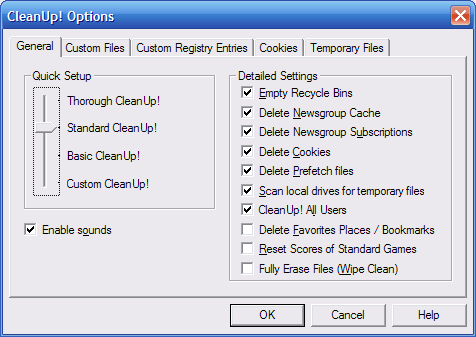
    WARNING!: This program is a really thorough piece of kit because it can even delete your Bookmarks if you have not selected the right options:

    Cleanup Options

  • Published on
    -
    1 min read

    Programmatically Using SqlDataSource

    The SqlDataSource control enables you to use a Web control to access data located in a relational data base, including Microsoft SQL Server and Oracle databases, as well as OLE DB and ODBC data sources. You can use the SqlDataSource control with other controls that display data, such as the GridView, FormView, and DetailsView controls, to display and manipulate data on an ASP.NET Web page, using little or no code.

    protected void PopulateComments(string recordNo)
    {
        //Connection to database
        string connString = ConfigurationManager.ConnectionStrings["ConnectionString"].ConnectionString;
        
        SqlDataSource sqlDataSource = 
            new SqlDataSource(connString, "SELECT [CommComments], [RelComments], [ManageComments], [RoleComments], [PersonalComments] FROM [tblSurveyResults] WHERE ([SurveyID] = @SurveyID)");
    
        sqlDataSource.SelectParameters.Add(new Parameter("SurveyID", System.TypeCode.Int32, recordNo));
        
        System.Data.DataView dv = (System.Data.DataView)sqlDataSource.Select(DataSourceSelectArguments.Empty);
        
        //Output Comments to label controls
        lblQuestion1Comments.Text = dv[0][0].ToString();
        lblQuestion2Comments.Text = dv[0][1].ToString();
        lblQuestion3Comments.Text = dv[0][2].ToString();
        lblQuestion5Comments.Text = dv[0][3].ToString();
        lblQuestion4Comments.Text = dv[0][4].ToString();
    }


    As you can see, the data is output from the database in little code. I believe this is far more flexible compared to dragging a dropping a SqlDataSource onto the page. The above code queries the database and then passes the selected fields to a DataView. You can then output each individual column data where you want. In this case, I have output the data to labels:

    //Output Comments to label controls
    lblQuestion1Comments.Text = dv[0][0].ToString(); //Output CommComments column data
    lblQuestion2Comments.Text = dv[0][1].ToString(); //Output RelComments column data
    lblQuestion3Comments.Text = dv[0][2].ToString(); //Output ManageComments column data
    lblQuestion4Comments.Text = dv[0][3].ToString(); //Output RoleComments column data
    lblQuestion5Comments.Text = dv[0][4].ToString(); //Output PersonalComments column data
    
  • Published on
    -
    1 min read

    Simple Way To Use A DataTable

    When I normally create a datatable, I use quite a few lines of code just to add columns and input data into my DataTable.  But recently I have been using the following method use a DataTable in my code. The following function validates RadionButtonLists that I have in my page by passing the RadioButtonList size (rblSize) and RadioButtonList name (rblName).

    //Function: Validate RadioButtonList for each question group
    bool GroupValidateRBL(int rblSize, string rblName)
    {
        bool validateOutput = true;
        int counter = 1;
       
        //Create DataTable object
        DataTable dt = new DataTable();
    
        //Add columns to DataTable
        dt.Columns.Add("No");
        dt.Columns.Add("RadioButtonName");
        dt.Columns.Add("Checked");
    
        while (counter <= rblSize)
        {
            ContentPlaceHolder cph = (ContentPlaceHolder)Page.Master.FindControl("ContentPlaceHolder1");
            RadioButtonList rbl = (RadioButtonList)cph.FindControl(rblName + counter);
    
           //Add Rows to Datatable
           dt.Rows.Add(new string[] { counter.ToString(), rblName, rbl.SelectedIndex.ToString() });
           counter++;
        }
    
        //Iterate through all rows in the DataTable to find all RadioButtonLists that have not been selected
        foreach (DataRow dr in dt.Rows)
        {
            if (Convert.ToInt32(dr["Checked"]) == -1)
            {
                validateOutput = false;
                break;
            }
        }
       return validateOutput;
    } 
    

    The DataTable in the function above stores a list of RadioButtonList entries and then iterates through each row in the DataTable to see if they have been selected. The data is entered into the DataTable by the following line:

    dt.Rows.Add(new string[] { counter.ToString(), rblName, rbl.SelectedIndex.ToString() });
    
  • Published on
    -
    1 min read

    Looping Through RadioButtonLists

    At the moment I am working on a Survey that contains tonnes of RadioButtonList controls that users will use to respond to the numerous questions I have on the website. All was going well until I thought about how I would find a quick and efficient way to enter all the RadioButtonList entries into my SQL database without having to do the following:

    _rblBLL.InsertResults(1, rblist1.SelectedValue);
    _rblBLL.InsertResults(2, rblist2.SelectedValue);
    _rblBLL.InsertResults(3, rblist3.SelectedValue);
    ...
    ...
    ...
    ...
    

    (InserResults() is my BLL function)

    As you can see above, this is indeed a long winded way of inserting all my RadioButtonList entries to the database.

    But I found a better way by using the FindControl() method:

    for (int i=1; i < questionNo; i++)
    {      
        RadioButtonList rbl = (RadioButtonList)this.FindControl("rblist" + i);
    
        if(rbl != null)
        {
             _rblBLL.InsertResults(i, rbl.SelectedValue);
        }
    } 
    

    As you can see, I created a for loop that will iterate through all the RadioButtonLists by incrementing the end value of RadioButtonList ID. So you will have to adopt a naming convention that has a number at the end as shown I have used above.

  • Published on
    -
    1 min read

    Last Post Of The Year

    logo_bullguard Well this is my last post of 2007. Even though I have not made many posts since I started this blog, hopefully next year will give me more time to pad this blog out.

    Since I have created this blog entry, I might as well talk about something. Well a day or two ago my Bullguard Internet Security had expired and even though I have been meaning to purchase a new yearly license, it was not on my priority list. Normally, when your Internet Securty expires the only thing that you cannot do is get up-to-date virus definitions, which is not that much of a deal since your computer is still protected.

    However, what I found with Bullguard was that the Virus Scanner,  Firewall, and Spam Filter was locked until I purchased my new yearly license. I found this to be quite annoying since I had to find an alternative Internet Security suite until my new version of Bullguard was posted.

    This is only a minor grudge from a great piece of Intenet Security though!

    Oh yeah! Happy New Year!!!

  • Published on
    -
    1 min read

    ASP.NET Login Authentication Problem

    I was trying to create a Login page for my website in ASP.NET a couple of days ago and I was stumped that the following piece of code did not work:

    private bool SiteLevelCustomAuthenticationMethod(string User, string Password)
    {   
       bool boolReturnValue = false;
       DataTable dtAuthUsers = SomeBLL.GetUsers();
       if (dtAuthUsers != null && dtAuthUsers.Rows.Count > 0)
       {
           DataView dvAuthUsers = dtAuthUsers.DefaultView;
           foreach (DataRowView drvAuthUsers in dvAuthUsers)
           {
                if (User == drvAuthUsers.Row["User"].ToString() && Password == drvAuthUsers.Row["Password"].ToString())
                {
                    boolReturnValue = true;
                }
            }
        }
        return boolReturnValue;
    }
    
    protected void LoginControl_Authenticate(object sender, AuthenticateEventArgs e)
    {
        bool Authenticated = false;
        Authenticated = SiteLevelCustomAuthenticationMethod(LoginControl.UserName, LoginControl.Password);
        e.Authenticated = Authenticated;
        if (Authenticated == true)
        {
            FormsAuthentication.RedirectFromLoginPage(string.Format("{0}", LoginControl.UserName), false);
        }
    } 
    

    Now after numerous debug sessions on this code, I could not find a thing wrong with it. The correct Username and Password was getting parsed to the Database but still the 'SiteLevelCustomAuthenticationMethod' function was still returning a false.

    What was causing this problem was actually quite simple (even though it had taken my a long time to solve!). Basically, in the User's table in my database had the following columns:

    1. User_ID ------> DataType: int
    2. Username ------> DataType: nvarchar
    3. Password ------> DataType: char

    Now this table look alright doesn't it? Well it isn't. The problem lies within the 'Password' column. Since this column format is 'char' with a length of 25, when you enter a password that is less than 25 characters in length a space will be added after to fill out the data length. For example, if you had a password that was 10 characters long, an extra 15 characters of spacing will be added after your password.

    In order to fix this problem, I changed the Password DataType to 'nvarchar', which solved the problem.

  • Published on
    -
    1 min read

    Broadband Speed Shock Horror!!!

    A few weeks ago I was watching "The Gadget Show", which in the UK is a fun and informative show about gadgets (yeah the name of the show gave it away) and technology. Anyway, there was one episode which really got my attention. It was about the varied Broadband speed each household is getting around the UK. They believed that many people falling short of the "up to" speeds offered by their ISP, we're campaigning for the truth: advertised speeds reflecting what we're actually getting.

    I decided to test their speculation out for myself by using one of these online "Broadband Speed Checker's".

    How Does It Work?

    The speed checker downloads a file from the server and measures how long your connection takes to download it. The size of the file will be different according to your line speed. The speed checker measures the speed at the time of the test so if your network is running slow at that time then speed checker will report a slow speed. This does not necessarily mean that your internet connection is slow at the other times.

    My Findings

    I currently have a 2MB internet conneciton speed that is supplied by NTL (well now under Virgin Media). I carried out the test and not surprisingly my connection speed was not 2MB it was around 1.5MB. I know that compared to other users, my connection speed is not too much of a reduction. But still I am quite angry that I am not getting exactly what I paid for.

    Well what are you waiting for? Give it a go and you might be surprised that you didn't get what you paid for! Leave a comment and share your results.