Blog

Posts written in 2013.

  • Published on
    -
    7 min read

    Create A Custom YouTube Form Control In Kentico

    It seems that I have a tendency to blog more about YouTube then any other Social API on this site. So here we go again... This time I want to show how to easily integrate a YouTube CMS Form Control within a Custom Table or Document Type within Kentico.

    As far as I'm aware, Kentico only allows you to insert YouTube markup into their HTML Editable Regions via the CKEditor. But what if you wanted to take things a step further and have the ability to return a video Title, Description and Thumbnail within the comfort of the Form tab?
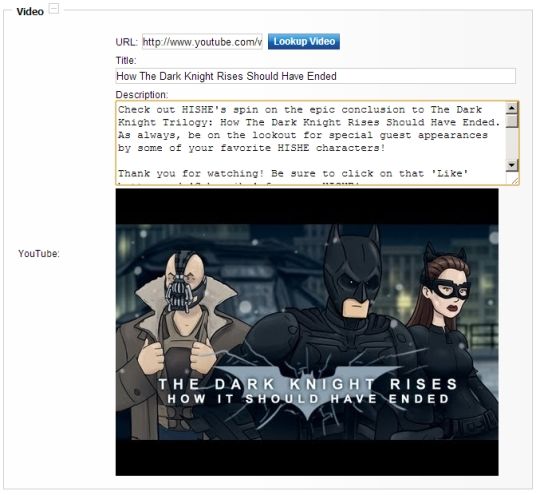
    YouTube Custom CMS Form Control

    As you can see from my custom form control, a user would paste the URL of a YouTube video and press the "Lookup Video" button that will return basic information about that video, ready for the user to carry out any further copy changes they require.

    So let's get to it.

    Step 1: Create A New User Control

    I have created a user control in "/CMSFormControls/Surinder/" of my Kentico installation. I have named the user control: YouTubeLookup.ascx.

    HTML

    <table><tbody>	<tr>		<td class="TextColumn">			<label for="<%=YouTubeUrl.ClientID >">URL:</label> <asp:textbox id="YouTubeUrl" runat="server"></asp:textbox> <asp:button cssclass="ContentButton" id="LookupVideoDetail" onclick="LookupVideoDetail_Click" runat="server" text="Lookup Video"> </asp:button></td>	</tr>	<tr>		<td class="TextColumn">			<label for="<%=YouTubeTitle.ClientID >">Title:</label> <asp:textbox id="YouTubeTitle" runat="server" width="500"></asp:textbox></td>	</tr>	<tr>		<td class="TextColumn">			<label for="<%=YouTubeDescription.ClientID >">Description:</label> <asp:textbox height="100" id="YouTubeDescription" runat="server" textmode="MultiLine" width="500"></asp:textbox></td>	</tr>	<tr>		<td class="TextColumn">			<asp:image id="YouTubeThumbnail" runat="server"></asp:image></td>	</tr></tbody>
    </table>
    

    Code-behind

    using System;
    using System.Collections.Generic;
    using System.Linq;
    using System.Web;
    using System.Web.UI;
    using System.Web.UI.WebControls;
    using CMS.FormControls;
    using CMS.GlobalHelper;
    using System.Web.Script.Serialization;
    
    public partial class CMSFormControls_Surinder_YouTubeLookup : FormEngineUserControl
    {
        private string _jsonValue;
    
        public override Object Value
        {
            get
            {
                return GetJsonMarkup();
            }
            set
            {
                _jsonValue = System.Convert.ToString(value);
            }
        }
    
        private string GetJsonMarkup()
        {
            //Pass all user entered form values to the YouTubeDetail class for serialization in the JavaScriptSerializer
            if (!String.IsNullOrEmpty(YouTubeUrl.Text))
            {
                YouTubeDetail yt = new YouTubeDetail();
                yt.ID = YouTubeHelper.GetVideoID(YouTubeUrl.Text);
                yt.Title = YouTubeTitle.Text;
                yt.Description = YouTubeDescription.Text;
                yt.Url = YouTubeUrl.Text;
                yt.ImageUrl = YouTubeThumbnail.ImageUrl;
    
                JavaScriptSerializer jsSerialize = new JavaScriptSerializer();
    
                return jsSerialize.Serialize(yt);
            }
            else
            {
                return String.Empty;
            }
        }
    
        public override bool IsValid()
        {
            JavaScriptSerializer jsSerialize = new JavaScriptSerializer();
            var jsResult = jsSerialize.Deserialize<YoutubeDetail>(_jsonValue);
    
            if (jsResult != null && !String.IsNullOrEmpty(jsResult.ToString()))
            {
                if (String.IsNullOrEmpty(jsResult.Url))
                    return false;
                else
                    return true;
            }
            else
            {
                return true;
            }
        }
    
        protected void EnsureItems()
        {
            PopulateControls();
        }
    
        private void PopulateControls()
        {
            JavaScriptSerializer jsSerialize = new JavaScriptSerializer();
            var jsResult = jsSerialize.Deserialize<YoutubeDetail>(_jsonValue);
    
            //Check there if JSON is present to populate form controls
            if (jsResult != null && !String.IsNullOrEmpty(jsResult.ToString()))
            {
                if (!String.IsNullOrEmpty(jsResult.Url))
                    YouTubeUrl.Text = jsResult.Url;
    
                if (!String.IsNullOrEmpty(jsResult.Title))
                    YouTubeTitle.Text = jsResult.Title;
    
                if (!String.IsNullOrEmpty(jsResult.Description))
                    YouTubeDescription.Text = jsResult.Description;
    
                if (!String.IsNullOrEmpty(jsResult.ImageUrl))
                    YouTubeThumbnail.ImageUrl = jsResult.ImageUrl;
            }
        }
    
        protected void Page_Load(object sender, EventArgs e)
        {
            if (!Page.IsPostBack)
                EnsureItems();
        }
    
        protected void LookupVideoDetail_Click(object sender, EventArgs e)
        {
            //If YouTube URL is present, get the information
            if (!String.IsNullOrEmpty(YouTubeUrl.Text))
            {
                YouTubeDetail yt = YouTubeHelper.GetVideoInformation(YouTubeUrl.Text);
    
                if (yt != null)
                {
                    YouTubeTitle.Text = yt.Title;
                    YouTubeDescription.Text = yt.Description;
                    YouTubeThumbnail.ImageUrl = yt.ImageUrl;
                }
            }
        }
    }
    

    From looking at my code, you've probably noticed I'm actively using a "JavaScriptSerializer" to pass all my form values as JSON. I find this is the most straight-forward way to store multiple form values in a custom control. In this case, our values will be stored within a Kentico table column in the following format:

    {
        "ID":"fLyoog562x4",
        "Title":"How The Dark Knight Rises Should Have Ended",
        "Description":"Check out HISHE\u0027s spin on the epic conclusion to The Dark Knight Trilogy: How The Dark Knight Rises Should Have Ended.",
        "Url":"http://www.youtube.com/watch?v=fLyoog562x4",
        "ImageUrl":"http://i1.ytimg.com/vi/fLyoog562x4/hqdefault.jpg"
    }
    

    Whenever I need to get those values back, all I need to do is call the JavaScriptSerializer.Deserialize method.

    NOTE: If what I have shown doesn't make any sense, it'll be useful to take a look at an in-depth tutorial on how to create a Custom Form Control in Kentico: http://devnet.kentico.com/docs/devguide/index.html?developing_form_controls.htm

    Step 2: Create YouTubeDetail Class

    In order to serialize and deserialize values when using the JavaScriptSerializer, we need to create a class object with a number of properties to interpret the JSON structure.

    public class YouTubeDetail
    {
        public string ID { get; set; }
        public string Title { get; set; }
        public string Description { get; set; }
        public string Url { get; set; }
        public string ImageUrl { get; set; }
    }
    

    Step 3: YouTube Methods

    This is the part when we start using Google's YouTube API and in order for this class to work, you will need to download the necessary DLL's. I suggest you take a gander at a post I wrote a while back called "Dynamically Output A List of YouTube Videos In ASP.NET" to get an in-depth introduction into using the YouTube API.

    To get data back from YouTube you will need as a minimum requirement the DLL's and register your application in order to pass an Application Name, Developer Key and Client ID values to your application.

    public class YouTubeHelper
    {
        private static string YouTubeDeveloperKey = WebConfigurationManager.AppSettings["YouTubeDeveloperKey"].ToString();
        private static string YouTubeAppName = WebConfigurationManager.AppSettings["YouTubeAppName"].ToString();
        private static string YouTubeClientID = WebConfigurationManager.AppSettings["YouTubeClientID"].ToString();
     
        //Get YouTube video
        public static Video YouTubeVideoEntry(string videoID)
        {
            YouTubeRequestSettings settings = new YouTubeRequestSettings(YouTubeAppName, YouTubeClientID, YouTubeDeveloperKey);
            YouTubeRequest request = new YouTubeRequest(settings);
     
            //Link to the feed we wish to read from
            string feedUrl = String.Format("http://gdata.youtube.com/feeds/api/videos/{0}", videoID);
     
            Feed<Video> videoFeed = request.Get<Video>(new Uri(feedUrl));
     
            return videoFeed.Entries.SingleOrDefault();
        }
     
        //Extract the YouTube ID from the web address.
        public static string GetVideoID(string videoUrl)
        {
            Uri tempUri = new Uri(videoUrl);
     
            string sQuery = tempUri.Query;
     
            return System.Web.HttpUtility.ParseQueryString(sQuery).Get("v");
        }
     
        //Get required YouTube video information
        public static YouTubeDetail GetVideoInformation(string url)
        {
            Video v = YouTubeVideoEntry(GetVideoID(url));
     
            //Pass required YouTube information to custom class called YouTubeDetail
            YouTubeDetail vDetail = new YouTubeDetail();
            vDetail.ID = v.VideoId;
            vDetail.Title = v.Title;
            vDetail.Description = v.Description;
            vDetail.ImageUrl = v.Thumbnails[2].Url;
    
            return vDetail;
        }
    
        //Output YouTube property within a document by passing the Document ID
        public static YouTubeDetail GetDocumentYouTubeValue(int docID)
        {
            TreeProvider tree = new TreeProvider();
            TreeNode tn = tree.SelectSingleDocument(docID);
    
            if (tn.GetValue("YouTube") != null && !String.IsNullOrEmpty(tn.GetValue("YouTube").ToString()))
            {
                JavaScriptSerializer jsSerialize = new JavaScriptSerializer();
                var jsResult = jsSerialize.Deserialize<YouTubeDetail>(tn.GetValue("YouTube").ToString());
    
                if (jsResult != null && !String.IsNullOrEmpty(jsResult.ToString()))
                {
                    return jsResult;
                }
                else
                {
                    return null;
                }
            }
            else
            {
                return null;
            }
        }
    }
    

    Step 4: Add New Control Into Kentico

    Please refer to the Kentico Development Guide (as referenced in Step 1). The main thing you need to ensure is that the control can only be used as a "Long text" type.

    YouTube Kentico Control Settings

    Step 5: Outputting The YouTube Values To A Page

    Since we have stored all our YouTube fields in a JSON string, we can get those values out by carrying out a deserialization on our document type property.

    if (CMSContext.CurrentDocument.GetStringValue("YouTubeVideo", String.Empty) != String.Empty)
    {
        JavaScriptSerializer jsSerialize = new JavaScriptSerializer();
        YouTubeDetail yt = jsSerialize.Deserialize<YouTubeDetail>(CMSContext.CurrentDocument.GetStringValue("YouTubeVideo", String.Empty));
    
        YouTubeTitle.Text = yt.Title;
        YouTubeDescription.Text = yt.Description;
        YouTubeUrl.Text = yt.Url;
    }
    

    You may think I have slightly over-engineered the process to store YouTube video's. But if you have a website that is trying to push video content along with its META data, I believe this is the way to go.

  • Published on
    -
    1 min read

    A Hidden User Control Is A Running User Control

    I've been a .NET Developer for around 6 years and it still amazes me how I can overlook something that I never really questioned. For example, when a user control is hidden, I always assumed that all the code it contained would never run since until it was made visible.

    However, after being told by one of my work colleagues that in fact a hidden user control will always run, it will just simply is hidden by the client. After searching the web for a definitive answer, I found a StackOverflow post that fully backed up his theory: http://stackoverflow.com/questions/12143693/hiding-user-controls-using-code-behind-does-internal-code-still-run-ie-am-i.

    As the StackOverflow post suggests, the most performance efficient way to show/hide a user control is by dynamically loading it in when required.

    if (jobs.Count > 0)
    {
         MyPlaceholder.Controls.Add(Page.LoadControl("/Controls/Listings/JobsList.ascx"));
    }
    

    As you can see in my example above, I'm loading my user control to a place holder in the page.

  • Even though my programming weapon of choice is .NET C#, there are times (unfortunate times!) where I need to dabble in a bit if PHP. Being a .NET developer means I do not have the setup to run PHP based sites such as Apache and MySQL.

    In the past I have tried to create an Apache configured server but I could never get it running 100% - possibly because I didn't have the patience or could justify the additional time required for setup when I could be working on a PHP site once in a blue moon...

    Last year, I came across a program called EasyPHP that allowed me to install a local instance of Apache and MySQL altogether in just one installation. It made it really to get up and running without all the setup and configuration hassle.

    Once installed you can create numerous websites and MySQL instances in a version of your own choosing. Wicked! I never been so excited about PHP in my life!

    I have only scratched the surface on the features EasyPHP provides and whenever I did need to use it, there has always been great improvements. Take a look at their site for more information:http://www.easyphp.org.

    So if you're a Windows man who needs to carry out PHP odds and ends, can't recommend EasyPHP enough.

  • A few weeks ago my Dad gave me my first mechanical keyboard. Knowing that I have a major fondness for anything that "lights up", he got me the "Ducky DK9008 Shine 2".

    The manufacturer wasn't kidding when they called their keyboard range "Shine 2". Soon as the keyboard is plugged in, things come to life and you are blinded by the most immensly bright blue light. Images on the internet will not truly justify how bright these LED's are! Thankfully, you have full control over the level of brightness and lighting modes.

    I'd be lying if I said that I've heard of the "Ducky" range of hardware peripherals until this point. Alas, I haven't. If the internet reviews are anything to go by, "Ducky" is well known in the mechanical keyboard market, providing a wide range of high quality and customisable keyboards. Nice!

    What's even better is the fact that I have the flagship model! I dread to think how much this thing costs...

    One thing I noticed after unboxing is the sheer weight. It's definitely one of the bulkiest keyboards I've ever handled. But this piece of hardware exudes quality and workmanship. Well this is something you'd expect from a top of the range keyboard that is on the higher end of the price spectrum.

    There has always been a misconception that mechanical keyboards are known for being stiff and produce a loud clacking noise. This couldn't be further from the truth with DK9008 Shine 2. This particular model uses the Cherry MX Brown switches, which produce a sharp response whether you are the kind of person that is a "heavy hitter" or who has the "lighter touch". Either way, the keys feel light to press with minimum effort and produce a nice satisfying "click".

    I've tried this keyboard for both standard typing and gaming. It's a great all rounder.

    One things for sure. Once you go mechanical you will never want to go back to the traditional membrane switch keyboard.

    For more info on the Ducky DK9008 Shine 2, take a look at their website: http://www.duckychannel.com.tw/en/DK9008_shine2.html

    And yes. This blog post was typed up using the Ducky DK9008 and I forsee all future posts will be typed up in the same manner. :-)

  • Published on
    -
    1 min read

    Goodbye BlogEngine. Hello Kentico!

    Kentico LogoFor many years, I've been a happy BlogEngine user. However, recently my website was starting to expand in a way that wasn't flexible enough for the BlogEngine platform. Don't get me wrong, BlogEngine is a great blogging platform and it is without a doubt one of the best out on the market. But the capabilities and features Kentico provides made moving over to another platform an easy decision.

    The future of my site needed something that would give me free reign and control on making full customisations myself in a solid framework, and Kentico seemed to fit this requirement.

    Having worked with the Kentico platform for quite a few years now, I was impressed by how easy or complex I could make a site. Most importantly, the page perfomance of my site has got quite a boost. For a site that doesn't look like is doing much at face value, it is behind the scenes.

    What was the migration process like?

    Migrating all my BlogEngine content into Kentico did take some time, but the Kentico Import tool really does take the hassle out of getting key blog post information into the CMS. Just don't be expect tags and categories to be imported in the process. Migrating these facets is a manual job.

    In addition, I decided to overhaul the friendly URL's used for my blog posts in keeping with the URL structure provided by BlogEngine. Even to this day, I'm not sold on the way Kentico generates it's friendly URL's for blog posts. For example:

    /Blog/February-2013/My-Blog-Post.aspx
    

    When it should be the following format:

    /Blog/2013/02/03/My-Blog-Post.aspx
    

    Luckily, it was pretty easy to write a Custom Eventhandler to add additional custom URL paths whenever I update or insert a new post (will add a post in the near future on how to do this).

    I still have some additional features to add to this site (and dare I say fixes!) so watch this space...

  • Published on
    -
    2 min read

    Does Kentico Cache Case-Sensitive Query String’s?

    I noticed something very strange whilst working on one of my recent Kentico projects, where I required a query string value to be case-sensitive. You might be asking why? Well the plan was to pass case-sensitive Base64 random value in a bit.ly ID format. For example: www.mysite.com/Home/iAfcTy.

    So I added a Wildcard URL to one of my pages to keep the URL looking nice and tidy. In this case: “/Home/{ID}”.

    Kentico Document Url Path

    Something with the most simplest of intensions ended up being a bit of a nightmare and to demonstrate what I experienced, see the following test-cases using Kentico’s Wildcard parameter.

    Test 1

    Passing “Hello” to the query string parameter resulted in the following:

    Kentico Wildcard Case 1

    This is the correct outcome.

    Test 2 – Things get interesting!

    Passing “HELLO” to the same query string parameter resulted in the following:

    Kentico Wildcard Case 2

    As you can see, the query string has been cached and resulted in the same value being used. It seems Kentico completely disregards the case sensitivity and it’s only by adding or removing characters that Kentico detects the value passed has changed.

    ***

    My understanding is that by default Kentico accepts the URL’s as entered by the website user. I thought by going to CMS Site Manager and changing the URL settings to “Use exactly the URL of the document” would accept case-sensitive lettering .

    Kentico Redirect Valid Urls

    As it turns out through my testing, this setting under “URL's and SEO” section doesn’t fix the issue and this may only work for document page names and not the query strings values themselves.

    For one moment, I thought I managed to find a bug in the Kentico platform and was hoping that I'd get a tree planted bearing my name through Kentico’s brilliant tree for a bug campaign. Alas, this was not the case. After discussing in great detail the problem with emails sent back and forth I couldn't seem to get the support personnel to replicate the issue.

    But if I'm experiencing this issue across different networks, workstations and installations, there must be an underlying problem within the Kentico platform.

    If one of my fellow Kentico experts can can try what I have stated in my post and report their findings in the comments section, it would be much appreciated.

    Who knows, there might be a really simple thing I’ve overlooked.

    Workaround

    Using the standard way of passing a query string value works perfectly and it only seems Kentico Wildcard URL’s  experiences this issue. So instead of using the Wildcard method, you will have to pass values in the following format:

    www.mysite.com/Home/?ID=Hello
    
  • Published on
    -
    1 min read

    Windows 2008 Task Scheduler Result Codes

    I’ve been working on a PowerShell script that required to be automatically run every 5 minutes. As you probably guessed, using Windows Task Scheduler is the way to go.

    Prior to assigning any scripts or programs to a scheduled task, I always run them manually first to ensure all issues are rectified.  We all know if there is an issue whilst running within Task Scheduler, Windows likes to help us by showing us some ambiguous error/success codes.

    Luckily, MSDN provides a comprehensive list of these codes that can be found here: http://msdn.microsoft.com/en-us/library/aa383604

    But there more common codes are listed below:

    0 or 0x0: The operation completed successfully.
    1 or 0x1: Incorrect function called or unknown function called.
    2 or 0x2: File not found.
    10 or 0xa: The environment is incorrect.
    0x41300: Task is ready to run at its next scheduled time.
    0x41301: Task is currently running.
    0x41302: Task is disabled.
    0x41303: Task has not yet run.
    0x41304: There are no more runs scheduled for this task.
    0x41306: Task is terminated.
    0x8004131F: An instance of this task is already running.
    0x800704DD: The service is not available (is 'Run only when an user is logged on' checked?)
    0xC000013A: The application terminated as a result of a CTRL+C.
    0xC06D007E: Unknown software exception.
    
  • Published on
    -
    2 min read

    Optimising Image Quality In System.Drawing

    Sometimes optimising images to have an adequate image to file size ratio can be difficult when dynamically generating images using “System.Drawing”.

    Over the years, I have worked on quite a few different projects around the use of “System.Drawing” and recently I found a flexible way of being able to have control over the image quality and file size.

    Here’s a snippet of of code from my Generic Handler (.ashx) file:

    public void ProcessRequest(HttpContext context)
    {
        context.Response.ContentType = "image/jpeg";
    
        //Create a new Bitmap
        Bitmap oBitmap = new Bitmap(800, 800, PixelFormat.Format24bppRgb);
    
        //Load Background Graphic from Image
        Graphics oGraphics = Graphics.FromImage(oBitmap);
    
        #region Your Image Code
         
        //Insert your code here.
    
        #endregion
    
        #region Stage 1: Image Quality Options
        
        oGraphics.InterpolationMode = InterpolationMode.HighQualityBicubic;
        oGraphics.SmoothingMode = SmoothingMode.HighQuality;
        oGraphics.PixelOffsetMode = PixelOffsetMode.HighQuality;
        oGraphics.CompositingQuality = CompositingQuality.HighQuality;
        
        #endregion
    
        //Clear graphic resources
        oGraphics.Dispose();
    
        #region Stage 2: Image Quality Options
    
        //Output image
        ImageCodecInfo[] Info = System.Drawing.Imaging.ImageCodecInfo.GetImageEncoders();
        EncoderParameters Params = new System.Drawing.Imaging.EncoderParameters(1);
        Params.Param[0] = new EncoderParameter(Encoder.Quality, 100L); //Set image quality
        context.Response.ContentType = Info[1].MimeType;
        oBitmap.Save(context.Response.OutputStream, Info[1], Params);
    
        #endregion
    }
    

    System.Drawing.Graphics Optimisations

    In all my “System.Drawing” development projects, I’ve always set the graphic object quality options (lines 19-22) and found that it never really worked for me. The reason for this is because I always placed these settings after creating my System.Drawing.Graphics object prior to my custom code. So the image was getting optimised before any of my functionality had taken place. Rubbish!

    The key is to set all your System.Drawing.Graphics object settings just before you dispose of it. Makes sense doesn’t it? Don’t know how I made such a noob mistake.

    By default, .NET uses the web safe options when converting Bitmap to an image and setting those four properties will have a big affect on how your image looks.

    Compression Level

    This is the good bit!

    .NET gives you the ability to carry out further tweaks on how your image will be rendered by allowing us to set the compression level. The compression level can be tweaked by modifying the value passed to the “EncoderParameter” constructor (line: 34).

    For another example of how this can be used, take a look at the following MSDN article: http://msdn.microsoft.com/en-us/library/bb882583.aspx

  • Ok I’ll admit Part 2 to my “Beginner’s Guide To Using Google Plus .NET API” has been on the back-burner for some time (or maybe it’s because I completely forgot). After getting quite a few email recently on the subject, I thought now would be the best time to continue with Part 2.

    It’s recommended you take a gander at Part 1 before proceeding to this post.

    As the title suggests, I will be showing how to output user’s publicly view posts. The final output of what my code will produce can be seen on my homepage under the “Google+ Posts” section.

    Create Class Object

    We will create a class called “GooglePlusPost" to allow us to easily store each item of post data within a Generic List.

    public class GooglePlusPost
    {
        public string Title { get; set; }
        public string Text { get; set; }
        public string PostType { get; set; }
        public string Url { get; set; }
    }


    Let’s Get The Posts!

    I have created a method called “GetPosts” that accepts a parameter to select the number of posts of your choice.

    public class GooglePlus
    {
        private static string ProfileID = ConfigurationManager.AppSettings["googleplus.profileid"].ToString();
        
        public static List<GooglePlusPost> GetPosts(int max)
        {
            try
            {
                var service = new PlusService();
                service.Key = GoogleKey;
                var profile = service.People.Get(ProfileID).Fetch();
    
                var posts = service.Activities.List(ProfileID, ActivitiesResource.Collection.Public);
                posts.MaxResults = max;
    
                List<GooglePlusPost> postList = new List<GooglePlusPost>();
    
                foreach (Activity a in posts.Fetch().Items)
                {
                    GooglePlusPost gp = new GooglePlusPost();
    
                    //If the post contains your own text, use this otherwise look for
                    //text contained in the post attachment.
                    if (!String.IsNullOrEmpty(a.Title))
                    {
                        gp.Title = a.Title;
                    }
                    else
                    {
                        //Check if post contains an attachment
                        if (a.Object.Attachments != null)
                        {
                            gp.Title = a.Object.Attachments[0].DisplayName;
                        }
                    }
    
                    gp.PostType = a.Object.ObjectType; //Type of post
                    gp.Text = a.Verb;
                    gp.Url = a.Url; //Post URL
    
                    postList.Add(gp);
                }
    
                return postList;
            }
            catch
            {
                return new List<GooglePlusPost>();
            }
        }
    }
    

    By default, I have ensured that my own post comment takes precedence over the contents of the attachment (see lines 24-35). If I decided to just share an attachment without a comment, the display text from the attachment will be used instead.

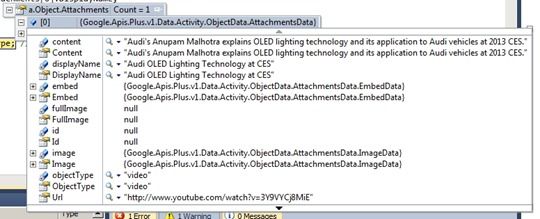
    There are quite a few facets of information an attachment contains and this only becomes apparent when you add a breakpoint and debug line 33. For example, if the attachment had an object of type “video”, you will get a wealth of information to embed a YouTube video along with its thumbnails and description.

    Attachment Debug View

    So there is room to make your Google+ feed much more intelligent. You just have to make sure you cater for every event to ensure your feed displays something useful without breaking. I’m in the process myself of displaying redoing my own Google+ feed to allow full access to content directly from my site.

    Recommendation

    It is recommended that you cache your collection of posts so you are not making constantly making request to Google+. You don’t want to exceed your daily request limit now do you.

    I’ve set my cache duration to refresh every three hours.

  • Published on
    -
    1 min read

    The Floppy Disk Reinvented – Into a Coffee Table

    You have to see it to believe it. The inner geek in me want to purchase this.

    Floppy Disk Coffee Table

    The guys who made this have managed to put in an impressive amount of detail (as much detail as you can get from a floppy disk!).

    Floppy Disk’s were well-known for their lack of storage space, thankfully, there’s a adequate sized secret compartment that is revealed by simply moving the metal shutter.

    More images of this beauty can be seen over at Design Boom: http://www.designboom.com/design/floppy-disk-table-by-axel-van-exel-marian-neulant/

    And whoever said the Floppy Disk is dead!? Smile