Blog

Posts written in 2013.

  • I had a need to have the ability to select a folder from within the site's media library. Not a file. A folder. The idea behind this requirement was to allow the site administrator to upload a bunch of images to a single directory in the media library, so that the contents (in this case images) could be output to the page.

    Unfortunately, after contacting Kentico support, I was told that such a folder selector control does not exist and I would need to create one myself. So I did exactly that!

    Step 1: Create A New User Control

    I have created a user control in "/CMSFormControls/Surinder/" of my Kentico installation. I have named the user control: FolderSelector.ascx.

    HTML

    <table>
            <tr>
                <td class="EditingFormValueCell">
                    <asp:TreeView ID="MediaLibraryTree" SelectedNodeStyle-BackColor="LightGray" ExpandDepth="0" ImageSet="Arrows" runat="server"></asp:TreeView>
                </td>
            </tr>
    </table>
    

    Code-behind

    using CMS.CMSHelper;
    using CMS.FormControls;
    using CMS.GlobalHelper;
    using CMS.MediaLibrary;
    using CMS.SettingsProvider;
    using System;
    using System.Collections.Generic;
    using System.IO;
    using System.Linq;
    using System.Text.RegularExpressions;
    using System.Web;
    using System.Web.Script.Serialization;
    using System.Web.UI;
    using System.Web.UI.WebControls;
    
    public partial class CMSFormControls_iSurinder_FolderSelector : FormEngineUserControl
    {
        private string _Value;
    
        public override Object Value
        {
            get
            {
                return MediaLibraryTree.SelectedValue;
            }
            set
            {
                _Value = System.Convert.ToString(value);
            }
        }
    
        public string MediaLibraryPath
        {
            get
            {
                //Get filter where condition format or default format
                return DataHelper.GetNotEmpty(GetValue("MediaLibraryPath"), String.Empty);
            }
            set
            {
                SetValue("MediaLibraryPath", value);
            }
        }
    
        public override bool IsValid()
        {
            bool isControlValid = true;
    
            if ((FieldInfo != null) && !FieldInfo.AllowEmpty)
            {
                this.ValidationError = "Please select an Image Gallery directory";
                isControlValid = false;
            }
    
            return isControlValid;
        }
    
        protected void EnsureItems()
        {
            if (MediaLibraryPath != String.Empty)
            {
                string fullPath = Server.MapPath(String.Format("/{0}", MediaLibraryPath));
    
                if (Directory.Exists(fullPath))
                {
                    DirectoryInfo rootDir = new DirectoryInfo(fullPath);
    
                    TreeNode treeNodes = OutputDirectories(rootDir, null);
    
                    MediaLibraryTree.Nodes.Add(treeNodes);
                }
                else
                {
                    this.ValidationError = "Directory path does not exist.";
                }
            }
            else
            {
                this.ValidationError = "Properties for this control have not been set.";
            }
        }
    
        protected void Page_Load(object sender, EventArgs e)
        {
            if (!Page.IsPostBack)
                EnsureItems();
        }
        
        TreeNode OutputDirectories(DirectoryInfo directory, TreeNode parentNode)
        {
            if (directory == null)
                return null;
    
            //Create a node for directory
            TreeNode dirNode = new TreeNode(directory.Name, directory.FullName);
    
            //Get subdirectories of the current directory
            DirectoryInfo[] subDirectories = directory.GetDirectories();
    
            //Mark node as selected
            if (dirNode.Value == _Value.ToString())
                dirNode.Selected = true;
    
            //Get all subdirectories
            for (int d = 0; d < subDirectories.Length; d++)
                OutputDirectories(subDirectories[d], dirNode);
                    
            //If the parent node is null, return this node
            //otherwise add this node to the parent and return the parent
            if (parentNode == null)
            {
                return dirNode;
            }
            else
            {
                parentNode.ChildNodes.Add(dirNode);
    
                return parentNode;
            }
        }
    }
    

    I'm hoping that the code I've shown above is quite self-explanatory. But the only thing you need to be aware of is the "MediaLibraryPath" public property. You will see in the next steps that we will be using this property to contain a link to where our Media Library resides.

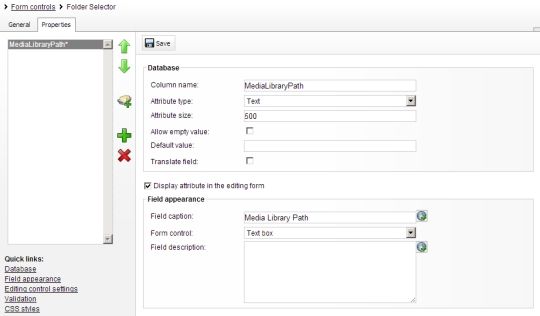
    Step 2: Add New Control To Kentico

    When creating a custom form control in Kentico, ensure we have the following form control settings:

    Kentico Folder Selector Settings

    Step 3: Add Form Control Property

    Remember, from Step 1, we had a property called "MediaLibraryPath". Now we just need to create this property in our custom control settings.

    Kentico Folder Selector Settings

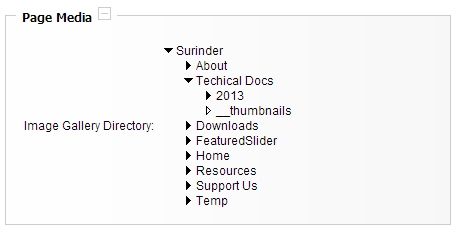
    Now, when our Folder Selector control is added to a document, we will need enter a map path to the location of our Media Library. For example, "/Surinder/media/Surinder/".

    If this custom control has been implemented successfully, you should see something like this when creating a new page based on a document type:

    Kentico Folder Selector Tree

  • In nearly all my previous projects I've worked on required some kind of manipulation with reading some form of JSON data.

    To allow better integration into my application, I always create strongly-typed classes that mirror the structure of the incoming data feed. This in turn allows me to serialize the JSON and select specific properties I require. But sometimes, its quite difficult and confusing to the exact class structure right, especially when the JSON contains lots of fields of data.

    When I find this is the case, I use json2csharp.com. By simply pasting the contents of your JSON, the site does all the hard work and creates all the strongly-typed classes for you.

  • In one word: No.

    I've been an Experts Exchange user on and off over the last few years and always re-registered my Experts Exchange account, at times, out of pure desperation in the hope that a complex question of mine could be answered.

    If I look back at all the questions I've asked throughout the year whilst being a fully paid member, the responses (or solutions as Experts Exchange call it) are by far not detailed enough for the price you pay. There have been many times when I've been very patiently waiting for some kind of response to my problem for days and even when highlighting to the moderator numerous times to get an expert to look into my issue, they seem to fail at the first hurdle...

    If Experts Exchange was truly the forum where all these so called "experts" reside, they should have no problem in resolving or if not at least assisting me to a relevent solution. Majority of the time its hit or miss to whether an answer I could either find an answer from their "vast" knowledge-base.

    The major problem I do have with Experts Exchange is that there is no refund policy and the customer support staff don't seem at all bothered by the fact that (in my case) four of my questions were not responded to. They are unable to see that you are paying them a service to do one thing: assist YOU!

    Experts Exchange really need to rethink their pricing model considerably for the true service they provide. This has become ever so apparent since the dawn of a widely used and popular StackOverflow Q&A forum where I find the response rate higher.

    Of course, I can only speak about my own experience and Experts Exchange is probably a great resource for others who are employed in a different sector of the IT industry. It all comes down to the expert answering your question. Some are really good, some not so good...

    Unfortunately, it's unable to fulfil my needs. I've learnt my lesson and will not be renewing my subscription after my last cancellation.

    Back in the day, there was a need for a paid service like Experts Exchange. But that's long since passed.

  • Published on
    -
    3 min read

    Instagram API: Get Access Token In ASP.NET

    I've written some code that outputs images using Instagram's Developer API. The code can either output images based on a user's profile or via search term.

    As you may already know, in order to get any form of information from any external API an access token is required. Before we dive into some code, the first thing that we need to do is register ourselves as an Instagram Developer by going to: http://instagram.com/developer/.

    Next, we need to register a new client specifically for our intended use. In my case, all I want to do is to get all image information from my own Instagram profile.

    Instagram API - Register New Client

    Here, you will be supplied with Client ID and Client Secret codes. But most importantly, you will need to set an OAuth Redirect URL (or Callback URL) for user's to authenticate your application.

    The strange thing I've noticed about the Instagram API is that a callback page is a compulsory requirement. Even if you are planning on carrying out something as simple as listing some images from your own profile where a public users intervention is not required.

    I'm not interested in their images, I'm interested in my own. I hope Instagram changes this soon. If Twitter can allow you to retrieve tweets by simply registering your application, why can't Instagram?

    From what I've read on Instagram's Google Group's is that an access token needs to only be generated once and they don't expire. But of course Instagram have stated:

    "These tokens are unique to a user and should be stored securely. Access tokens may expire at any time in the future."

    Just make sure you have some fail safe's in your code that carries out the re-authentication process within your application on the event access token has expired. In my own implementation, I've kept the callback page secret and new access token requests can be made within an Administration interface.

    So lets get to the code.

    Step 1: Authentication Request Classes

    These strongly-typed classes mirror the exact structure of the JSON returned from our authentication request. Even though we only require the "access_token" property, I've added additional information, such as details on the Instagram user making the request.

    public class AuthToken
    {
        [JsonProperty("access_token")]
        public string AccessToken { get; set; }
    
        [JsonProperty("user")]
        public InstagramUser User { get; set; }
    }
    
    public class InstagramUser
    {
        [JsonProperty("id")]
        public string ID { get; set; }
    
        [JsonProperty("username")]
        public string Username { get; set; }
    
        [JsonProperty("full_name")]
        public string FullName { get; set; }
    
        [JsonProperty("profile_picture")]
        public string ProfilePicture { get; set; }
    }
    

    It's worth noting at this point that I'm using Newtonsoft.Json framework.

    Step 2: Callback Page

    protected void Page_Load(object sender, EventArgs e)
    {
        if (!String.IsNullOrEmpty(Request["code"]) && !Page.IsPostBack)
        {
            try
            {
                string code = Request["code"].ToString();
    
                NameValueCollection parameters = new NameValueCollection();
                parameters.Add("client_id", ConfigurationManager.AppSettings["instagram.clientid"].ToString());
                parameters.Add("client_secret", ConfigurationManager.AppSettings["instagram.clientsecret"].ToString());
                parameters.Add("grant_type", "authorization_code");
                parameters.Add("redirect_uri", ConfigurationManager.AppSettings["instagram.redirecturi"].ToString());
                parameters.Add("code", code);
    
                WebClient client = new WebClient();
                var result = client.UploadValues("https://api.instagram.com/oauth/access_token", "POST", parameters);
    
                var response = System.Text.Encoding.Default.GetString(result);
    
                var jsResult = JsonConvert.DeserializeObject(response);
    
                //Store Access token in database
                InstagramAPI.StoreAccessToken(jsResult.AccessToken);
    
                Response.Redirect("/CallbackSummary.aspx?status=success", false);
            }
            catch (Exception ex)
            {  
                EventLogProvider.LogException("Instagram - Generate Authentication Key", "INSTAGRAM", ex);
    
                Response.Redirect("/CallbackSummary.aspx?status=error");
            }
        }
    }
    

    As you can see, I'm redirecting the user to a "CallbackSummary" page to show if the authentication request was either a success or failure. (Remember, the page is secured within my own Administration interface.)

    If the request is successful, the access token is stored.

    Step 3: Request Callback Page

    The last piece of the puzzle is to actually request our callback page by authorizing ourselves via Instagram API. In this case, I just have a simple page with the following mark up:

    <p>If Instagram fails to output images to the page, this maybe because a new Authorisation key needs to be generated.</p>
    <p>To generate a new key, press the button below and follow the required steps.</p>
    <a onclick="window.open('https://api.instagram.com/oauth/authorize/?client_id=<%=ConfigurationManager.AppSettings["instagram.clientid"].ToString() %>&redirect_uri=<%=ConfigurationManager.AppSettings["instagram.redirecturi"].ToString() %>&response_type=code', 'newwindow', config='height=476,width=641,toolbar=no, menubar=no, scrollbars=no, resizable=no,location=no,directories=no, status=no'); return false;" href="#" target="_parent">Generate</a>
    

    If all goes to plan, you should have successfully recieved the access token.

    I will post more Instagram code in future posts.

  • Published on
    -
    1 min read

    C# In Depth by Jon Skeet Review

    C# In Depth Third EditionWhen working as a programmer, it's really easy to continue coding in the same manner you have done since you picked up a language and made your first program.

    The saying: "Why fix it if it ain't broken?" comes to mind...

    I for one sometimes fail to move with the times (unknowingly to me) and find new and better ways of coding. It's only on the off chance I get introduced to different approaches through my work colleague or whilst Googling for an answer to one of my coding queries.

    After reading some rave reviews on C# In Depth, written by the one and only Stackoverflow god: Jon Skeet. I decided to part with my hard earned money and make a purchase.

    C# In Depth is different from other programming books I've read on C#. In fact it's really good and don't let the title of the book deter you. The contents is ideal for novice and semi-experienced programmers.

    Firstly, you start off by being shown code samples on how C# has evolved through its iterations (v1 - v4). In most cases I gave myself a gratifying pat on the back when I noticed the approaches I've taken in my own projects utilised practises and features of the current language. ;-)

    Secondly, unlike some programming books I've read in the past, it's not intimidating to read at all. Jon Skeet really has a great way to talk about some concepts I find difficult to comprehend in a clear a meaningful way, so I could utilise these concepts within my current applications.

    The only minor niggle I have is that there were a few places where I would have liked specific chapters to go into more detail. On the other hand, it gave me the opportunity to research the nitty-gritty details for myself.

    Since I purchased this book, I found myself referencing it many times and appreciating what C# has to offer along with it misconstrued and underused features.

    All in all, the author truly has a gift in clearly demonstrating his understanding on the subject with finesse and if I am able to comprehend even one-tenth of his knowledge, I will be a happy man.

  • Published on
    -
    1 min read

    Stephen Elop's "Burning Platform" Memo Is Art

    Today, an article that (for some reason or another) resonated with me from yester-year popped up in in my news feed: The well known "Burning Platform" memo written by Stephen Elop - at a time when Nokia's future was uncertain. It describes Nokia's troubles as an oil rig on fire and radical changes will need to be made to ensure the company can continue to succeed in years to come.

    As I look back at this infamous memo, I'm reminded how Elop manages to grab your attention in an artistic and well written way. I am instantly able to relate exactly to dire circumstances the CEO and it's workers face.

    For those who don't know what I am talking about, here's an excerpt:

    There is a pertinent story about a man who was working on an oil platform in the North Sea. He woke up one night from a loud explosion, which suddenly set his entire oil platform on fire. In mere moments, he was surrounded by flames. Through the smoke and heat, he barely made his way out of the chaos to the platform’s edge. When he looked down over the edge, all he could see were the dark, cold, foreboding Atlantic waters.


    As the fire approached him, the man had mere seconds to react. He could stand on the platform, and inevitably be consumed by the burning flames. Or, he could plunge 30 meters in to the freezing waters. The man was standing upon a “burning platform,” and he needed to make a choice.


    He decided to jump. It was unexpected. In ordinary circumstances, the man would never consider plunging into icy waters. But these were not ordinary times – his platform was on fire. The man survived the fall and the waters. After he was rescued, he noted that a “burning platform” caused a radical change in his behaviour.


    We too, are standing on a “burning platform,” and we must decide how we are going to change our behaviour.


    ...

  • Published on
    -
    2 min read

    A Jump Into Building A Kentico Site Using MVC!

    As of late, I've been attempting to expand my .NET web application development skills by learning MVC and now have the understanding on how it all works. By Jove, I think I’ve got it!

    After building a few small custom websites, I decided to utilise what I've learnt and start building a Kentico site in MVC. Ever since Kentico supported MVC Razor, I've been itching to try it out.

    The main drive to build a Kentico site in MVC for me has been the ability to easily build a complex site by separating an application into the model, the view, and the controller to give me a lot more control over how I want the application to be built. But the best part has to be the clean unadulterated HTML mark up that rendered on the page!

    I think the mark of a good web developer is based on not only how clean their HTML markup is but also (more importantly) their programming skills. But when visiting sites, we only get exposure to the HTML markup. Unfortunately, there's only so far you can go in cleaning the markup when building a site using Web Forms. Even with View state completely disabled and selectively using .NET controls the output can still be quite mucky.

    As a web developer, whenever I visit a site that interests me from a technical level, I often look at the HTML mark up just to see how clean it is. I'm always intrigued to see if a site that looks and functions great is built just as well as it looks.

    But I digress...

    Kentico's support for MVC is definitely impressive. I felt quite at home when moving from a custom MVC web build to a Kentico build. Of course, there are some differences in terms of where your Models, Views and Controllers reside within the file structure of your website.

    If you plan on building a Kentico site using MVC, take a look at this post by Martin Hejtmanek who gives a basic overview on the steps required to get you up and running.

    From what I have built so far, I haven't noticed any limitations in the MVC framework. Just workarounds are required for some features (which I'll detail in future blog posts).

    Question Raised...

    As much as I like having the option of building an MVC site in Kentico, I ask myself the question: In reality, how many sites I build will actually be in MVC?

    The reason why I ask this is because Kentico provides many useful ready to use features out-the-box, a website could be built in half the time of an MVC build. Just think of the number of web parts Kentico has freely available to use!

    You couldn't justify to a paying client the additional time and cost will create a more scalable website that produces cleaner HTML markup. For smaller websites, an MVC site in Kentico could potentially be viable and any custom controls you do make (such as pagination and login controls) could be rolled out across future sites.

    Nevertheless, I'm hoping to do more MVC in Kentico moving forward.

  • Ever since Twitter ditched version 1 of their API to version 1.1, an additional hurdle created when attempting to get any data from Twitter. Authentication (using OAuth) is now required on all API request endpoints. I can see why Twitter decided to go down this route but it does add a little headache when carrying out the most simplest requests.

    In all the sites I have worked on, I've always relied on third party libraries to help me interact with Twitter, such as Twitterizer (no v1.1 support) and TweetSharp. But due to the increased complexity on some of the sites I've been working on, third party libraries don't seem to cut the mustard any more. A more scalable solution is required...

    I came across a really simple and expandable class library called OAuthTwitterWrapper that stemmed from a StackOverflow question I found. Out-of-the-box, this library contains calls required to retrieve a user's timeline and return searches which is great to get you up and running quickly.

    The OAuthTwitterWrapper provided me a really good basis to add further Twitter features, for example a list of users favourite tweets.

    If you don't plan on doing anything too complex when interacting with the Twitter API, third party libraries such as TweetSharp will meet your everyday needs. However, if you want more control over how you make requests, the OAuthTwitterWrapper provides a good foundation.

  • Published on
    -
    1 min read

    Focusing Control On Postback Using JavaScript

    Postbacks can be annoying. Especially when you have a long page of content with a form at the bottom and on button click causes the page to skip back to the top of the page.

    For a user who is not used to a site, this can be incredibly annoying and disorientating simply due to the fact the page has moved to a different position. This isn't so much of an issue if you happen to have a webpage that is low on content and a form will always be in clear view.

    But there is quite a nice easy way to get back to a specific area of a page by using the following line of JavaScript will be added in the page after a postback has occurred.

    if (Page.IsPostBack)
    {
        ScriptManager.RegisterStartupScript(this, typeof(string), "PostbackFocus", "window.location.hash = 'feedback-form'", true);
    }
    

    By placing this code in your Page_Load method, the user will be taken to an anchor point placed within the page. In this case, a <div> with an ID attribute of "feedback-form".

  • Published on
    -
    1 min read

    Renaming A Document Type Table Using SQL

    Don't you just hate it when you've created a Document Type in Kentico that is full of data and for some reason you need to rename it. I know I do.

    Even though Kentico does give you the ability to rename your Document Types via its interface, the old table name still exists within the SQL database. This may not bother some developers but this makes me feel damn right dirty.

    I came across an SQL script Matt Lee wrote in his blog, that takes the hassle of renaming the tables manually within a Kentico database.

    Definitely check it out. It has saved me a lot of time.

    Source: SQL Script To Rename A Document Type Table