Blog

Posts written in June 2022.

  • Whenever there is a need to restructure an Excel spreadsheet to an acceptable form to be used for a SaaS platform or custom application, my first inclination is to build something in C# to get the spreadsheet into a form I require.

    This week I felt adventurous and decided to break the mundane job of formatting a spreadsheet using an approach I've been reading up on for some time but just never got a chance to apply in a real-world scenario - Google App Scripts.

    What Is A Google App Script?

    Released in 2009, Google App Scripts is a cloud-based platform that allows you to automate tasks across Google Workspace products such as Drive, Docs, Sheets, Calendar, Gmail, etc. You could think of App Scripts as similar to writing a macro in Microsoft Office. They both can automate repeatable tasks and extend the standard features of the application.

    The great thing about Google App Script development is being able to use popular web languages (HTML/CSS/JavaScript) to build something custom. Refreshing when compared to the more archaic option of using VBA in Microsoft Office.

    Some really impressive things can be achieved using App Scripts within the Google ecosystem.

    Google Sheets App Script

    The Google App Script I wrote fulfils the job of taking the contents of cells in a row from one spreadsheet to be copied into another. The aim is to carry out automated field mapping, where the script would iterate through each row from the source spreadsheet and create a new row in the target spreadsheet where the cell value would be placed in a different column.

    This example will demonstrate a very simple approach where the source spreadsheet will contain five columns where each row contains numbers in ascending order to then be copied to the target spreadsheet in descending order.

    Before we add the script, we need to create two spreadsheets:

    • Source sheet: Source - Numbers Ascending
    • Target sheet: Destination - Numbers Descending

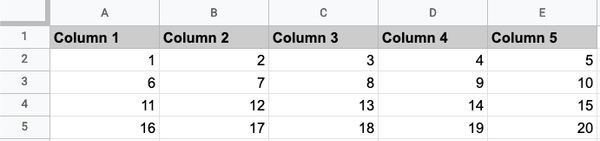
    The source sheet should mirror the same structure as the screenshot (below) illustrates.

    Google Sheet - Source

    The target sheet just needs to contain the column headers.

    The App Script can be created by:

    1. Navigating to Extensions > App Scripts from the toolbar. This will open a new tab presenting an interface to manage our scripts.
    2. In the "Files" area, press the "+" and select "Script".
    3. Name the script file: "export-cells-demo.gs".

    Add the following code:

    // Initialiser.
    function run() {
      sendDataToDestinationSpreadSheet();
    }
    
    // Copies values from a source spreadsheet to the target spreadsheet.
    function sendDataToDestinationSpreadSheet() {
      var activeSheet = SpreadsheetApp.getActiveSpreadsheet();
    
      // Get source spreadsheet by its name.
      var sourceSheet = activeSheet.getSheetByName('Source - Numbers Ascending');
    
      // Select the source spreadsheet cells.
      var sourceColumnRange = sourceSheet.getRange('A:E');
      var sourceColumnValues = sourceColumnRange.getValues();
    
      // Get target spreadsheet by its name..
      var targetSheet = activeSheet.getSheetByName('Destination - Numbers Descending');
    
      // Iterate through all rows from the source sheet.
      // Start index at 1 to ignore the column header.
      for(var i = 1; i < sourceColumnValues.length; i++) {
        // Get the cell value for the row.
        var column1 = sourceColumnValues[0,i][0];
        var column2 = sourceColumnValues[0,i][1];
        var column3 = sourceColumnValues[0,i][2];
        var column4 = sourceColumnValues[0,i][3];
        var column5 = sourceColumnValues[0,i][4];
        
        // Use getRange() to get the value position by declaring the row and column number.
        // Use setValue() to copy the value into target spreadsheet column.
        targetSheet.getRange(i+1, 1).setValue(column5);
        targetSheet.getRange(i+1, 2).setValue(column4);
        targetSheet.getRange(i+1, 3).setValue(column3);
        targetSheet.getRange(i+1, 4).setValue(column2);
        targetSheet.getRange(i+1, 5).setValue(column1);
      }
    }
    

    The majority of this script should be self-explanatory with the aid of comments. The only part that requires further explanation is where the values in the target sheet are set, as this is where we insert the numbers for each row in descending order:

    ...
    ...
    targetSheet.getRange(i+1, 1).setValue(column5);
    targetSheet.getRange(i+1, 2).setValue(column4);
    targetSheet.getRange(i+1, 3).setValue(column3);
    targetSheet.getRange(i+1, 4).setValue(column2);
    targetSheet.getRange(i+1, 5).setValue(column1);
    ...
    ...
    

    The getRange function accepts two parameters: Row Number and Column Number. In this case, the row number is acquired from the for loop index as we're using the same row position in both source and target sheets. However, we want to change the position of the columns in order to display numbers in descending order. To do this, I set the first column in the target sheet to contain the value of the last column from the source sheet and carried on from there.

    All the needs to be done now is to run the script by selecting our "run()" function from the App Scripts toolbar and pressing the "Run" button.

    The target spreadsheet should now contain the numbered values for each row in descending order.

    Google Sheet - Target

    Voila! You've just created your first Google App Script in Google Sheets with simple field mapping.

    Conclusion

    Creating my first Google App Script in a real-world scenario to carry out some data manipulation has opened my eyes to the possibilities of what can be achieved without investing additional time developing something like a Console App to do the very same thing.

    There is a slight learning curve involved to understand the key functions required to carry out certain tasks, but this is easily resolved with a bit of Googling and reading through the documentation.

    My journey into Google App Scripts has only just begun and I look forward to seeing what else it has to offer!

  • I’ve recently updated my website from the ground up (something I will write in greater detail in a future post) and when it came to releasing all changes to Netlify, I was greeted by the following error in the build log:

    7:39:29 PM: $ gatsby build
    7:39:30 PM: error Gatsby requires Node.js 14.15.0 or higher (you have v12.18.0).
    7:39:30 PM: Upgrade Node to the latest stable release: https://gatsby.dev/upgrading-node-js
    

    Based on the error, it appears that the Node version installed on my machine is older than what Netlify requires... In fact, I was surprised to discover that it was very old. So I updated Node on my local environment as well as all of the NPM packages for my website.

    I now needed to ensure my website hosted in Netlify was using the same versions.

    The quickest way to update Node and NPM versions is to add the following environment variables to your site:

    NODE_VERSION = "14.15.0"
    NPM_VERSION = "8.5.5"
    

    You can also set the Node and NPM versions by adding a netlify.toml file to the root of your website project before committing your build to Netlify:

    [build.environment]
        NODE_VERSION = "14.15.0"
        NPM_VERSION = "8.5.5" 
    
  • Published on
    -
    4 min read

    300th Blog Post!

    Hitting the 300th blog post milestone isn't something I could have ever imagined. But here we are. This seems like an ideal opportunity to look back and reflect on how it all started and my journey...

    Where It Started

    The year is 2007. A 22-year-old junior web developer called Surinder decided he wanted to create a blog to primarily serve as a knowledge base of all the things he learned in his career so far. Originally, built in BlogEngine - a nice open-source and lightweight .NET-based blogging platform, he made his foray into the blogging world.

    The very first post published involved a SQL matter that (at the time) he thought was very complex in nature - Implement SCOPE_IDENTITY() in Data Access Layer. It was this very post that started it all and as they say: The rest is history...

    As strange as it may sound, at the very start, my blog was a secret that I hid from my peers. Being a junior developer, I found myself lacking confidence in the very industry I was working in. What right do I have to start a blog and share any technical knowledge when those who I worked with are more experienced than me?

    After three years when I felt more confident in the type of posts my blog contained, I decided to allow search engines to index my content. It was also during this time I moved on job-wise and used my website to give my prospective employer an insight into my capability. It must have worked - I got the job!

    Identity Crisis

    In the early years, my blog had a bit of an identity crisis when it came to its domain name. It started with computing-studio.com, to surinder.computing-studio.com, then isurinder.com and lastly to what it will forever be immortalised as - surinderbhomra.com. The change in the domain name was a result of not wanting there to be an expectation that I will solely be writing about technical-related content and wanted the website to focus more on me as an individual.

    Finding My Writing Groove

    Throughout my time blogging, I've fallen in and out of love of writing and at times hit writer's block. As a consequence, there have at times been gaps in consistently outputting content. I think this is primarily due to taking a very long time to find my feet and finding a voice.

    I can honestly say that it's over the last few years I've finally found my writing groove and figured out the type of content I want to push out. Not only do I enjoy writing about all things technical, but also started garnering a fascination with writing more personal pieces where I’m not bound by any specific subject.

    Writing Is Both A Passion and A Healer

    The driving force after publishing my latest posts is the excitement of thinking about what to write next. This mentality has worked great for me as I know my next post will help me grow whatever the subject is in my next writing endeavour. I no longer feel like writing is a discipline, it's a passion.

    There is something cathartic in pounding the keys of my keyboard to output something that was once a small thought in my head to something of substance. I also found that writing acts as a coping mechanism during times of negativity and stress.

    Cringe Factor

    I do cringe looking back at some of my earlier posts. As much as I'd like to delete these posts, I leave them as they are to act as an anchor to ground me and as a reminder of how far I've come. Through the thirty pages of posts, I can see how I've changed throughout the years and grown as a person.

    In the very beginning writing was a way to make my mark in the world and if I could get some form of monetary gain or high readership for a post, I'd class that as a win. Now that I've matured this has is no longer of relevance.

    Content Syndication

    My strategy now is to make my content accessible to a wider audience by syndicating posts to other platforms. Syndication takes your content to more readers and helps boost organic and referral traffic back to your website. At the moment, I syndicate my content based on the subject matter:

    What I've learnt is that it's all about serving the right content to the right users.

    Imposter Syndrome

    Even now after 15 years of writing, I still suffer from the occasional bout of imposter syndrome where I perceive my skill set as lower than my actual skill set. There will always be someone capable of doing things better and I have to remember this shouldn't be a negative takeaway. Surrounding yourself with such people is an opportunity to learn more and become better at what I do. There have been posts where I received some good constructive criticisms that helped me approach things differently.

    Where Do I Go From Here?

    Blogging is a marathon, not a race. I've written 300 posts over 15 years, equating to 15 posts per year. If my writing groove continues on its current trajectory, this will only increase as long as I feel I have quality content to publish.

    I've noticed there are many posts stored within Evernote that don't make the cut - and this is good thing. Not every thought or idea is worth publishing.

    I hope I can continue to output content in the years to come and with any luck, I look forward to writing a post marking the next 300th blog post.