Blog

Posts written in May 2015.

  • There are many things that impress me about Kentico, especially when I compare my experiences to other CMS providers from previous walks of life. But the one thing that impresses me above all is how easy the guys at Kentico make upgrading to newer versions of their CMS platform. So I wasn't daunted when I had the job to upgrade a site from Kentico 5.5 all the way up to 8.2.

    Everything went smoothly. I was in the last leg of the upgrade process where the site had been upgraded to version 7 and was about to make the transition to 8. At this point, I started encoutering issues...

    Upgrading from version 7 to 8 alone is a very big jump and you will find that getting your site fully functional will require more effort than all the previous upgrades combined - depending on the size and complexity of your Kentico instance. Take a look at the "Upgrade Overview" section in the Kentico upgrade documentation for a list of important changes.

    I decided to list some quite important steps based upon information I have collated from issues others have experienced as well as key points covered within the Kentico Upgrade documentation. Following the points listed below resolved my upgrade issues, so it will more than likely help you too.

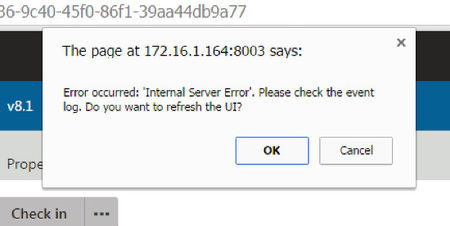
    1) Clear Browser Cache

    After each upgrade, remember to always clear your browser of all temporary files stored in cache and old cookies prior to logging into the Administration Area. Otherwise you will more than likely see a mish-mash of old/new graphical elements, as well as an Internal Server Error popup.

    Kentico 8 Upgrade - Internal Server Error

    2) Run The Site After Each Upgrade

    This is something I've had a tendency to forget. It is imperative that you run the site after each upgrade before moving onto the next, since Kentico requires code to be executed as well as database tasks.

    3) Update Macro Signatures

    This is an easy one. You'll probably see a bunch of Macro security errors in Kentico's Event Log post upgrade like these:

    Kentico 8 Upgrade - Macro Resolver Error

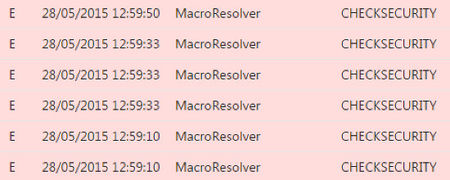
    Luckily, this is easily resolved by simply updating the macro signatures in the System > Macros > Signatures area of within the CMS Administration.

    Kentico 8 Upgrade - Sign Macros

    The system then resigns all macros. The new security signatures of all macros contain the username of your administrator account.

    4) Re-save All Page Types

    This is a strange one. For some odd reason, I experienced the same Internal Server Error popup message when logged into the CMS as described in point 1. In addition, I found when attempting to navigate directly to the website, I would get an Object not set to an instance of an object.NET error whenever a "DocumentContext.CurrentDocument" call was made.

    So I decided to randomly try something Kentico master Juraj suggested from one of his forum responses, which was to add and then remove a field from a document type. Instead, I just went to the Field section of each Page Type and clicked the "Save" button.

    I have no idea what difference this makes within the Kentico setup but this seems to do the trick.

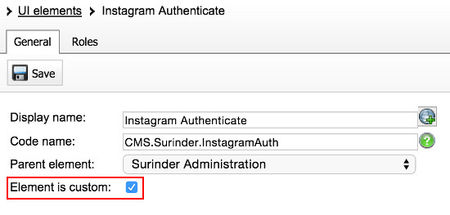
    5) Custom Modules Created In Version 7

    If you have developed any custom modules, ensure you have marked them as "custom" before upgrading to version 8. I had numerous upgrade failures when Kentico Installation Manager was trying to upgrade the database. The error occurred in the CMS_UIElement table due to duplicated Element Resource ID's.

    You can mark your custom module as "custom" in version 7 by going to: Site Manager > Development > Modules > Your Custom Module > User Interface.

    Kentico 7 - Setting Element Is Custom

    6) Check Data & DB Versions

    After you have run an upgrade for each major version (6.0, 7.0, 8.0, 8.2), make sure you run the following SQL query against your Kentico database:

    SELECT
        KeyName, KeyValue
    FROM
        CMS_SettingsKey
    WHERE
        KeyName IN ('CMSDBVersion', 'CMSDataVersion')
    

    If both values for "CMSDBVersion" and "CMSDataVersion" are the same, you know the upgrade has successfully completed and you're on the right track. When I made my first attempt to upgrade a site from 7 to 8, I found the Data Version was 7.0 and the DB Version was 8.2. Not good.

    Useful Links

  • ...and I think I know why...

    Out of all the issues Google PageSpeed Insights seems to have when analysing my site, there are two specific things crop up that annoy me:

    1. ​Reduce server response time
    2. ​Leverage browser caching (due to Google Analytics JavaScript file)

    The Google Analytics issue is something I will have to live with since (as far as I'm aware) there's nothing I can do. It would be nice if Google wouldn't penalise you for using a product they have developed. However, the "Reduce server response time" was something that perplexed me. My site is relatively simple and not doing anything over-the-top.

    Due to the nature of my hosting setup (shared), I didn't have all the capabilities to make my website respond any better. The only way I could think of improving server response time was to move my hosting to another region and purchasing a VPS to get more control.

    Now, I think I have resolved the server response time issue...It has something to do with a Web Statistics service called AWStats that was enabled by default as an "addon" service on my hosting. Once disabled through my Plesk Management Portal, Google PageSpeed didn't seem to have any issue with my server response.

    I cannot 100% confirm if by disabling the Web Statistics service is a permanent solution and will work for everyone else. But there might be some truth behind this. Web Statistic services like AWStats store all analytical data in log files directly on the server, so this must have some affect on the time a request is made. I could be talking complete nonesense.

    If you have experienced the same problem as me, check your own hosting setup and it's "addon" services. You never know, it may give you that extra Google PageSpeed point. :-)

  • Published on
    -
    1 min read

    My Paypal REST API .NET Starter Kit

    I've just completed working on a site that required PayPal integration to carry out credit card payments, using PayPal's REST API interface. I did find some aspects of the implementing PayPal's REST API a little confusing and there seemed to be a blurred line on what is the best approach. This is probably due to the vast number of .NET examples provided in PayPal's own Github repository.

    I decided to create my own PayPal REST API .NET Starter kit, by combining my own efforts together with PayPal documentation and code examples from other developers online. Feel free to fork it from my Bitbucket repository: https://bitbucket.org/SurinderBhomra/paypal-.net-starter-kit.

    The PayPal REST API .NET Starter kit contains everything you need to make a start in making your first card payment. It encompasses a very basic form to enter test transactions, as well as the following Nuget package references:

    • log4net
    • Newtonsoft.Json
    • PayPalCoreSDK
    • RestApiSDK

    All you'll need to do is create is a PayPal Client ID and Secret, build the solution and away you go. Every time you make a transaction, a "PaypalPayment" object is returned, containing useful information to be used at application level if the payment was a success and if not, the full error information.

    A successful transaction will generate the following invoice to the user's PayPal account:

    PayPal Invoice Sample

    I am using my PayPal Starter kit as a foundation to build upon if I ever get the opportunity to develop more features, such as refunds.

    Feel free to modify my code and (even better!) add more features.

  • Published on
    -
    3 min read

    Web.Config/App.Config Maintainability

    Web Configuration Snippet When working on large projects whether it be websites or software applications, I like to try and make sure that settings from within my app/web configuration files are not only easily accessible within code, but also maintainable for future updates.

    Over the years, I have tried different approaches in an attempt to streamline how I use ASP.NET's configuration files within my day-to-day development and this is what I currently do.

    Group and Alphabetise

    I have started to sort all my settings alphabetically and group common functions/settings together. This alone makes navigating through a large configuration file much more easier.

    In addition, having a standard in-house development style and agreeing with your fellow developers how sections within the configuration file is expected to be structured can be useful. For example, on web projects I've worked on, all key sections are  sorted in the following order:

    1. configSections
    2. appSettings
    3. connectionStrings
    4. system.web
    5. customErrors
    6. system.webServer
    7. locations

    Common Naming Conventions

    I like to name my appsettings in the following format: "<Setting-Group>.<Name>". So if I were to add appsettings that related to Twitter, it would look something as the following:

    <add key="Twitter.ApiUrl" value="https://api.twitter.com/1.1/statuses/show.json" />
    <add key="Twitter.ApiKey" value="" />
    <add key="Twitter.ApiSecret" value="" />
    <add key="Twitter.AccessToken" value="" />
    <add key="Twitter.AccessTokenSecret" value="" />
    <add key="Twitter.Username" value="shomra" />
    

    This provides a simple and descriptive approach to breaking down all settings into manageable chunks.

    Strongly-Type AppSettings

    One thing that truly annoyed me when I first started .NET development is calling configuration values from within C# code. Not only did you have to write out (the very long-winded!) "ConfigurationManager.AppSettings["Twitter.Username"]", but also cast the value to a specific type.

    Using the "ConfigurationManager.AppSettings[]" call is awful. It creates the potential for typo's that aren't caught by the compiler and there's no nice intellisense to make our coding easier.

    I create a static configuration wrapper class to strongly-type all my config settings. The way I name my settings (as you can see from the "Common Naming Conventions" section) compliments the structure of my wrapper class.

    public class Config
    {
        public static class Social
        {
            #region Twitter
    
            public static class Twitter
            {
                public static string TwitterApiUrl
                {
                    get
                    {
                        return ConfigurationManager.AppSettings["Twitter.ApiUrl"];
                    }
                }
    
                public static string TwitterUsername
                {
                    get
                    {
                        return ConfigurationManager.AppSettings["Twitter.Username"];
                    }
                }
    
                public static string TwitterApiKey
                {
                    get
                    {
                        return ConfigurationManager.AppSettings["Twitter.ApiKey"];
                    }
                }
    
                public static string TwitterApiSecret
                {
                    get
                    {
                        return ConfigurationManager.AppSettings["Twitter.ApiSecret"];
                    }
                }
    
                public static string TwitterAccessToken
                {
                    get
                    {
                        return ConfigurationManager.AppSettings["Twitter.AccessToken"];
                    }
                }
    
                public static string TwitterAccessTokenSecret
                {
                    get
                    {
                        return ConfigurationManager.AppSettings["Twitter.AccessTokenSecret"];
                    }
                }
            }
    
            #endregion
        }
    }
    

    Admittingly, this can be quite time-consuming but when compared to the long-term benefits this has saved me a lot of headache.

    What Else Could Be Done?

    I've seen some developers use Applications Settings Architecture within the .NET framework when building Windows applications by creating a "Settings" file within the project.

    The only downside I can see with this approach is that all config values declared within the "Settings" file will be compiled at runtime and you lose the flexibility to change configuration values externally. Here's a nice StackOverflow post that describes this method in greater detail.

    If any of you readers have further suggestions or advice, I am all ears! :-)

    The Future...

    As Nick Dyer quite rightly pointed out to me yesterday on Google+, that our beloved web.config file will no longer form part of the applications we create in ASP.NET 5. We will have the freedom to create an applications configuration the way we want, simplifying the whole process.

    As I understand, there will be support for creating configuration inputs that can be placed inside JSON, XML and INI files using the new IConfiguration and ConfigurationModel sources.

    Sounds very promising.