Google has always impressed me with the quality of their API libraries allowing us to interface with their products in a somewhat straight-forward manner. In the past, I’ve used a couple of Google’s API’s for implementing YouTube video’s or Checkout merchant within my own sites. What makes life even easier is that the API’s are available in my native programming framework - .NET.
Google were quite slow in launching an official API upon Google Plus’s initial release and even though unofficial API’s were available, I thought it would be best to wait until an official release was made. I’ve been playing around with Google’s .NET API for a couple weeks now and only just had the time to blog about it.
I am hoping to make this beginners guide a three part series:
- Profile Data
- User Posts
- User’s +1’s
So let’s get to it!
Today, I shall be showing you the basic API principles to get you started in retrieving data from your own Google+ profile.
Prerequisites
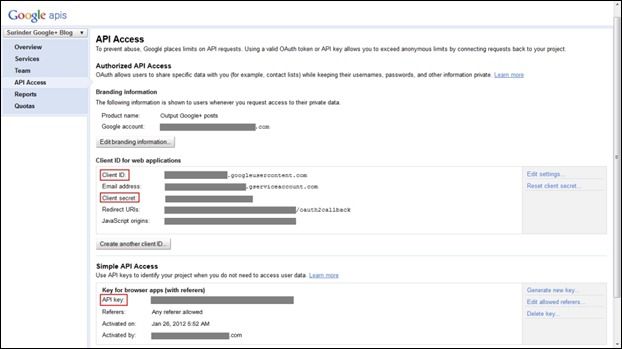
Before we can start thinking about coding our page to retrieve profile information, it’s a requirement to register your application by going to: https://code.google.com/apis/console. Providing you already have an account with Google (and who hasn’t?), this shouldn’t be a problem. If you don’t see the page (below), a new API Project needs to be created.

Only the Client ID, Client Secret and API Key will be used in our code allowing us to carry our API requests from our custom application.
Next, download the Google Plus .NET Client. My own preference is to use the Binary release containing compiled .NET Google Client API and all dll's for all supported services.
Building A Custom Profile Page
-
Create a new Visual Studio Web Application.
-
Unzip the Binary Zip file containing all Google service DLL’s. Find and reference the following DLL’s in your project:
- Google.Apis.dll
- Google.Apis.Authentication.OAuth2.dll
- Google.Apis.Plus.v1.dll
- Copy and paste the following front-end HTML code:
<h2>
    About Me
</h2>
<br />
<table>
    <tr>
        <td valign="top">
            <asp:Image ID="ProfileImage" runat="server"></asp:Image>
        </td>
        <td valign="top">
            <strong>Name:</strong> <asp:Label ID="DisplayName" runat="server"></asp:Label>
            <br /><br />
            <strong>About Me:</strong> <asp:Label ID="AboutMe" runat="server"></asp:Label>
            <br />
            <strong>Gender:</strong> <asp:Label ID="Gender" runat="server"></asp:Label>
            <br /><br />
            <strong>Education/Employment:</strong> <asp:Literal ID="Work" runat="server"></asp:Literal>
        </td>
    </tr>
    <tr>
        <td colspan="2" valign="middle">
            <asp:HyperLink ID="GotoProfileButton" runat="server">Go to my Google+ profile</asp:HyperLink>
        </td>
    </tr>
</table>
- Copy and paste the following C# code:
using System;
using System.Collections.Generic;
using System.Linq;
using System.Web;
using System.Web.UI;
using System.Web.UI.WebControls;
using System.Text;
using Google.Apis.Authentication.OAuth2.DotNetOpenAuth;
using Google.Apis.Authentication.OAuth2;
using Google.Apis.Plus.v1;
using Google.Apis.Plus.v1.Data;

namespace GooglePlusAPITest
{
    public partial class About : System.Web.UI.Page
    {
        private string ProfileID = "100405991313749888253"; // My public Profile ID
        private string GoogleIdentifier = "<GoogleIdentifier>";
        private string GoogleSecret = "<GoogleSecret>";
        private string GoogleKey = "<GoogleKey>";

        protected void Page_Load(object sender, EventArgs e)
        {
            if (!Page.IsPostBack)
                GetGooglePlusProfile();
        }

        private void GetGooglePlusProfile()
        {
            var provider = new NativeApplicationClient(GoogleAuthenticationServer.Description);
            provider.ClientIdentifier = GoogleIdentifier;
            provider.ClientSecret = GoogleSecret;

            var service = new PlusService();
            service.Key = GoogleKey;

            var profile = service.People.Get(ProfileID).Fetch();

            // Profile Name
            DisplayName.Text = profile.DisplayName;

            //About me
            AboutMe.Text = profile.AboutMe;

            //Gender
            Gender.Text = profile.Gender;

            // Profile Image
            ProfileImage.ImageUrl = profile.Image.Url;

            // Education/Employment
            StringBuilder workHTML = new StringBuilder();

            workHTML.Append("<ul>");

            foreach (Person.OrganizationsData work in profile.Organizations.ToList())
            {
                workHTML.AppendFormat("<li>{0} ({1})", work.Title, work.Name);
            }

            workHTML.Append("</ul>");

            Work.Text = workHTML.ToString();

            //Link to Google+ profile
            GotoProfileButton.NavigateUrl = profile.Url;
        }
    }
}
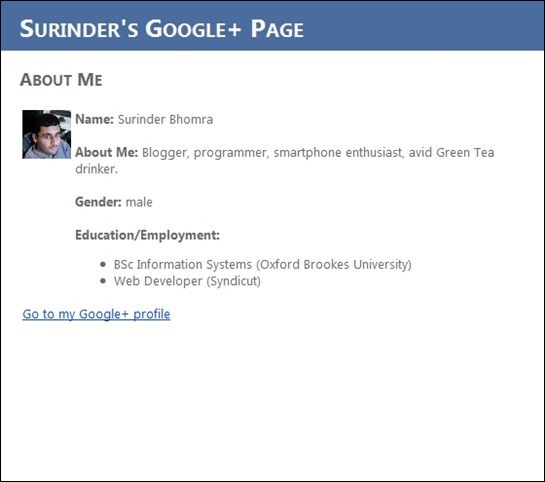
Once completed, the page should resemble something like this:

I think you can all agree this example was pretty straight-forward. We are simply using the people.get method which translates into the following HTTP request:
https://www.googleapis.com/plus/v1/people/100405991313749888253?key=APIKey
Unless you really want to display my profile information on your site (who wouldn’t!), you can keep the code as it is. But you have the flexibility to change the “ProfileID” variable to an ID of your own choice. To find your Profile ID, read: How Do I Find My Google Plus User ID?.


