Blog

Posts written in March 2012.

  • Android Rooted…if you want a true Android experience.

    When thinking of all the Android smartphones I’ve purchased in the past, they all inherit a common bad trait. Each user interface is different, causing a somewhat inconsistent experience when moving onto different Android handsets. This isn’t an issue for the bog standard phone user. However, when a phone is promoted to be running on Android, you expect there to be no difference.

    Currently, we have the following variations of Android:

    • SenseUI
    • TouchWiz
    • MotoBlur
    • LG TouchMax

    We can all agree the first version of Android was not exactly a pretty sight. Thus, phone manufacturers took it upon themselves from day one to push Android to the limit. In most cases they got it right but there were others who fell short.

    Android 4.0 was supposed to be a turning point and instil the original vision Google intended to have in their operating system. Providing great design, functionality and innovation. Even though Android 4.0 is widely available, it will sadly never see the light of day. Well that is, in its true form. A good example of this is the recent Android 4.0 update released for Samsung Galaxy S2 owners. You’d be forgiven not to notice any change after upgrading due to the TouchWiz interface.

    The only option is to root. This is the “root” I plan on taking in the future (you see what I did there!). Android has a great modding community who like me care what version of Android that runs on their phone. Generally, you will find that an unadulterated version of Android runs far better than its custom-skinned counterparts. It just seems a shame the lengths we have to go through to get the version of Android of our choosing.

    So it looks like custom UI’s are here to stay. Obviously handset makers think they can offer something Android cannot and this will not be changing anytime soon. To me, simply using a stock version of Android seems like a win-win situation for both the end-user and handset makers. Handset makers can spend less time in porting upcoming versions and spend more time and money innovating their hardware. Just leave software development to the professionals.

    For a platform that has so much potential, this has to be the main sticking point. Phil Nickinson’s article, “Dear Molly Rants: Let's talk about Android 'fragmentation' ..." sums it all up quite nicely:

    Google is constantly updating the Android code. Anyone can go get it. Problem is the smartphone…Android itself is not the problem here. It can, however, be the solution.

  • Published on
    -
    3 min read

    CheckBoxList RepeatLayout - How Did I Miss That???

    The thing that annoys me when using ASP.NET controls is the amount of cluttered HTML that gets generated. It sometimes reminds of my early web development days when Dreamweaver was the development tool of choice. That was a long time ago!

    CheckBoxList

    By default when using a Checkbox or Radio button list, the following markup is generated:

    <table id="MainContent_TestCheckList">
        <tbody>
                <tr>
                    <td>
                        <input type="checkbox" value="1" name="ctl00$MainContent$TestCheckList$0" id="MainContent_TestCheckList_0"><label for="MainContent_TestCheckList_0">Item 1</label>
                    </td>
                    <td>
                        <input type="checkbox" value="2" name="ctl00$MainContent$TestCheckList$1" id="MainContent_TestCheckList_1"><label for="MainContent_TestCheckList_1">Item 2</label>
                    </td>
                    <td>
                        <input type="checkbox" value="3" name="ctl00$MainContent$TestCheckList$2" id="MainContent_TestCheckList_2"><label for="MainContent_TestCheckList_2">Item 3</label>
                    </td>
                    <td>
                        <input type="checkbox" value="4" name="ctl00$MainContent$TestCheckList$3" id="MainContent_TestCheckList_3"><label for="MainContent_TestCheckList_3">Item 4</label>
                    </td>
                </tr>
        </tbody>
    </table>
    

    Yuck!

    Thankfully, this control contains a property called “RepeatLayout” that gives us the option to render our list of checkboxes or radio buttons in a much nicer way.

    Flow

    Rendered within a <span> container.

    <span id="MainContent_TestCheckList">
        <input type="checkbox" value="1" name="ctl00$MainContent$TestCheckList$0" id="MainContent_TestCheckList_0"><label for="MainContent_TestCheckList_0">Item 1</label>
        <input type="checkbox" value="2" name="ctl00$MainContent$TestCheckList$1" id="MainContent_TestCheckList_1"><label for="MainContent_TestCheckList_1">Item 2</label>
        <input type="checkbox" value="3" name="ctl00$MainContent$TestCheckList$2" id="MainContent_TestCheckList_2"><label for="MainContent_TestCheckList_2">Item 3</label>
        <input type="checkbox" value="4" name="ctl00$MainContent$TestCheckList$3" id="MainContent_TestCheckList_3"><label for="MainContent_TestCheckList_3">Item 4</label>
    </span>
    

    OrderedList or UnorderedList

    Rendered within a <ul> (unordered list) or <ol> (ordered list). Note: Multi-column layouts (RepeatColumns attribute) are not supported when using this option.

    <ul id="MainContent_TestCheckList">
        <li><input type="checkbox" value="1" name="ctl00$MainContent$TestCheckList$0" id="MainContent_TestCheckList_0"><label for="MainContent_TestCheckList_0">Item 1</label></li>
        <li><input type="checkbox" value="2" name="ctl00$MainContent$TestCheckList$1" id="MainContent_TestCheckList_1"><label for="MainContent_TestCheckList_1">Item 2</label></li>
        <li><input type="checkbox" value="3" name="ctl00$MainContent$TestCheckList$2" id="MainContent_TestCheckList_2"><label for="MainContent_TestCheckList_2">Item 3</label></li>
        <li><input type="checkbox" value="4" name="ctl00$MainContent$TestCheckList$3" id="MainContent_TestCheckList_3"><label for="MainContent_TestCheckList_3">Item 4</label></li>
    </ul>
    

    Table

    We won’t be using this option.

  • Published on
    -
    2 min read

    Retrieve A Single YouTube Video in .NET

    Back in 2009 I wrote a simple web application to output all videos uploaded from a user’s channel. Luckily, hardly anything has changed. Now you only need to register for a Developer Key and state an Application Name. You are no longer required to provide a Client ID.

    This time round, I needed to output data onto my page from a single YouTube entry when a user pastes the URL of a YouTube video in one of my form fields.

    using System;
    using System.Linq;
    using System.Text;
    using Google.GData;
    using Google.YouTube;
    using Google.GData.Client;
    
    namespace MyProject.Helpers.Common
    {
        public class YouTubeHelper
        {
            private static string YouTubeDeveloperKey = WebConfigurationManager.AppSettings["YouTubeDeveloperKey"].ToString();
            private static string YouTubeAppName = WebConfigurationManager.AppSettings["YouTubeAppName"].ToString();
    
            //Get YouTube video
            public static Video YouTubeVideoEntry(string videoID)
            {
                YouTubeRequestSettings settings = new YouTubeRequestSettings(YouTubeAppName, YouTubeDeveloperKey);
                YouTubeRequest request = new YouTubeRequest(settings);
    
                //Link to the feed we wish to read from
                string feedUrl = String.Format("http://gdata.youtube.com/feeds/api/videos/{0}", videoID);
    
                Feed<Video> videoFeed = request.Get<Video>(new Uri(feedUrl));
    
                return videoFeed.Entries.SingleOrDefault();
            }
    
            //Extract the YouTube ID from the web address.
            public static string GetVideoID(string videoUrl)
            {
                Uri tempUri = new Uri(videoUrl); 
    
                string sQuery = tempUri.Query;
    
                return System.Web.HttpUtility.ParseQueryString(sQuery).Get("v");
            }
    
            //Get required YouTube video information
            public static YouTubeDetail GetVideoInformation(string url)
            {
                Video v = YouTubeVideoEntry(GetVideoID(url));
    
                //Pass required YouTube information to custom class called YouTubeDetail
                YouTubeDetail vDetail = new YouTubeDetail();
                vDetail.ID = v.VideoId;
                vDetail.Title = v.Title;
                vDetail.Description = v.Description;
    
                return vDetail;
            }
        }
    }
    

    Hopefully, my “YouTubeHelper” class is easy to follow. All you need to use is the “GetVideoInformation()” method by simply passing a page link to where your YouTube video resides. At the moment only full YouTube URL’s are accepted not the short URL (http://youtu.be/).

  • Ever since Google+ came along, I noticed website authors were getting their picture displayed next to article’s they’ve written in Google searches. Not to be left out of this trend, I decided I would attempt to get my ugly-mug displayed next to all my authored content as well.

    Having carried out almost all of Google’s requirements through minor HTML modifications and verifying my Google+ account is linked to this blog, it’s finally happened!

    Author information in search results

    You may find that it can take some time for authorship information to appear in search results. I carried out all necessary steps back in January 2012. So it’s taken a good 3 months to get picked up. I am sure times will vary depending on the popularity of your site and the number of authored content it contains.

    Here are the four basic things I did to get my mug-shot in Google’s search results:

    1. Make sure your Google+ profile has a recognisable headshot photo of high quality.
    2. Link your site to your Google+ account by adding a badge.
    3. Verify your Google+ account with an email address containing your domain address.
    4. Add a link to your site in the “Contributor” box in your Google+ profile.
  • I've been playing around with creating multilingual sites in Kentico (version 5.5R2). One of (the many) Kentico strengths is being able to configure an existing site installation to cater for multi-lingual support in a straight-forward manner.

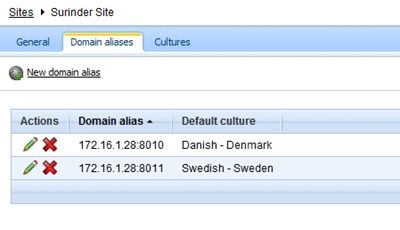
    I came across a perplexing problem when trying to view both of my multilingual sites within the same browser. In my development environment I created two domain aliases and sites in IIS:

    1. Danish – http://172.16.1.28:8010
    2. British – http://172.16.1.28:8011

    As you can see, I differentiate between two of my site cultures by the port number.

    Kentico Domain Aliases

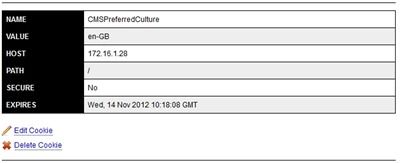
    I could only view one version of the site on both URL’s. This was all due to a cookie that gets created on first site visit and stores the “CMSPreferredCulture” based on the domain name excluding the port number. For those who aren’t aware, “CMSPreferredCulture” simply contains a localisation code for the site. You might be thinking: What’s the big deal?

    Kentico CMSPreferredCulture Cookie

    Well an issue only occurs when you are developing and testing the multi-lingual setup within a local environment and don’t have access to a range of unique domains. I thought that I could use the different port numbers in my environment to distinguish between the different site cultures.

    I was wrong. Kentico only uses the domain name and excludes any port  numbers. If you need to view different culture versions of your site at the same time, you will need to view them in different browsers.

    A small thing like this can cause some bewilderment for a Kentico novice. It sure bewildered me. You would expect to have the ability to view different versions of a site based on the domain aliases setup in Kentico.

    If anyone can suggest a work-around. Please leave a comment.

  • If you are storing images or files using a “Direct Uploader” field type within a document and you need to retrieve them in your code, you have two options to get this file back:

    1. Read up on the Kentico API (DocumentHelper.GetAttachment() methods).
    2. Use Kentico’s “GetFile.aspx” page to reference the file itself.

    As much as I would like to do things properly and familiarise myself with the Kentico API in greater detail, project time constraints can be a hindrance. In this case, I used the “GetFile.aspx” page in the following manner:

    <img src="/CMSPages/GetFile.aspx?guid=<Attachment GUID>" title="My Kentico Image" />
    

    The GUID for “Attachment GUID” will be found in the document where you use the “Direct Uploader” field.

    I don’t know if this is what you would necessarily call a hack. But it works!

  • Published on
    -
    1 min read

    Running Facebook Applications Locally

    Having the ability to run and develop Facebook applications within the comfort of a local environment is a must. Previously, I always thought in order to work on Facebook applications a public facing URL was required to allow Facebook to communicate with your application directly. Fortunately this is not the case.

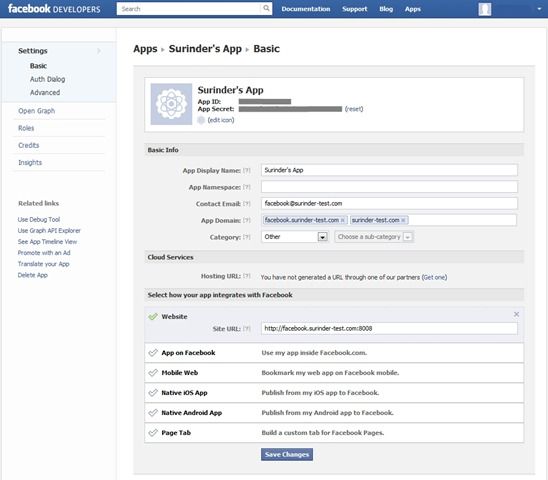
    All you need to do is set up a server alias in your hosts file and use this alias as an “App Domain” within your Facebook Application settings.

    Quick Example

    I created a new site in Microsoft IIS called: “facebook.surinder-test.com” running under port 8008. Feel free to change the port number to your own choosing. To browse the site we need to add this web address to Windows host file (C:\Windows\System32\drivers\etc):

    # localhost name resolution is handled within DNS itself.
    #    127.0.0.1       localhost
    #    ::1             localhost
    
    127.0.0.1     facebook.surinder-test.com
    127.0.0.1     localhost
    

    This will route all your requests to ”facebook.surinder-test.com” to localhost.

    Next, make the following changes to your Facebook Application settings page:

    FB App Screen