Blog

Categorised by 'General Development'.

  • While manually importing data into a Google Sheet to complete the boring chore of data restructuring, I wondered if there was any way that the initial import might be automated. After all, it would be much more efficient to link directly to an external platform to populate a spreadsheet.

    Google App Scripts provides a UrlFetchApp service giving us the ability to make HTTP POST and GET requests against an API endpoint. The following code demonstrates a simple API request to a HubSpot endpoint that will return values from a Country field by performing a GET request with an authorization header.

    function run() {
      apiFetch();
    }
    
    function apiFetch() {
      // API Endpoint options, including header options.
      var apiOptions = {
         "async": true,
         "crossDomain": true,
         "method" : "GET",
         "headers" : {
           "Authorization" : "Bearer xxx-xxx-xxxxxxx-xxxxxx-xxxxx",
           "cache-control": "no-cache"
         }
       };
    
      // Fetch contents from API endpoint.
      const apiResponse = UrlFetchApp.fetch("https://api.hubapi.com/crm/v3/properties/contact/country?archived=false", apiOptions);
      
      // Parse response as as JSON object.
      const data = JSON.parse(apiResponse.getContentText());
    
      // Populate "Sheet1" with data from API.
      if (data !== null && data.options.length > 0) {
          // Select the sheet.
          const activeSheet = SpreadsheetApp.getActiveSpreadsheet();
          const sheet = activeSheet.getSheetByName("Sheet1");
    
          for (let i = 0; i < data.options.length; i++) {
            const row = data.options[i];
    
            // Add value cells in Google sheet.
            sheet.getRange(i+1, 1).setValue(row.label);
          }
      }
    }
    

    When this script is run, a request is made to the API endpoint to return a JSON response containing a list of countries that will populate the active spreadsheet.

    The Google App Script official documentation provides even more advanced options for configuring the UrlFetchAppservice to ensure you are not limited in how you make your API requests.

    In such little code, we have managed to populate a Google Sheet from an external platform. I can see this being useful in a wide variety of use cases to make a Google Sheet more intelligent and reduce manual data entry.

    In the future, I'd be very interested in trying out some AI-related integrations using the ChatGPT API. If I manage to think of an interesting use case, I'd definitely write a follow-up blog post.

  • I've been delving further into the world of Google App Scripts and finding it my go-to when having to carry out any form of data manipulation. I don't think I've ever needed to develop a custom C# based import tool to handle the sanitisation and restructuring of data ever since learning the Google App Script approach.

    In this post, I will be discussing how to search for a value within a Google Sheet and return all columns within the row the searched value resides. As an example, let's take a few columns from a dataset of ISO-3166 Country and Region codes as provided by this CSV file and place them in a Google Sheet named "Country Data".

    The "Country Data" sheet should have the following structure:

    name alpha-2 alpha-3 country-code
    Australia AU AUS 036
    Austria AT AUT 040
    Azerbaijan AZ AZE 031
    United Kingdom of Great Britain and Northern Ireland GB GBR 826
    United States of America US USA 840

    App Script 1: Returning A Single Row Value

    Our script will be retrieving the two-letter country code by the country name - in this case "Australia". To do this, the following will be carried out:

    1. Perform a search on the "Country Data" sheet using the findAll() function.
    2. The getRow() function will return single row containing all country information.
    3. A combination of getLastColumn() and getRange() functions will output values from the row.
    function run() {
      var twoLetterIsoCode = getCountryTwoLetterIsoCode("Australia"); 
    }
    
    function getCountryTwoLetterIsoCode(countryName) {
      var activeSheet = SpreadsheetApp.getActiveSpreadsheet();
      var countryDataSheet = activeSheet.getSheetByName('Country Data');
    
      // Find text within sheet.
      var textSearch = countryDataSheet.createTextFinder(countryName).findAll();
    
      if (textSearch.length > 0) {
        // Get single row from search result.
        var row = textSearch[0].getRow();    
        // Get the last column so we can use for the row range.
        var rowLastColumn = countryDataSheet.getLastColumn();
        // Get all values for the row.
        var rowValues = countryDataSheet.getRange(row, 1, 1, rowLastColumn).getValues();
    
        return rowValues[0][1]; // Two-letter ISO code from the second column.
      }
      else {
        return "";
      }
    }
    

    When the script is run, the twoLetterIsoCode variable will contain the two-letter ISO code: "AU".

    App Script 2: Returning Multiple Row Matches

    If we had a dataset that contained multiple matches based on a search term, the script from the first example can be modified using the same fundamental functions. In this case, all we need to do is use a for loop and pass all row values to an array.

    The getCountryTwoLetterIsoCode() will look something like this:

    function getCountryTwoLetterIsoCode(countryName) {
      var activeSheet = SpreadsheetApp.getActiveSpreadsheet();
      var countryDataSheet = activeSheet.getSheetByName('Country Data');
    
      // Find text within sheet.
      var textSearch = countryDataSheet.createTextFinder(countryName).findAll();
    
      // Array to store all matched rows.
      var searchRows = [];
    
      if (textSearch.length > 0) {
        // Loop through matches.
        for (var i=0; i < textSearch.length; i++) {
          var row = textSearch[i].getRow();  
          // Get the last column so we can use for the row range.
          var rowLastColumn = countryDataSheet.getLastColumn();
          // Get all values for the row.
          var rowValues = countryDataSheet.getRange(row, 1, 1, rowLastColumn).getValues(); 
    
          searchRows.push(rowValues);
        }
      }
    
      return searchRows;
    }
    

    The searchRows array will contain a collection of matched rows as well as the column data. To carry out a similar output as shown in the first App Script example - the two-letter country code, the function can be called in the following way:

    // Get first match.
    var matchedCountryData = getCountryTwoLetterIsoCode("Australia")[0];
    
    // Get the second column value (alpha-2).
    var twoLetterIsoCode = matchedCountryData[0][1];
    

    Conclusion

    Both examples have demonstrated different ways of returning row values of a search term. The two key lines of code that allows us to do this are:

    // Get the last column so we can use for the row range.
    var rowLastColumn = countryDataSheet.getLastColumn();
    
    // Get all values for the row.
    var rowValues = countryDataSheet.getRange(row, 1, 1, rowLastColumn).getValues();
    
  • Whenever there is a need to restructure an Excel spreadsheet to an acceptable form to be used for a SaaS platform or custom application, my first inclination is to build something in C# to get the spreadsheet into a form I require.

    This week I felt adventurous and decided to break the mundane job of formatting a spreadsheet using an approach I've been reading up on for some time but just never got a chance to apply in a real-world scenario - Google App Scripts.

    What Is A Google App Script?

    Released in 2009, Google App Scripts is a cloud-based platform that allows you to automate tasks across Google Workspace products such as Drive, Docs, Sheets, Calendar, Gmail, etc. You could think of App Scripts as similar to writing a macro in Microsoft Office. They both can automate repeatable tasks and extend the standard features of the application.

    The great thing about Google App Script development is being able to use popular web languages (HTML/CSS/JavaScript) to build something custom. Refreshing when compared to the more archaic option of using VBA in Microsoft Office.

    Some really impressive things can be achieved using App Scripts within the Google ecosystem.

    Google Sheets App Script

    The Google App Script I wrote fulfils the job of taking the contents of cells in a row from one spreadsheet to be copied into another. The aim is to carry out automated field mapping, where the script would iterate through each row from the source spreadsheet and create a new row in the target spreadsheet where the cell value would be placed in a different column.

    This example will demonstrate a very simple approach where the source spreadsheet will contain five columns where each row contains numbers in ascending order to then be copied to the target spreadsheet in descending order.

    Before we add the script, we need to create two spreadsheets:

    • Source sheet: Source - Numbers Ascending
    • Target sheet: Destination - Numbers Descending

    The source sheet should mirror the same structure as the screenshot (below) illustrates.

    Google Sheet - Source

    The target sheet just needs to contain the column headers.

    The App Script can be created by:

    1. Navigating to Extensions > App Scripts from the toolbar. This will open a new tab presenting an interface to manage our scripts.
    2. In the "Files" area, press the "+" and select "Script".
    3. Name the script file: "export-cells-demo.gs".

    Add the following code:

    // Initialiser.
    function run() {
      sendDataToDestinationSpreadSheet();
    }
    
    // Copies values from a source spreadsheet to the target spreadsheet.
    function sendDataToDestinationSpreadSheet() {
      var activeSheet = SpreadsheetApp.getActiveSpreadsheet();
    
      // Get source spreadsheet by its name.
      var sourceSheet = activeSheet.getSheetByName('Source - Numbers Ascending');
    
      // Select the source spreadsheet cells.
      var sourceColumnRange = sourceSheet.getRange('A:E');
      var sourceColumnValues = sourceColumnRange.getValues();
    
      // Get target spreadsheet by its name..
      var targetSheet = activeSheet.getSheetByName('Destination - Numbers Descending');
    
      // Iterate through all rows from the source sheet.
      // Start index at 1 to ignore the column header.
      for(var i = 1; i < sourceColumnValues.length; i++) {
        // Get the cell value for the row.
        var column1 = sourceColumnValues[0,i][0];
        var column2 = sourceColumnValues[0,i][1];
        var column3 = sourceColumnValues[0,i][2];
        var column4 = sourceColumnValues[0,i][3];
        var column5 = sourceColumnValues[0,i][4];
        
        // Use getRange() to get the value position by declaring the row and column number.
        // Use setValue() to copy the value into target spreadsheet column.
        targetSheet.getRange(i+1, 1).setValue(column5);
        targetSheet.getRange(i+1, 2).setValue(column4);
        targetSheet.getRange(i+1, 3).setValue(column3);
        targetSheet.getRange(i+1, 4).setValue(column2);
        targetSheet.getRange(i+1, 5).setValue(column1);
      }
    }
    

    The majority of this script should be self-explanatory with the aid of comments. The only part that requires further explanation is where the values in the target sheet are set, as this is where we insert the numbers for each row in descending order:

    ...
    ...
    targetSheet.getRange(i+1, 1).setValue(column5);
    targetSheet.getRange(i+1, 2).setValue(column4);
    targetSheet.getRange(i+1, 3).setValue(column3);
    targetSheet.getRange(i+1, 4).setValue(column2);
    targetSheet.getRange(i+1, 5).setValue(column1);
    ...
    ...
    

    The getRange function accepts two parameters: Row Number and Column Number. In this case, the row number is acquired from the for loop index as we're using the same row position in both source and target sheets. However, we want to change the position of the columns in order to display numbers in descending order. To do this, I set the first column in the target sheet to contain the value of the last column from the source sheet and carried on from there.

    All the needs to be done now is to run the script by selecting our "run()" function from the App Scripts toolbar and pressing the "Run" button.

    The target spreadsheet should now contain the numbered values for each row in descending order.

    Google Sheet - Target

    Voila! You've just created your first Google App Script in Google Sheets with simple field mapping.

    Conclusion

    Creating my first Google App Script in a real-world scenario to carry out some data manipulation has opened my eyes to the possibilities of what can be achieved without investing additional time developing something like a Console App to do the very same thing.

    There is a slight learning curve involved to understand the key functions required to carry out certain tasks, but this is easily resolved with a bit of Googling and reading through the documentation.

    My journey into Google App Scripts has only just begun and I look forward to seeing what else it has to offer!

  • Last year, I completed my Hubspot CMS for Marketers Certification because I wanted to see if I could not only pass a Hubspot exam, but also gain a better understanding of the platform from a marketing standpoint.

    As a Hubspot developer, I've discovered that it's all too easy to get caught up in the technical side of things and potentially miss out on all the features Hubspot offers to offer. I found the "Hubspot CMS for Marketers" certification exam to be quite beneficial in helping me see things from a different perspective, therefore I opted to renew it.

    Hubspot CMS for Marketers Certification

    I also completed the "Hubspot CMS for Developers" certification as this is something I missed out on last year. This certification consisted of an exam and a practical piece on the core development criteria of building a theme.

    Hubspot CMS for Developers Certification

    Both these certifications compliment one another and highly recommend taking these both if you're working with the CMS side of Hubspot.

  • When building React applications, my components would consist of a mixture of React Function and Class components. As much as I love to use React Function components due to their simple, lightweight and concise code construction, I had a misconception they were limited in features.

    React Function components are generally classed as "stateless" where I would go as far as to send props (if required) and return the rendered output in HTML. So whenever there was a need for some form of interaction where state was required, a Class component would be used.

    It was only until recently I was made aware of React Hooks that allowed React Function components to have state. Let's take a look at a simple example where we are increasing and decreasing a number.

    import React, { useState } from 'react';
    
    const CounterApp = () => {
      const [state, setState] = useState({
        count: 0
      });  
    
      const incrementCount = () => {
        setState({
          count: state.count + 1,
        });
      }
    
      const decrementCount = () => {
        setState({
          count: state.count - 1,
        });
      }
    
      return (
        <div>
          <h1>{state.count}</h1>
    
          <button onClick={incrementCount}>Increment</button>
          <button onClick={decrementCount}>Decrement</button>
        </div>
      );
    };
    
    export default CounterApp;
    

    In the code above we have accomplished two things:

    1. Storing our counter in state.
    2. Click handlers

    The useState() hook declaration accepts properties in the way we are accustomed to when used in a Class component. The similarity doesn't stop there, you'll also notice the same approach when setting and getting a state property.

    Multiple states can also be declared and through the array destructuring syntax lets us give different names to the state variables we declared by calling useState. Really cool!

    const [age, setAge] = useState(42);
    const [fruit, setFruit] = useState('banana');
    const [todos, setTodos] = useState([{ text: 'Learn Hooks' }]);
    

    Even though this post has concentrated on state, I've found React Function components offer similar features as a Class component. This is how I will be building my components going forward.

  • I decided to write this post to primarily act as a reminder to myself when dealing with programmatically creating content pages in Umbraco and expanding upon my previous post on setting a dropdownlist in code. I have been working on a piece of functionality where I needed to develop an import task to pull in content from a different CMS platform to Umbraco that encompassed the use of different field-types, such as:

    • Textbox
    • Dropdownlist
    • Media Picker
    • Content Picker

    It might just be me, but I find it difficult to find solutions to Umbraco related problems I sometimes face. This could be due to results returned in search engines reference forum posts for older versions of Umbraco that are no longer compatible in the version I'm working in (version 8).

    When storing data in the field types listed (above), I encountered issues when trying to store values in all field types except “Textbox”. The other fields either required some form of JSON structure or Udi to be parsed.

    Code

    My code contains three methods:

    1. SetPost - to create a new blog post, or update an existing blog post if one already exists.
    2. GetAuthorIdByName - uses Umbraco Examine Search Index to get back an Author document and return the Udi.
    3. GetUmbracoMedia - uses the internal Examine Search Index to return details of a file in a form that will be acceptable to store within a Media Picker content field.

    The SetPost method consists of a combination of fields required by my Blog Post document, the primary ones being:

    • Blog Post Type (blogPostType) - Dropdownlist
    • Blog Post Author (blogPostAuthor) - Content Picker
    • Image (image) - Media Picker
    • Categories (blogPostCategories) - Tags
    /// <summary>
    /// Creates or updates an existing blog post.
    /// </summary>
    /// <param name="title"></param>
    /// <param name="summary"></param>
    /// <param name="postDate"></param>
    /// <param name="type"></param>
    /// <param name="imageUrl"></param>
    /// <param name="body"></param>
    /// <param name="categories"></param>
    /// <param name="authorId"></param>
    /// <returns></returns>
    private static PublishResult SetPost(string title, 
                                        string summary, 
                                        DateTime postDate, 
                                        string type, 
                                        string imageUrl, 
                                        string body, 
                                        List<string> categories = null, 
                                        string authorId = "")
    {
        PublishResult publishResult = null;
        IContentService contentService = Current.Services.ContentService;
        ISearcher searchIndex = ExamineUtility.GetIndex().GetSearcher();
    
        // Get blog post by it's page title.
        ISearchResult blogPostSearchItem = searchIndex.CreateQuery()
                                        .Field("pageTitle", title.TrimEnd())
                                        .And()
                                        .NodeTypeAlias("blogPost")
                                        .Execute(1)
                                        .FirstOrDefault();
    
        bool existingBlogPost = blogPostSearchItem != null;
    
        // Get the parent section where the new blog post will reside, in this case Blog Index.
        IContent blogIndex = contentService.GetPagedChildren(1099, 0, 1, out _).FirstOrDefault();
    
        if (blogIndex != null)
        {
            IContent blogPostContent;
    
            // If blog post doesn't already exist, then create a new node, otherwise retrieve existing node by ID to update.
            if (!existingBlogPost)
                blogPostContent = contentService.CreateAndSave(title.TrimEnd(), blogIndex.Id, "blogPost");
            else
                blogPostContent = contentService.GetById(int.Parse(blogPostSearchItem.Id));
    
            if (!string.IsNullOrEmpty(title))
                blogPostContent.SetValue("pageTitle", title.TrimEnd());
    
            if (!string.IsNullOrEmpty(summary))
                blogPostContent.SetValue("pageSummary", summary);
    
            if (!string.IsNullOrEmpty(body))
                blogPostContent.SetValue("body", body);
                    
            if (postDate != DateTime.MinValue)
                blogPostContent.SetValue("blogPostDate", postDate);
    
            // Set Dropdownlist field.
            if (!string.IsNullOrEmpty(type))
                blogPostContent.SetValue("blogPostType", JsonConvert.SerializeObject(new[] { type }));
    
            // Set Content-picker field by parsing a "Udi". Reference to an Author page. 
            if (authorId != string.Empty)
                blogPostContent.SetValue("blogPostAuthor", authorId);
    
            // Set Media-picker field.
            if (imageUrl != string.Empty)
            {
                string umbracoMedia = GetUmbracoMedia(imageUrl);
    
                // A stringified JSON object is required to set a Media-picker field.
                if (umbracoMedia != string.Empty)
                    blogPostContent.SetValue("image",  umbracoMedia);
            }    
    
            // Set tags.
            if (categories?.Count > 0)
                blogPostContent.AssignTags("blogPostCategories", categories);
    
            publishResult = contentService.SaveAndPublish(blogPostContent);
        }
    
        return publishResult;
    }
    
    /// <summary>
    /// Gets UDI of an author by fullname.
    /// </summary>
    /// <param name="fullName"></param>
    /// <returns></returns>
    private static string GetAuthorIdByName(string fullName)
    {
        if (!string.IsNullOrEmpty(fullName))
        {
            ISearcher searchIndex = ExamineUtility.GetIndex().GetSearcher();
    
            ISearchResult authorSearchItem = searchIndex.CreateQuery()
                                            .Field("nodeName", fullName)
                                            .And()
                                            .NodeTypeAlias("author")
                                            .Execute(1)
                                            .FirstOrDefault();
    
            if (authorSearchItem != null)
            {
                UmbracoHelper umbracoHelper = Umbraco.Web.Composing.Current.UmbracoHelper;
                return Udi.Create(Constants.UdiEntityType.Document, umbracoHelper.Content(authorSearchItem.Id).Key).ToString();
            }
        }
    
        return string.Empty;
    }
    
    /// <summary>
    /// Gets the umbracoFile of a media item by filename.
    /// </summary>
    /// <param name="fileName"></param>
    /// <returns></returns>
    private static string GetUmbracoMedia(string fileName)
    {
        if (!string.IsNullOrEmpty(fileName))
        {
            ISearcher searchIndex = ExamineUtility.GetIndex("InternalIndex").GetSearcher();
    
            ISearchResult imageSearchItem = searchIndex.CreateQuery()
                                            .Field("umbracoFileSrc", fileName)
                                            .Execute(1)
                                            .FirstOrDefault();
    
            if (imageSearchItem != null)
            {
                List<Dictionary<string, string>> imageData = new List<Dictionary<string, string>> {
                        new Dictionary<string, string>() {
                            { "key", Guid.NewGuid().ToString() },
                            { "mediaKey", imageSearchItem.AllValues["__Key"].FirstOrDefault().ToString() },
                            { "crops", null },
                            { "focalPoint", null }
                    }
                };
    
                return JsonConvert.SerializeObject(imageData);
            }
        }
    
        return string.Empty;
    }
    

    Usage Example - Iterating Through A Dataset

    In this example, I'm iterating through a dataset of posts and parsing the field value to each parameter of the SetPost method.

    ...
    ...
    ...
    SqlDataReader reader = sqlCmd.ExecuteReader();
    
    if (reader.HasRows)
    {
        while (reader.Read())
        {
            SetPost(reader["BlogPostTitle"].ToString(),
                    reader["BlogPostSummary"].ToString(),
                    DateTime.Parse(reader["BlogPostDate"].ToString()),
                    reader["BlogPostType"].ToString(),
                    reader["BlogPostImage"].ToString(),
                    reader["BlogPostBody"].ToString(),
                    new List<string>
                    {
                            "Category 1",
                            "Category 2",
                            "Category 3"
                    },
                    GetAuthorIdByName(reader["BlogAuthorName"].ToString()));
        }
    }
    ...
    ...
    ...
    

    Use of Umbraco Examine Search

    One thing to notice is that when I’m retrieving the parent page to where the new page will reside or checking for a page or media file, Umbraco Examine Search Index is used. I find querying the search index is the most efficient way to return data without consistently hitting the database - ideal for when carrying out a repetitive task like an import.

    In my code samples, I'm using a custom ExamineUtility class to retrieve the search index in a more condensed and tidy manner:

    public class ExamineUtility
    {
        /// <summary>
        /// Get Examine search index.
        /// </summary>
        /// <param name="defaultIndexName"></param>
        /// <returns></returns>
        public static IIndex GetIndex(string defaultIndexName = "ExternalIndex")
        {
            if (!ExamineManager.Instance.TryGetIndex(defaultIndexName, out IIndex index) || !(index is IUmbracoIndex))
                throw new Exception("Examine Search Index could not be found.");
    
            return index;
        }
    }
    

    Conclusion

    Hopefully, the code I have demonstrated in this post will give a clearer idea on how to programmatically work with content pages using a combination of different field types. For further code samples on working with different field types, take a look at the "Built-in Umbraco Property Editors" documentation.

  • After working on all things Hubspot over the last year whether that involved building and configuring site instances to developing API integrations, I have seemed to have missed out on CMS development-related projects. Most recently, I have been involved in an Umbraco site build where pages needed to be dynamically created via an external API.

    Programmatically creating CMS pages is quite a straight-forward job as all one needs to do is:

    • Select the parent node your dynamically created page needs to reside
    • Check the parent exists
    • Create page and set field values
    • Publish

    From past experience when passing values to page fields, it's been simple as passing a single value based on the field type. For example:

    myNewPage.SetValue("pageTitle", "Hello World");
    myNewPage.SetValue("bodyContent", "<p>Lorem ipsum dolor sit amet, consectetur adipiscing elit.</p>");
    myNewPage.SetValue("hasExpired", true);
    myNewPage.SetValue("price", 9.99M);
    

    Umbraco has something completely different in mind if you plan on setting the value of type "Dropdown". Simply sending a single value will not work even though it is accepted during runtime. You will need to send a value as a Json array:

    string type = "Permanent";
    myNewPage.SetValue("jobType", JsonConvert.SerializeObject(new[] { type }));
    

    This is approach is required regardless of whether you've set the "Dropdown" field type in Umbraco as single or multiple choice.

  • Ever since a Ucommerce site built in Umbraco went live, the uptime monitoring system would send a notification every day or so to report the site has gone down.

    There isn't any reason for this to happen as the site in question wasn't getting enough visitors a day to warrant such a service disruption. It was a new online presence. In addition, the hosting architecture can handle such an influx of visitors with ease should such a scenario arise.

    Something random is happening at application level causing the site to timeout. Naturally, the first place to check when there are any application problems is the event log. No errors were being flagged. Just pages and pages of "Information" level entries, which are of little use. This didn't seem right and decided to check where the log files are stored within the '/App_Data/Logs' directory and just as well I did. I was greeted by many log files totalling over 3GB in size, with the current day log measuring at 587MB and increasing.

    Appending new lines of text to an already large text file is bound to have an impact on site performance, especially when it's happening at such regular intervals. I needed to streamline what gets logged. I have no interest in "Information" log entries. To do this, the following setting in the serilog.config file found in the "/config" director needed to be updated:

    <add key="serilog:write-to:File.restrictedToMinimumLevel" value="Warning" />
    

    Previously, this setting is set to "Debug" which logs all site activity. Once this was updated, the socket timeout issue was resolved.

  • Since around September last year, I've been involved in a lot of Hubspot projects at my place of work - Syndicut. It's the latest edition to the numerous other platforms that are offered to clients.

    The approach to developing websites in Hubspot is not something I'm used to coming from a programming background where you build everything custom using some form of server-side language. But I was surprised by what you can achieve within the platform.

    Having spent months building sites using the Hubspot Markup Language (HUBL), utilising a lot of the powerful marketing features and using the API to build a custom .NET Hubspot Connector, I thought it was time to attempt a certification focusing on the CMS aspect of Hubspot.

    There are two CMS certifications:

    1. Hubspot CMS for Marketers
    2. Hubspot CMS for Developers

    I decided to tackle the "CMS for Marketers" certification first as this mostly covers the theory aspect on how you use Hubspot to create a user-friendly, high-performing website and leveraging that with Hubspot CRM. These are the areas you can get quite shielded from if you're purely just developing in pages and modules. I thought it would be beneficial to expose myself from a marketing standpoint to get an insight into how my development forms part of the bigger picture.

    I'm happy to report I am now Hubspot CMS for Marketers certified.

    Hubspot CMS for Marketers Certification

  • I’ll be the first to admit that I very rarely (if at all!) assign a nice pretty share image to any post that gets shared on social networks. Maybe it’s because I hardly post what I write to social media in the first place! :-) Nevertheless, this isn’t the right attitude. If I am really going to do this, then the whole process needs to be quick and render a share image that sets the tone before that will hopefully entice a potential reader to click on my post.

    I started delving into how my favourite developer site, dev.to, manages to create these really simple text-based share images dynamically. They have a pretty good setup as they’ve somehow managed to generate a share image that contains relevant post related information perfectly, such as:

    • Post title
    • Date
    • Author
    • Related Tech Stack Icons

    For those who are nosey as I and want to know how dev.to undertakes such functionality, they have kindly written the following post - How dev.to dynamically generates social images.

    Since my website is built using the Gatsby framework, I prefer to use a local process to dynamically generate a social image without the need to rely on another third-party service. What's the point in using a third-party service to do everything for you when it’s more fun to build something yourself!

    I had envisaged implementing a process that will allow me to pass in the URL of my blog posts to a script, which in turn will render a social image containing basic information about a blog post.

    Intro Into Puppeteer

    Whilst doing some Googling, one tool kept cropping up in different forms and uses - Puppeteer. Puppeteer is a Node.js library maintained by Google Chrome’s development team and enables us to control any Chrome Dev-Tools based browser through scripts. These scripts can programmatically execute a variety of actions that you would generally do in a browser.

    To give you a bit of an insight into the actions Puppeteer can carry out, check out this Github repo. Here you can see Puppeteer is a tool for testing, scraping and automating tasks on web pages. It’s a very useful tool. The only part I spent most of my time understanding was its webpage screenshot feature.

    To use Puppeteer, you will first need to install the library package in which two options are available:

    • Puppeteer Core
    • Puppeteer

    Puppeteer Core is the more lighter-weight package that can interact with any Dev-Tool based browser you already have installed.

    npm install puppeteer-core
    

    You then have the full package that also installs the most recent version of Chromium within the node_modules directory of your project.

    npm install puppeteer
    

    I opted for the full package just to ensure I have the most compatible version of Chromium for running Puppeteer.

    Puppeteer Webpage Screenshot Script

    Now that we have Puppeteer installed, I wrote a script and added it to the root of my Gatsby site. The script carries out the following:

    • Accepts a single argument containing the URL of a webpage. This will be the page containing information about my blog post in a share format - all will become clear in the next section.
    • Approximately screenshot a cropped version of the webpage. In this case 840px x 420px - the exact size of my share image.
    • Use the page name in the URL as the image file name.
    • Store the screenshot in my "Social Share” media directory.
    const puppeteer = require('puppeteer');
    
    // If an argument is not provided containing a website URL, end the task.
    if (process.argv.length !== 3) {
      console.log("Please provide a single argument containing a website URL.");
      return;
    }
    
    const pageUrl = process.argv[2];
    
    const options = {
        path: `./static/media/Blog/Social Share/${pageUrl.substring(pageUrl.lastIndexOf('/') + 1)}.jpg`,
        fullPage: false,
        clip: {
          x: 0,
          y: 0,
          width: 840,
          height: 420
        }
      };
      
      (async () => {
        const browser = await puppeteer.launch({headless: false});
        const page = await browser.newPage()
        await page.setViewport({ width: 1280, height: 800, deviceScaleFactor: 1.5 })
        await page.goto(pageUrl)
        await page.screenshot(options)
        await browser.close()
      })(); 
    

    The script can be run as so:

    node puppeteer-screenshot.js http://localhost:8000/socialcard/Blog/2020/07/25/Using-Instagram-API-To-Output-Profile-Photos-In-ASPNET-2020-Edition
    

    I made an addition to my Gatsby project that generated a social share page for every blog post where the URL path was prefixed with /socialcard. These share pages will only be generated when in development mode.

    Social Share Page

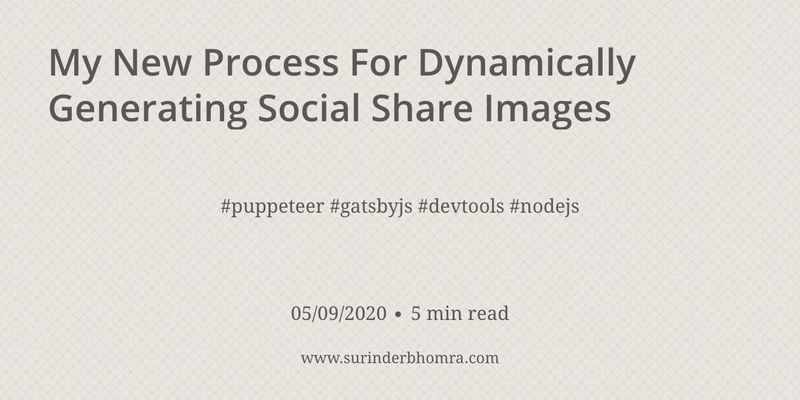
    Now that we have our Puppeteer script, all that needs to be accomplished is to create a nice looking visual for Puppeteer to convert into an image. I wanted some form of automation where blog post information was automatically populated.

    I’m starting off with a very simple layout taking some inspiration from dev.to and outputting the following information:

    • Title
    • Date
    • Tags
    • Read time

    Working with HTML and CSS isn’t exactly my forte. Luckily for me, I just needed to do enough to make the share image look presentable.

    Social Card Page

    You can view the HTML and CSS on JSFiddle. Feel free to update and make it better! If you do make any improvements, update the JSFiddle and let me know!

    Next Steps

    I plan on adding some additional functionality allowing a blog post teaser image (if one is added) to be used as a background and make things look a little more interesting. At the moment the share image is very plain. As you can tell, I keep things really simple as design isn’t my strongest area. :-)

    If all goes to plan, when I share this post to Twitter you should see my newly generated share image.