Blog

Posts written in 2017.

  • Published on
    -
    3 min read

    Kentico Cloud: Custom MVC Cache Attribute

    I decided to write this blog post after one of my fellow Kentico Cloud developer Matt Nield tweeted the following last week:

    So happy to see this coming to Kentico Cloud! The amount to times I yearned for something I could use to clear cache!
    — Surinder Bhomra (@SurinderBhomra) July 13, 2017

    Webhook capability is something I have been yearning for since I built my first Kentico Cloud project and this feature cannot come soon enough! It will really take the Kentico Cloud headless CMS integration within our applications to the next level. One of the main things I am looking forward to is using webhooks is to develop a form of dependency caching, so when content is updated in Kentico Cloud, the application can reflect these changes.

    In fact, I am so excited to have this feature in my hands for my caching needs, I have already started developing something I could potentially use in time for the Q3 2017 release - should be any time now.


    As we all know, to not only improve overall performance of your application as well as reducing requests to the Kentico Cloud API, we are encouraged to set a default cache duration. There is documentation on the different routes to accomplish this:

    1. Controller-level - using OutputCache attribute
    2. CachedDeliveryClient class - provided by the Kentico Cloud Boilerplate that acts as a wrapper around the original DeliveryClient object to easily cache data returned from the API for a fixed interval.

    I personally prefer caching at controller level, unless the application is doing something very complex at runtime for manipulating incoming data. So in the mean time whilst I wait for webhook functionality to be released, I decided to create a custom controller attribute called "KenticoCacheAttribute", that will only start the caching process only if the application is not in debug mode.
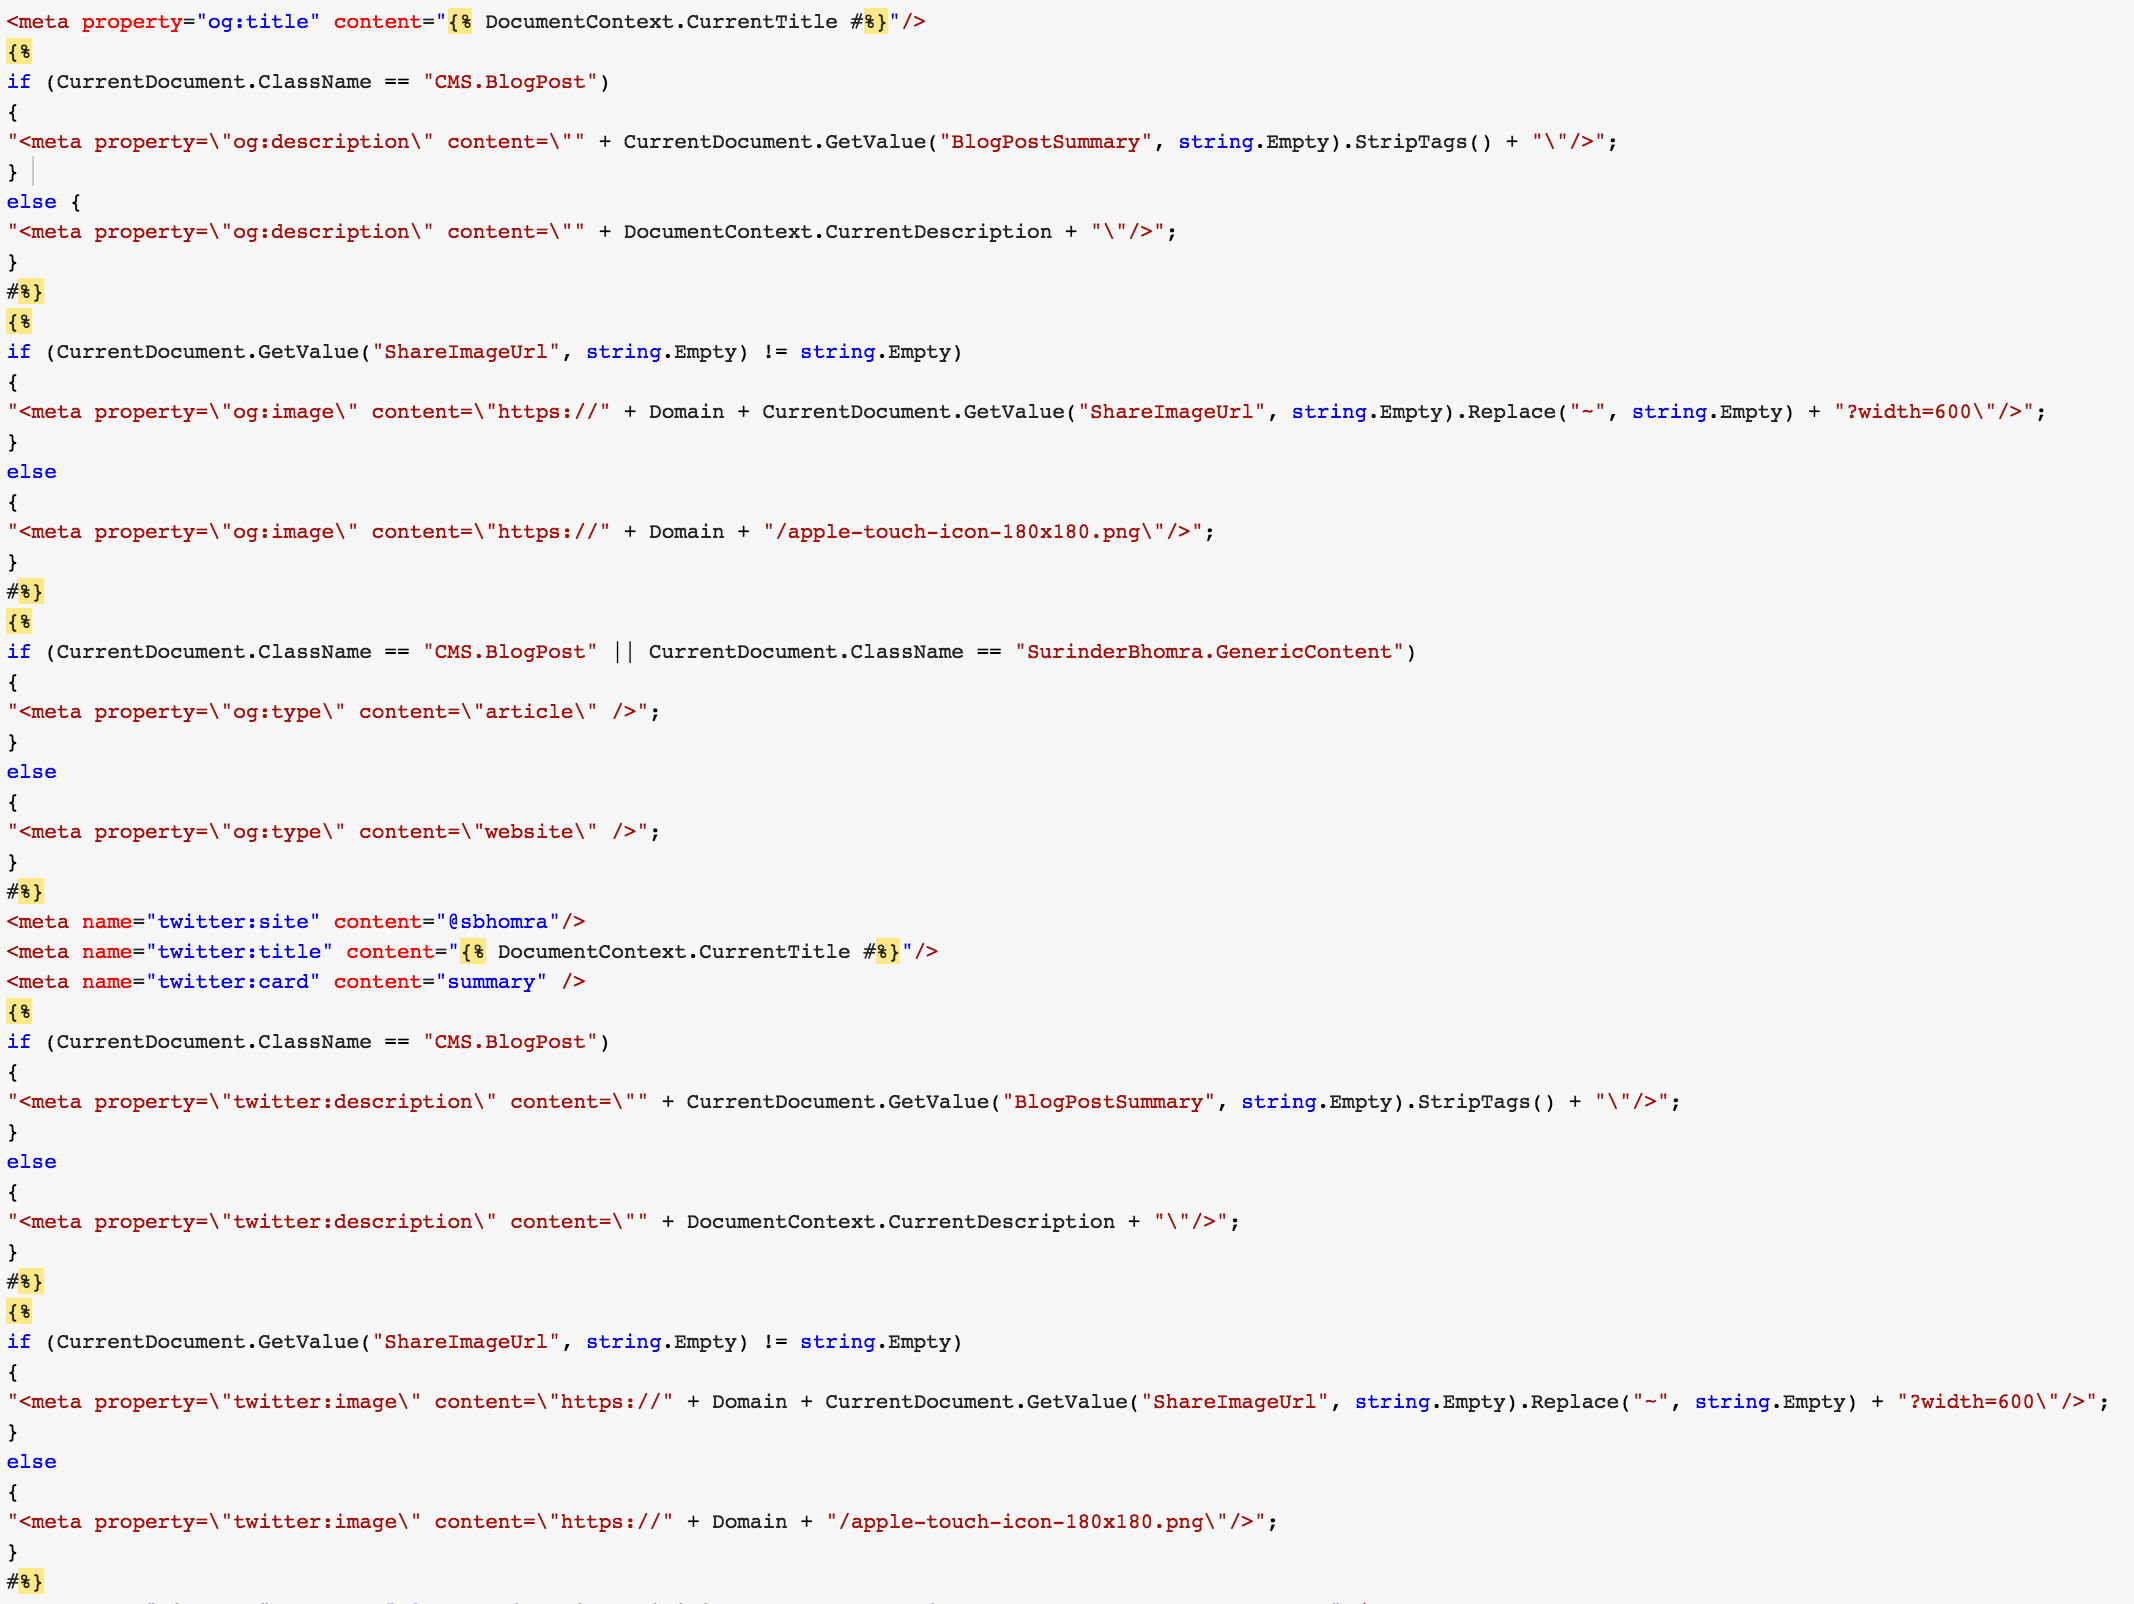
    using System;
    using System.Collections.Generic;
    using System.Linq;
    using System.Web;
    using System.Web.Mvc;
    
    namespace Site.Web.Attributes
    {
        public class KenticoCacheAttribute : OutputCacheAttribute
        {
            public KenticoCacheAttribute()
            {
                Duration = HttpContext.Current.IsDebuggingEnabled ? 0 : int.Parse(ConfigurationManager.AppSettings["KenticoCloud.CacheDuration"]);
            }
        }
    }
    

    The "KenticoCacheAttribute" inherits the OutputCacheAttribute class, which gives me additional control to when I'd like the caching process to happen. In this case, the cache duration is set within the web.config.

    I found the one main benefit of my custom controller attribute is that I will never forget to start caching pages on my website when it comes to deployment to production, since we never want our website to have debugging enabled unless we're in a development environment. This also works the other way. We're not too concerned about caching in a development environment as we always want to see changes in incoming data straight away.

    The new cache attribute is used in the exact same approach as OutputCacheAttribute, in the following way:

    [Route("{urlSlug}")]
    [KenticoCacheAttribute(VaryByParam = "urlSlug")]
    public async Task<ActionResult> Detail(string urlSlug)
    {
         // Do something...
    
        return View();
    }
    

    This is a very simple customisation I found useful through my Kentico Cloud development.

    The custom attribute I created is just the start on how I plan on integrating cache managment for Kentico Cloud applications. When webhook capability is released, I can see further improvements being made, but may require a slightly different approach such as developing a custom MVC Action Filter instead.

  • I like to keep my blob containers quite tidy and delete any files that would unnecessarily increase its size. For a project I was working on, I had a blob that was being used to temporarily store images a user uploaded for manipulation at a later time. I saw no reason to keep these files for no longer than 24 hours. An Azure WebJob seemed an ideal solution to do this.

    I could've left the blob container to stagnate and fester over time and the reasoning behind creating a cleanup task wasn't from a cost point of view. A blob container is very reasonably priced for the amount of storage and requests I would be making. I was more concerned about performance for times where I would be trawling through many thousands of files to get back the image a user had uploaded for temporary use by my web application.

    Creating an Azure WebJob is very easy and versatile. You have the flexibility to develop a WebJob by creating the following scripts or programs:

    • .cmd, .bat, .exe (using windows cmd)
    • .ps1 (using powershell)
    • .sh (using bash)
    • .php (using php)
    • .py (using python)
    • .js (using node)
    • .jar (using java)

    In this post, I will be developing my WebJob using a Console Application that will generate an executable. In Visual Studio 2017, there are two ways you can go about creating a project for your WebJob:

    1. Console Application project
    2. Selecting Azure WebJob project - which you will find under the "Cloud" category.

    If you create your WebJob using a Console Application, you will still have the option later on to "Publish as an Azure WebJob..." when right-clicking on the project. In the code below I happened to be using a Console Application only because I didn't even know a Azure WebJob project existed until after I completed development on my project. Doh!

    Program.cs

    I have created a new project called "Site.AzueWebJob.Cleanup". The project uses the following two Azure nuget packages:

    
    namespace Site.AzureWebJob.Cleanup
    {
        class Program
        {
            static void Main(string[] args)
            {
                try
                {
                    CloudStorageAccount storageAccount = CloudStorageAccount.Parse("<Insert Storage Connection String Here>");
    
                    CloudBlobClient blobClient = storageAccount.CreateCloudBlobClient();
                    CloudBlobContainer dataContainer = blobClient.GetContainerReference("<Blob container name>");
    
                    Console.WriteLine("Hourly threshold to remove records: {0}", ConfigurationManager.AppSettings["Azure.CleanupHours"]);
    
                    #region Retrieve all data items greater than 24 hours and delete them
    
                    Console.WriteLine("Retrieving old data files...");
    
                    // Get files where the "Last Modified Date" is olders than 24 hours.
                    IEnumerable<CloudBlob> oldData = dataContainer.ListBlobs()
                                    .OfType<CloudBlob>()
                                    .Where(b => b.Properties.LastModified.Value.Date < DateTime.Now.AddHours(int.Parse(ConfigurationManager.AppSettings["Azure.CleanupHours"].ToString()) * -1));
    
                    IList<CloudBlob> dataBlobs = oldData as IList<CloudBlob> ?? oldData.ToList();
    
                    Console.WriteLine("Data records retrieved: {0}.", dataBlobs.Count);
                    Console.WriteLine("Removing old data files...");
    
                    // Loop through the files and delete if they exist.
                    foreach (CloudBlob dataBlob in dataBlobs)
                    {
                        bool isDeleted = dataBlob.DeleteIfExists();
    
                        if (isDeleted)
                            Console.WriteLine("Deleted: {0}.", dataBlob.Name);
                    }
    
                    #endregion
    
                    Console.WriteLine("Removing old data complete.");
                }
                catch (Exception ex)
                {
                    Console.WriteLine("Error cleaning container files: {0}", ex.Message);
                }
    
                Console.WriteLine("Clean Containers WebJob complete.");
            }
        }
    }
    

    There isn't really much to it. All I am doing is retrieving all files that are older than 24 hours (value set within App.config app setting called: "Azure.CleanupHours") and then carrying out the delete process by looping through any records returned.

    The most safest way to delete a file is to use the CloudBlob.DeleteIfExists() call. As the method name suggests, it will only delete a file if it exists. Using the CloudBlob.Delete() will cause an exception if for some reason the file isn't there and will require additional error handling.

    Final Steps

    Now that we have our Azure WebJob ready to go, the only thing left is to publish to your Azure Web App by simply right-clicking on your project and selecting: "Publish as an Azure WebJob...". Here you will connect to your Azure instance and have the options to choose how your WebJob should run:

    • Continuously
    • On Demand
    • On Schedule
  • Published on
    -
    4 min read

    Salesforce .NET API: Get File Attachment

    Reading and writing files from an external application to Saleforce has always resulted in giving me quite the headache... Writing to Salesforce probably exacerbates things more than reading. I will aim to detail in a separate post on how you can write a file to Salesforce.

    In this post I will demonstrate how to read a file found in the "Notes & Attachments" area of Salesforce as well as getting back all information about that file.

    The first thing we need is our attachment object, to get back all information about our file. I created one called "AttachmentInfo":

    public class AttachmentInfo
    {
        public string Id { get; set; }
        public string Name { get; set; }
        public string Description { get; set; }
        public string BodyLength { get; set; }
        public string ContentType { get; set; }
        public byte[] FileBytes { get; set; }
    }
    

    I created two methods in a class named "AttachmentInfoProvider". Both methods are pretty straight-forward and retrieve data from Salesforce using a custom GetRows() method that is part of another class object I created: ObjectDetailInfoProvider. You can get the code for this from the following blog post - Salesforce .NET API: Select/Insert/Update Methods.

    GetAttachmentsDataByParentId() Method

    /// <summary>
    /// Gets all attachments that belong to an object. For example a contact.
    /// </summary>
    /// <param name="parentId"></param>
    /// <param name="fileNameMatch"></param>
    /// <param name="orderBy"></param>
    /// <returns></returns>
    public static async Task<List<AttachmentInfo>> GetAttachmentsDataByParentId(string parentId, string fileNameMatch, string orderBy)
    {
        string cacheKey = $"GetAttachmentsByParentId|{parentId}|{fileNameMatch}";
    
        List<AttachmentInfo> attachments = CacheEngine.Get<List<AttachmentInfo>>(cacheKey);
    
        if (attachments == null)
        {
            string whereCondition = string.Empty;
    
            if (!string.IsNullOrEmpty(fileNameMatch))
                whereCondition = $"Name LIKE '%{fileNameMatch}%'";
    
            List<dynamic> attachmentObjects = await ObjectDetailInfoProvider.GetRows("Attachment", new List<string> {"Id", "Name", "Description", "Body", "BodyLength", "ContentType"}, whereCondition, orderBy);
    
            if (attachmentObjects.Any())
            {
                attachments = attachmentObjects.Select(attObj => new AttachmentInfo
                {
                    Id = attObj.Id,
                    Name = attObj.Name,
                    Description = attObj.Description,
                    BodyLength = attObj.BodyLength,
                    ContentType = attObj.ContentType
                }).ToList();
    
                // Add collection of pick list items to cache.
                CacheEngine.Add(attachments, cacheKey, 15);
            }
        }
    
        return attachments;
    }
    

    The GetAttachmentsDataByParentId() method takes in three parameters:

    • parentId: The ID that links an attachment to another object. For example, a contact.
    • fileNameMatch: The name of the file you wish to search for. For most flexibility, a wildcard search is performed.
    • orderBy: Order the returned dataset.

    If you're thinking this method alone will return the file itself, you'd be disappointed - this is where our next method GetFile() comes into play.

    GetFile() Method

    /// <summary>
    /// Gets attachment in its raw form ready for transformation to a physical file, in addition to its file attributes.
    /// </summary>
    /// <param name="attachmentId"></param>
    /// <returns></returns>
    public static async Task<AttachmentInfo> GetFile(string attachmentId)
    {
        List<dynamic> attachmentObjects = await ObjectDetailInfoProvider.GetRows("Attachment", new List<string> {"Id", "Name", "Description", "BodyLength", "ContentType"}, $"Id = '{attachmentId}'", string.Empty);
    
        if (attachmentObjects.Any())
        {
            AttachmentInfo attachInfo = new AttachmentInfo();
    
            #region Get Core File Information
    
            attachInfo.Id = attachmentObjects[0].Id;
            attachInfo.Name = attachmentObjects[0].Name;
            attachInfo.BodyLength = attachmentObjects[0].BodyLength;
            attachInfo.ContentType = attachmentObjects[0].ContentType;
    
            #endregion
    
            #region Get Attachment As Byte Array
    
            Authentication salesforceAuth = await AuthenticationResponse.Rest();
    
            HttpClient queryClient = new HttpClient();
    
            string apiUrl = $"{SalesforceConfig.PlatformUrl}/services/data/v37.0/sobjects/Attachment/{attachmentId}/Body";
    
            HttpRequestMessage request = new HttpRequestMessage(HttpMethod.Get, apiUrl);
            request.Headers.Add("Authorization", $"OAuth {salesforceAuth.AccessToken}");
            request.Headers.Accept.Add(new MediaTypeWithQualityHeaderValue("application/json"));
    
            HttpResponseMessage response = await queryClient.SendAsync(request);
    
            if (response.StatusCode == HttpStatusCode.OK)
                attachInfo.FileBytes = await response.Content.ReadAsByteArrayAsync();
    
            #endregion
    
            return attachInfo;
        }
        else
        {
            return null;
        }
    }
    

    An attachment ID is all we need to get back a file in its raw form. You will probably notice there is some similar functionality happening in this method where I am populating all fields of the AttachmentInfo object, just like the GetAttachmentsDataByParentId() method I detailed above. The only difference being is the fact this time round only a single file is returned.

    The reason behind this approach comes from a performance standpoint. I could have modified the GetAttachmentsDataByParentId() method to also return the file in its byte form. However, this didn't seem a good approach, since we could be outputting multiple files large in size. So making a separate call to focus on getting the physical file seemed like a wise approach.

    To take things one step further, you can render the attachment from Salesforce within your ASP.NET application using a Generic Handler (.ashx file):

    <%@ WebHandler Language="C#" Class="SalesforceFileHandler" %>
    
    using System;
    using System.Text;
    using System.Threading.Tasks;
    using System.Web;
    using Site.Salesforce;
    using Site.Salesforce.Models.Attachment;
    
    public class SalesforceFileHandler : HttpTaskAsyncHandler
    {
        public override async Task ProcessRequestAsync(HttpContext context)
        {
            string fileId = context.Request.QueryString["FileId"];
        
            // Check if there is a File ID in the query string.
            if (!string.IsNullOrEmpty(fileId))
            {
                AttachmentInfo attachment = await AttachmentInfoProvider.GetFile(fileId);
    
                // If attachment is returned, render to the browser window.
                if (attachment != null)
                {
                    context.Response.Buffer = true;
    
                    context.Response.AppendHeader("Content-Disposition", $"attachment; filename=\"{attachment.Name}\"");
    
                    context.Response.BinaryWrite(attachment.FileBytes);
    
                    context.Response.OutputStream.Write(attachment.FileBytes, 0, attachment.FileBytes.Length);
                    context.Response.ContentType = attachment.ContentType;
                }
                else
                {
                    context.Response.ContentType = "text/plain";
                    context.Response.Write("Invalid File");
                }
            }
            else
            {
                context.Response.ContentType = "text/plain";
                context.Response.Write("Invalid Request");
            }
    
            context.Response.Flush();
            context.Response.End();
        }
    }
    
  • Published on
    -
    5 min read

    Kentico Open Graph Custom Macro

    Ever since I re-developed my website in Kentico 10 using Portal Templates, I have been a bit more daring when it comes to immersing myself into the inner depths of Kentico's API and more importantly - K# macro development. One thing that has been on my list of todo's for a long time was to create a custom macro extension that would render all required META open graph tags in a page.

    Adding these type of META tags using ASPX templates or MVC framework is really easy to do when you have full control over the page markup. I'll admit, I don't know if there is already an easier way to do what I am trying to accomplish (if there is let me know), but I think this macro is quite flexible with capability to expand the open graph output further.

    This is how I currently render the Meta HTML within my own website at masterpage level (click for a larger image):

    Open Graph HTML In Masterpage

    I instantly had problems with this approach:

    1. The code output is a mess.
    2. Efficiency from a performance standpoint does not meet my expectations.
    3. Code maintainability is not straight-forward, especially if you have to update this code within the Page Template Header content.

    CurrentDocument.OpenGraph() Custom Macro

    I highly recommend reading Kentico's documentation on Registering Custom Macro Methods before adding my code. It will give you more of an insight on what can be done that my blog post alone will not cover. The implementation of my macro has been developed for a Kentico site that is a Web Application and has been added to the "Old_App_Code" directory.

    // Registers methods from the 'CustomMacroMethods' container into the "String" macro namespace
    [assembly: RegisterExtension(typeof(CustomMacroMethods), typeof(TreeNode))]
    namespace CMSApp.Old_App_Code.Macros
    {
        public class CustomMacroMethods : MacroMethodContainer
        {
            [MacroMethod(typeof(string), "Generates Open Graph META tags", 0)]
            [MacroMethodParam(0, "param1", typeof(string), "Default share image")]
            public static object OpenGraph(EvaluationContext context, params object[] parameters)
            {
                if (parameters.Length > 0)
                {
                    #region Parameter variables
    
                    // Parameter 1: Current document.
                    TreeNode tnDoc = parameters[0] as TreeNode;
                    
                    // Paramter 2: Default social icon.
                    string defaultSocialIcon = parameters[1].ToString();
    
                    #endregion
    
                    string metaTags = CacheHelper.Cache(
                        cs =>
                        {
                            string domainUrl = $"{HttpContext.Current.Request.Url.Scheme}{Uri.SchemeDelimiter}{HttpContext.Current.Request.Url.Host}{(!HttpContext.Current.Request.Url.IsDefaultPort ? $":{HttpContext.Current.Request.Url.Port}" : null)}";
    
                            StringBuilder metaTagBuilder = new StringBuilder();
    
                            #region General OG Tags
                            
                            metaTagBuilder.Append($"<meta property=\"og:title\" content=\"{DocumentContext.CurrentTitle}\"/>\n");
    
                            if (tnDoc.ClassName == KenticoConstants.Page.BlogPost)
                                metaTagBuilder.Append($"<meta property=\"og:description\" content=\"{tnDoc.GetValue("BlogPostSummary", string.Empty).RemoveHtml()}\" />\n");
                            else
                                metaTagBuilder.Append($"<meta property=\"og:description\" content=\"{tnDoc.DocumentPageDescription}\" />\n");
    
                            if (tnDoc.GetValue("ShareImageUrl", string.Empty) != string.Empty)
                                metaTagBuilder.Append($"<meta property=\"og:image\" content=\"{domainUrl}{tnDoc.GetStringValue("ShareImageUrl", string.Empty).Replace("~", string.Empty)}?width=600\" />\n");
                            else
                                metaTagBuilder.Append($"<meta property=\"og:image\" content=\"{domainUrl}/{defaultSocialIcon}\" />\n");
    
                            #endregion
    
                            #region Twitter OG Tags
    
                            if (tnDoc.ClassName == KenticoConstants.Page.BlogPost || tnDoc.ClassName == KenticoConstants.Page.GenericContent)
                                metaTagBuilder.Append("<meta property=\"og:type\" content=\"article\" />\n");
                            else
                                metaTagBuilder.Append("<meta property=\"og:type\" content=\"website\" />\n");
    
                            metaTagBuilder.Append($"<meta name=\"twitter:site\" content=\"@{Config.Twitter.Account}\" />\n");
                            metaTagBuilder.Append($"<meta name=\"twitter:title\" content=\"{DocumentContext.CurrentTitle}\" />\n");
                            metaTagBuilder.Append("<meta name=\"twitter:card\" content=\"summary\" />\n");
    
                            if (tnDoc.ClassName == KenticoConstants.Page.BlogPost)
                                metaTagBuilder.Append($"<meta property=\"twitter:description\" content=\"{tnDoc.GetValue("BlogPostSummary", string.Empty).RemoveHtml()}\" />\n");
                            else
                                metaTagBuilder.Append($"<meta property=\"twitter:description\" content=\"{tnDoc.DocumentPageDescription}\" />\n");
    
                            if (tnDoc.GetValue("ShareImageUrl", string.Empty) != string.Empty)
                                metaTagBuilder.Append($"<meta property=\"twitter:image\" content=\"{domainUrl}{tnDoc.GetStringValue("ShareImageUrl", string.Empty).Replace("~", string.Empty)}?width=600\" />");
                            else
                                metaTagBuilder.Append($"<meta property=\"twitter:image\" content=\"{domainUrl}/{defaultSocialIcon}\" />");
    
                            #endregion
    
                            // Setup the cache dependencies only when caching is active.
                            if (cs.Cached)
                                cs.CacheDependency = CacheHelper.GetCacheDependency($"documentid|{tnDoc.DocumentID}");
    
                            return metaTagBuilder.ToString();
                        },
                        new CacheSettings(Config.Kentico.CacheMinutes, KenticoHelper.GetCacheKey($"OpenGraph|{tnDoc.DocumentID}"))
                    );
    
                    return metaTags;
                }
                else
                {
                    throw new NotSupportedException();
                }
            }
        }
    }
    

    This macro has been tailored specifically to my site needs with regards to how I am populating the OG META tags, but is flexible enough to be modified based on a different site needs. I am carrying out checks to determine what pages are classed as "article" or "website". In this case, I am looking out for my Blog Post and Generic Content pages.

    I am also being quite specific on how the OG Description is populated. Since my website is very blog orientated, there is more of a focus to populate the description fields with "BlogPostSummary" field if the current page is a Blog Post, otherwise default to "DocumentPageDescription" field.

    Finally, I ensured that all article pages contained a new Page Type field called "ShareImageUrl", so that I have the option to choose a share image. This is not compulsory and if no image has been selected, a default share image you pass as a parameter to the macro will be used.

    Using the macro is pretty simple. In the header section of your Masterpage template, just add the following:

    Open Graph Macro Declaration

    As you can see, the OpenGraph() macro can be accessed by getting the current document and passing in a default share icon as a parameter.

    Macro Benchmark Results

    This is where things get interesting! I ran both macro implementations through Kentico's Benchmark tool to ensure I was on the right track and all efforts to develop a custom macro extension wasn't all in vain. The proof is in the pudding (as they say!).

    Old Implementation

    Total runs: 1000
    Total benchmark time: 1.20367s
    Total run time: 1.20267s
    
    Average time per run: 0.00120s
    Min run time: 0.00000s
    Max run time: 0.01700s
    

    New Implementation - OpenGraph() Custom Macro

    Total runs: 1000
    Total benchmark time: 0.33222s
    Total run time: 0.33022s
    
    Average time per run: 0.00033s
    Min run time: 0.00000s
    Max run time: 0.01560s
    

    The good news is that the OpenGraph() macro approach has performed better over my previous approach across all benchmark results. I believe caching the META tag output is the main reason for this as well as reusing the current document context when getting page values.

  • Published on
    -
    3 min read

    Salesforce .NET API: Select/Insert/Update Methods

    To continue my ever expanding Salesforce journey in the .NET world, I am adding some more features to my "ObjectDetailInfoProvider" class that I started writing in my previous post. This time making some nice easy, re-usable CRU(D) methods... just without the delete.

    All the methods query Salesforce using Force.com Toolkit for .NET, which I have slightly adapted to allow me to easily interchange to a traditional REST approach when required.

    Get Data

    /// <summary>
    /// Gets data from an object based on specified fields and conditions.
    /// </summary>
    /// <param name="objectName"></param>
    /// <param name="fields"></param>
    /// <param name="whereCondition"></param>
    /// <param name="orderBy"></param>
    /// <param name="max"></param>
    /// <returns></returns>
    public static async Task<List<dynamic>> GetRows(string objectName, List<string> fields, string whereCondition, string orderBy = null, int max = -1)
    {
        ForceClient client = await AuthenticationResponse.ForceCom();
    
        #region Construct SQL Query
    
        StringBuilder query = new StringBuilder();
    
        query.Append("SELECT ");
    
        if (fields != null && fields.Any())
        {
            for (int c = 0; c <= fields.Count - 1; c++)
            {
                query.Append(fields[c]);
    
                query.Append(c != fields.Count - 1 ? ", " : " ");
            }
        }
        else
        {
            query.Append("* ");
        }
    
        query.Append($"FROM {objectName} ");
    
        if (!string.IsNullOrEmpty(whereCondition))
            query.Append($"WHERE {whereCondition} ");
    
        if (!string.IsNullOrEmpty(orderBy))
            query.Append($"ORDER BY {orderBy}");
    
        if (max > 0)
            query.Append($" LIMIT {max}");
    
        #endregion
    
        // Pass SQL query to Salesforce.
        QueryResult<dynamic> results = await client.QueryAsync<dynamic>(query.ToString());
    
        return results.Records;
    }
    

    Insert Row

    /// <summary>
    /// Creates a new row within an specific object.
    /// </summary>
    /// <param name="objectName"></param>
    /// <param name="fields"></param>
    /// <returns>Record ID</returns>
    public static async Task<string> InsertRow(string objectName, Dictionary<string, object> fields)
    {
        try
        {
            ForceClient client = await AuthenticationResponse.ForceCom();
    
            IDictionary<string, object> objectFields = new ExpandoObject();
    
            // Iterate through fields and populate dynamic object.
            foreach (KeyValuePair<string, object> f in fields)
                objectFields.Add(f.Key, f.Value);
    
            SuccessResponse response = await client.CreateAsync(objectName, objectFields);
    
            if (response.Success)
                return response.Id;
            else
                return string.Empty;
        }
        catch (Exception ex)
        {
            // Log error here.
    
            return string.Empty;
        }
    }
    

    Update Row

    /// <summary>
    /// Updates existing row within an specific object.
    /// </summary>
    /// <param name="recordId"></param>
    /// <param name="objectName"></param>
    /// <param name="fields"></param>
    /// <returns>Record ID</returns>
    public static async Task<string> UpdateRow(string recordId, string objectName, Dictionary<string, object> fields)
    {
        try
        {
            ForceClient client = await AuthenticationResponse.ForceCom();
    
            IDictionary<string, object> objectFields = new ExpandoObject();
    
            // Iterate through fields and populate dynamic object.
            foreach (KeyValuePair<string, object> f in fields)
                objectFields.Add(f.Key, f.Value);
    
            SuccessResponse response = await client.UpdateAsync(objectName, recordId, objectFields);
    
            if (response.Success)
                return response.Id;
            else
                return string.Empty;
        }
        catch (Exception ex)
        {
            // Log error here.
    
            return string.Empty;
        }
    }
    

    The neat thing about Insert and Update methods is that I am using an ExpandoObject, which is a dynamic data type that can represent dynamically changing data. This is a new feature in .NET 4.0. Ideal for the ultimate flexibility when it comes to parsing field name and its value. It's a very dynamic object that allows you to add properties and methods on the fly and then access them again.

    If there is any other useful functionality to add to these methods, please leave a comment.

  • Published on
    -
    4 min read

    Salesforce .NET API: Get Picklist Values

    I have been doing a lot of Saleforce integration lately, which has been both interesting and fun. Throughout my time working on Salesforce, I noticed that I am making very similar calls when pulling information out for consumption into my website. So I decided to make an extra effort to develop methods that would allow me to re-use commonly used functionality into a class library to make overall coding quicker.

    I am adding all my Salesforce object query related functionality to a class object called "ObjectDetailInfoProvider". This will give me enough scope to expand with additional methods as I see fit.

    To start with, I decided to deal with returning all information from both picklist and multi-select picklists fields, since I find that I constantly require the values of data due to the vast number of forms I am developing. To be extra efficient in every request, I taken the extra step to cache all returned data for a set period of time. I hate the idea of constantly hammering away at an API unless absolutely necessary.

    Before we get into it, it's worth noting that I am referencing a custom "AuthenticationResponse" class I created. You can grab the code here.

    Objects

    There are around seven class objects used purely for deserialization when receiving data from Salesforce. I'll admit I won't use all fields the API has to offer, but I normally like to have a complete fieldset to hand on the event I require further data manipulation.

    The one to highlight out of all the class objects is "ObjectFieldPicklistValue", that will store key information about the picklist values, such as Label, Value and Active state. All methods will return this object.

    public class ObjectFieldPicklistValue
    {
        [JsonProperty("active")]
        public bool Active { get; set; }
    
        [JsonProperty("defaultValue")]
        public bool DefaultValue { get; set; }
    
        [JsonProperty("label")]
        public string Label { get; set; }
    
        [JsonProperty("validFor")]
        public string ValidFor { get; set; }
    
        [JsonProperty("value")]
        public string Value { get; set; }
    }
    

    I have added all other Object Field class objects to a snippets section on my Bitbucket account.

    GetPicklistFieldItems() & GetMultiSelectPicklistFieldItems() Methods

    Both methods perform similar functions; the only difference is cache keys and lambda expression to only pull out either a picklist or multipicklist by its field name.

    /// <summary>
    /// Gets a values from a specific picklist within a Salesforce object. Items returned are cached for 15 minutes.
    /// </summary>
    /// <param name="objectApiName"></param>
    /// <param name="pickListFieldName"></param>
    /// <returns>Pick list values</returns>
    public static async Task<List<ObjectFieldPicklistValue>> GetPicklistFieldItems(string objectApiName, string pickListFieldName)
    {
        string cacheKey = $"GetPicklistFieldItems|{objectApiName}|{pickListFieldName}";
    
        List<ObjectFieldPicklistValue> pickListValues = CacheEngine.Get<List<ObjectFieldPicklistValue>>(cacheKey);
    
        if (pickListValues == null)
        {
            Authentication salesforceAuth = await AuthenticationResponse.Rest();
    
            HttpClient queryClient = new HttpClient();
    
            string apiUrl = $"{SalesforceConfig.PlatformUrl}services/data/v37.0/sobjects/{objectApiName}/describe";
    
            HttpRequestMessage request = new HttpRequestMessage(HttpMethod.Get, apiUrl);
            request.Headers.Add("Authorization", $"Bearer {salesforceAuth.AccessToken}");
            request.Headers.Accept.Add(new MediaTypeWithQualityHeaderValue("application/json"));
                    
            HttpResponseMessage response = await queryClient.SendAsync(request);
    
            string outputJson = await response.Content.ReadAsStringAsync();
    
            if (!string.IsNullOrEmpty(outputJson))
            {
                // Get all the fields information from the object.
                ObjectFieldInfo objectField = JsonConvert.DeserializeObject<ObjectFieldInfo>(outputJson);
    
                // Filter the fields to get the required picklist.
                ObjectField pickListField = objectField.Fields.FirstOrDefault(of => of.Name == pickListFieldName && of.Type == "picklist");
                        
                List<ObjectFieldPicklistValue> picklistItems = pickListField?.PicklistValues.ToList();
    
                #region Set cache
    
                pickListValues = picklistItems;
    
                // Add collection of pick list items to cache.
                CacheEngine.Add(picklistItems, cacheKey, 15);
    
                #endregion
            }
        }
    
        return pickListValues;
    }
    
    /// <summary>
    /// Gets a values from a specific multi-select picklist within a Salesforce object. Items returned are cached for 15 minutes.
    /// </summary>
    /// <param name="objectApiName"></param>
    /// <param name="pickListFieldName"></param>
    /// <returns>Pick list values</returns>
    public static async Task<List<ObjectFieldPicklistValue>> GetMultiSelectPicklistFieldItems(string objectApiName, string pickListFieldName)
    {
        string cacheKey = $"GetMultiSelectPicklistFieldItems|{objectApiName}|{pickListFieldName}";
    
        List<ObjectFieldPicklistValue> pickListValues = CacheEngine.Get<List<ObjectFieldPicklistValue>>(cacheKey);
    
        if (pickListValues == null)
        {
            Authentication salesforceAuth = await AuthenticationResponse.Rest();
    
            HttpClient queryClient = new HttpClient();
    
            string apiUrl = $"{SalesforceConfig.PlatformUrl}services/data/v37.0/sobjects/{objectApiName}/describe";
    
            HttpRequestMessage request = new HttpRequestMessage(HttpMethod.Get, apiUrl);
            request.Headers.Add("Authorization", $"Bearer {salesforceAuth.AccessToken}");
            request.Headers.Accept.Add(new MediaTypeWithQualityHeaderValue("application/json"));
    
            HttpResponseMessage response = await queryClient.SendAsync(request);
    
            string outputJson = await response.Content.ReadAsStringAsync();
    
            if (!string.IsNullOrEmpty(outputJson))
            {
                // Get all the fields information from the object.
                ObjectFieldInfo objectField = JsonConvert.DeserializeObject<ObjectFieldInfo>(outputJson);
    
                // Filter the fields to get the required picklist.
                ObjectField pickListField = objectField.Fields.FirstOrDefault(of => of.Name == pickListFieldName && of.Type == "multipicklist");
    
                List<ObjectFieldPicklistValue> picklistItems = pickListField?.PicklistValues.ToList();
    
                #region Set cache
    
                pickListValues = picklistItems;
    
                // Add collection of pick list items to cache.
                CacheEngine.Add(picklistItems, cacheKey, 15);
    
                #endregion
            }
        }
    
        return pickListValues;
    }
    
  • Published on
    -
    2 min read

    New Year, New Site!

    This site has been longing for an overhaul, both visually and especially behind the scenes. As you most likely have noticed, nothing has changed visually at this point in time - still using the home-cooked "Surinder theme". This should suffice in the meantime as it currently meets my basic requirements:

    • Bootstrapped to look good on various devices
    • Simple
    • Function over form - prioritises content first over "snazzy" design

    However, behind the scenes is a different story altogether and this is where I believe matters most. Afterall, half of web users expect a site to load in 2 seconds or less and they tend to abandon a site that isn’t loaded within 3 seconds. Damning statistics!

    The last time I overhauled the site was back in 2014 where I took a more substantial step form to current standards. What has changed since then? I have upgraded to Kentico 10, but this time using ASP.NET Web Forms over MVC.

    Using ASP.NET Web Form approach over MVC was very difficult decision for me. Felt like I was taking a backwards step in making my site better. I'm the kind of developer who gets a kick out of nice clean code output. MVC fulfils this requirement. Unfortunately, new development approach for building MVC sites from Kentico 9 onwards will not work under a free license.

    The need to use Kentico as a platform was too great, even after toying with the idea of moving to a different platform altogether. I love having the flexibility to customise my website to my hearts content. So I had to the option to either refit my site in Kentico 10 or Kentico Cloud. In the end, I chose Kentico 10. I will be writing in another post why I didn't opt for the latter. I'm still a major advocate of Kentico Cloud and started using it on other projects.

    The developers at Kentico weren't lying when they said that Kentico 10 is "better, stronger, faster". It really is! I no longer get the spinning loader for obscene duration of time whilst opening popups in the administration interface or lengthy startup times when the application has to restart.

    Upgrading from Kentico 8.0 to 10 alone was a great start. I have taken some additional steps to keep my site clean as possible:

    1. Disable view state on all pages, components and user controls.
    2. Caching static files, such as CSS, JS and images. You can see how I do this at web.config level from this post.
    3. Maximising Kentico's cache dependencies to cache all data.
    4. Took the extra step to export all site contents into a fresh installation of Kentico 10, resulting in a slightly smaller web project and database size.
    5. Restructured pages in the content tree to be more efficient when storing large number of pages under one section.

    I basically carried out the recommendations on optimising website performance and then some! My cache statatics have never been so high!

    My Kentico 10 Cache Statistics

    One slight improvement (been a long time coming) is better open graph support when sharing pages on Facebook and Twitter. Now my links look pretty within a tweet.