It seems that I have a tendency to blog more about YouTube then any other Social API on this site. So here we go again... This time I want to show how to easily integrate a YouTube CMS Form Control within a Custom Table or Document Type within Kentico.
As far as I'm aware, Kentico only allows you to insert YouTube markup into their HTML Editable Regions via the CKEditor. But what if you wanted to take things a step further and have the ability to return a video Title, Description and Thumbnail within the comfort of the Form tab?
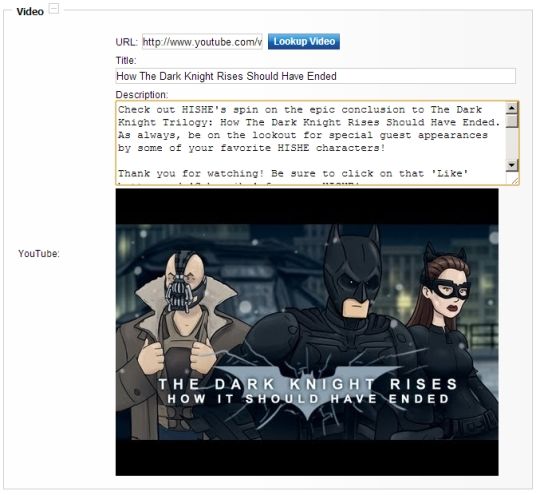
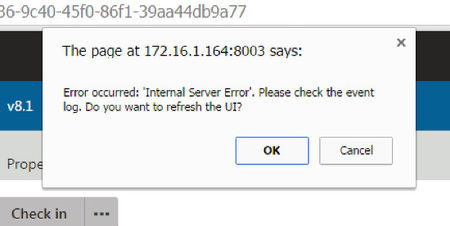
As you can see from my custom form control, a user would paste the URL of a YouTube video and press the "Lookup Video" button that will return basic information about that video, ready for the user to carry out any further copy changes they require.
So let's get to it.
Step 1: Create A New User Control
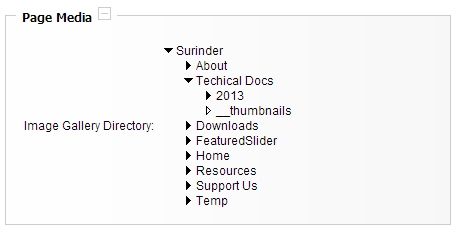
I have created a user control in "/CMSFormControls/Surinder/" of my Kentico installation. I have named the user control: YouTubeLookup.ascx.
HTML
<table><tbody>	<tr>		<td class="TextColumn">			<label for="<%=YouTubeUrl.ClientID >">URL:</label> <asp:textbox id="YouTubeUrl" runat="server"></asp:textbox> <asp:button cssclass="ContentButton" id="LookupVideoDetail" onclick="LookupVideoDetail_Click" runat="server" text="Lookup Video"> </asp:button></td>	</tr>	<tr>		<td class="TextColumn">			<label for="<%=YouTubeTitle.ClientID >">Title:</label> <asp:textbox id="YouTubeTitle" runat="server" width="500"></asp:textbox></td>	</tr>	<tr>		<td class="TextColumn">			<label for="<%=YouTubeDescription.ClientID >">Description:</label> <asp:textbox height="100" id="YouTubeDescription" runat="server" textmode="MultiLine" width="500"></asp:textbox></td>	</tr>	<tr>		<td class="TextColumn">			<asp:image id="YouTubeThumbnail" runat="server"></asp:image></td>	</tr></tbody>
</table>
Code-behind
using System;
using System.Collections.Generic;
using System.Linq;
using System.Web;
using System.Web.UI;
using System.Web.UI.WebControls;
using CMS.FormControls;
using CMS.GlobalHelper;
using System.Web.Script.Serialization;

public partial class CMSFormControls_Surinder_YouTubeLookup : FormEngineUserControl
{
    private string _jsonValue;

    public override Object Value
    {
        get
        {
            return GetJsonMarkup();
        }
        set
        {
            _jsonValue = System.Convert.ToString(value);
        }
    }

    private string GetJsonMarkup()
    {
        //Pass all user entered form values to the YouTubeDetail class for serialization in the JavaScriptSerializer
        if (!String.IsNullOrEmpty(YouTubeUrl.Text))
        {
            YouTubeDetail yt = new YouTubeDetail();
            yt.ID = YouTubeHelper.GetVideoID(YouTubeUrl.Text);
            yt.Title = YouTubeTitle.Text;
            yt.Description = YouTubeDescription.Text;
            yt.Url = YouTubeUrl.Text;
            yt.ImageUrl = YouTubeThumbnail.ImageUrl;

            JavaScriptSerializer jsSerialize = new JavaScriptSerializer();

            return jsSerialize.Serialize(yt);
        }
        else
        {
            return String.Empty;
        }
    }

    public override bool IsValid()
    {
        JavaScriptSerializer jsSerialize = new JavaScriptSerializer();
        var jsResult = jsSerialize.Deserialize<YoutubeDetail>(_jsonValue);

        if (jsResult != null && !String.IsNullOrEmpty(jsResult.ToString()))
        {
            if (String.IsNullOrEmpty(jsResult.Url))
                return false;
            else
                return true;
        }
        else
        {
            return true;
        }
    }

    protected void EnsureItems()
    {
        PopulateControls();
    }

    private void PopulateControls()
    {
        JavaScriptSerializer jsSerialize = new JavaScriptSerializer();
        var jsResult = jsSerialize.Deserialize<YoutubeDetail>(_jsonValue);

        //Check there if JSON is present to populate form controls
        if (jsResult != null && !String.IsNullOrEmpty(jsResult.ToString()))
        {
            if (!String.IsNullOrEmpty(jsResult.Url))
                YouTubeUrl.Text = jsResult.Url;

            if (!String.IsNullOrEmpty(jsResult.Title))
                YouTubeTitle.Text = jsResult.Title;

            if (!String.IsNullOrEmpty(jsResult.Description))
                YouTubeDescription.Text = jsResult.Description;

            if (!String.IsNullOrEmpty(jsResult.ImageUrl))
                YouTubeThumbnail.ImageUrl = jsResult.ImageUrl;
        }
    }

    protected void Page_Load(object sender, EventArgs e)
    {
        if (!Page.IsPostBack)
            EnsureItems();
    }

    protected void LookupVideoDetail_Click(object sender, EventArgs e)
    {
        //If YouTube URL is present, get the information
        if (!String.IsNullOrEmpty(YouTubeUrl.Text))
        {
            YouTubeDetail yt = YouTubeHelper.GetVideoInformation(YouTubeUrl.Text);

            if (yt != null)
            {
                YouTubeTitle.Text = yt.Title;
                YouTubeDescription.Text = yt.Description;
                YouTubeThumbnail.ImageUrl = yt.ImageUrl;
            }
        }
    }
}
From looking at my code, you've probably noticed I'm actively using a "JavaScriptSerializer" to pass all my form values as JSON. I find this is the most straight-forward way to store multiple form values in a custom control. In this case, our values will be stored within a Kentico table column in the following format:
{
    "ID":"fLyoog562x4",
    "Title":"How The Dark Knight Rises Should Have Ended",
    "Description":"Check out HISHE\u0027s spin on the epic conclusion to The Dark Knight Trilogy: How The Dark Knight Rises Should Have Ended.",
    "Url":"http://www.youtube.com/watch?v=fLyoog562x4",
    "ImageUrl":"http://i1.ytimg.com/vi/fLyoog562x4/hqdefault.jpg"
}
Whenever I need to get those values back, all I need to do is call the JavaScriptSerializer.Deserialize method.
NOTE: If what I have shown doesn't make any sense, it'll be useful to take a look at an in-depth tutorial on how to create a Custom Form Control in Kentico: http://devnet.kentico.com/docs/devguide/index.html?developing_form_controls.htm
Step 2: Create YouTubeDetail Class
In order to serialize and deserialize values when using the JavaScriptSerializer, we need to create a class object with a number of properties to interpret the JSON structure.
public class YouTubeDetail
{
    public string ID { get; set; }
    public string Title { get; set; }
    public string Description { get; set; }
    public string Url { get; set; }
    public string ImageUrl { get; set; }
}
Step 3: YouTube Methods
This is the part when we start using Google's YouTube API and in order for this class to work, you will need to download the necessary DLL's. I suggest you take a gander at a post I wrote a while back called "Dynamically Output A List of YouTube Videos In ASP.NET" to get an in-depth introduction into using the YouTube API.
To get data back from YouTube you will need as a minimum requirement the DLL's and register your application in order to pass an Application Name, Developer Key and Client ID values to your application.
public class YouTubeHelper
{
    private static string YouTubeDeveloperKey = WebConfigurationManager.AppSettings["YouTubeDeveloperKey"].ToString();
    private static string YouTubeAppName = WebConfigurationManager.AppSettings["YouTubeAppName"].ToString();
    private static string YouTubeClientID = WebConfigurationManager.AppSettings["YouTubeClientID"].ToString();

    //Get YouTube video
    public static Video YouTubeVideoEntry(string videoID)
    {
        YouTubeRequestSettings settings = new YouTubeRequestSettings(YouTubeAppName, YouTubeClientID, YouTubeDeveloperKey);
        YouTubeRequest request = new YouTubeRequest(settings);

        //Link to the feed we wish to read from
        string feedUrl = String.Format("http://gdata.youtube.com/feeds/api/videos/{0}", videoID);

        Feed<Video> videoFeed = request.Get<Video>(new Uri(feedUrl));

        return videoFeed.Entries.SingleOrDefault();
    }

    //Extract the YouTube ID from the web address.
    public static string GetVideoID(string videoUrl)
    {
        Uri tempUri = new Uri(videoUrl);

        string sQuery = tempUri.Query;

        return System.Web.HttpUtility.ParseQueryString(sQuery).Get("v");
    }

    //Get required YouTube video information
    public static YouTubeDetail GetVideoInformation(string url)
    {
        Video v = YouTubeVideoEntry(GetVideoID(url));

        //Pass required YouTube information to custom class called YouTubeDetail
        YouTubeDetail vDetail = new YouTubeDetail();
        vDetail.ID = v.VideoId;
        vDetail.Title = v.Title;
        vDetail.Description = v.Description;
        vDetail.ImageUrl = v.Thumbnails[2].Url;

        return vDetail;
    }

    //Output YouTube property within a document by passing the Document ID
    public static YouTubeDetail GetDocumentYouTubeValue(int docID)
    {
        TreeProvider tree = new TreeProvider();
        TreeNode tn = tree.SelectSingleDocument(docID);

        if (tn.GetValue("YouTube") != null && !String.IsNullOrEmpty(tn.GetValue("YouTube").ToString()))
        {
            JavaScriptSerializer jsSerialize = new JavaScriptSerializer();
            var jsResult = jsSerialize.Deserialize<YouTubeDetail>(tn.GetValue("YouTube").ToString());

            if (jsResult != null && !String.IsNullOrEmpty(jsResult.ToString()))
            {
                return jsResult;
            }
            else
            {
                return null;
            }
        }
        else
        {
            return null;
        }
    }
}
Step 4: Add New Control Into Kentico
Please refer to the Kentico Development Guide (as referenced in Step 1). The main thing you need to ensure is that the control can only be used as a "Long text" type.

Step 5: Outputting The YouTube Values To A Page
Since we have stored all our YouTube fields in a JSON string, we can get those values out by carrying out a deserialization on our document type property.
if (CMSContext.CurrentDocument.GetStringValue("YouTubeVideo", String.Empty) != String.Empty)
{
    JavaScriptSerializer jsSerialize = new JavaScriptSerializer();
    YouTubeDetail yt = jsSerialize.Deserialize<YouTubeDetail>(CMSContext.CurrentDocument.GetStringValue("YouTubeVideo", String.Empty));

    YouTubeTitle.Text = yt.Title;
    YouTubeDescription.Text = yt.Description;
    YouTubeUrl.Text = yt.Url;
}
You may think I have slightly over-engineered the process to store YouTube video's. But if you have a website that is trying to push video content along with its META data, I believe this is the way to go.